
Instruction manual


Hedge Trimmer
WG205E WG206E
WG207E WG208E
98
98
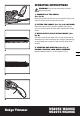
TO START YOUR HEDGE TRIMMER
There are two switch levers fitted in your Hedge
trimmer (2 & 4).
Both switch levers need to be depressed for the product
to start. Depress and hold the front switch lever (4) and
press the switch lever (2).
TO STOP YOUR HEDGE TRIMMER
Move Hedge trimmer away from cutting area before
stopping.
To stop, release one of the switch levers.
WARNING: If any parts are missing, damaged
or broken, do not operate your Hedge trimmer
until all damaged parts have been replaced or repaired.
Failure to do so could result in serious personal injury.
5. HOW TO USE YOUR HEDGE TRIMMER
Inspect the area to be cut before each use, remove
objects which can be thrown or become entangled in
the cutting blades.
Always hold the Hedge trimmer with both hands and
with the blade away from you before turning it on.
Always keep the power cord behind the Hedge
trimmer when in use. Do not place it over the
hedge that you are trimming where it may be cut
by the blade.
When trimming new growth, use a wide sweeping
action so that the stems are fed directly into the blade.
Allow the cutting blades to reach full speed before
entering the material to be cut.
Always work going away from people and solid objects
such as walls, large stones, trees, vehicles etc.
If the blade stalls, immediately stop the Hedge trimmer.
Disconnect the Hedge trimmer from the mains and
clear the jammed debris from the cutting blades.
Wear gloves when trimming thorny or prickly growth.
Move the Hedge trimmer to feed the branches directly
into the blade cutting edges.
Do not try to cut stems that are too large to feed into
the cutting blade.
TOP CUTTING (See Fig. G)
Use a wide sweeping motion. A slight downward tilt of
the cutting blades in the direction of motion gives the
best cutting results.
SIDE CUTTING (See Fig. H)
When trimming the sides of the hedge, begin at the
bottom and cut upwards, tapering the hedge inward
at the top. This shape will expose more of the hedge,
resulting in a more uniformed growth.
WARNING: Check extension cords before each
use. If damaged replace immediately. Never
use your tool with a damaged cord since touching the
E
F
6
G
H