auto-adjusts to your walking speed Cordless self-propelled lawn mower Tondeuse à gazon autotractée sans fil Cortacésped de autopropulsión inalámbrica hElPliNE NUmbEr 1-866-354-worx (9679) EN P07 F P20 ES P35 WG789
1 2 3 4 5 6 7 8 6 11 17 9 10
19 18 a 15 16 A B1 B2 14 C1 C2 b c D1 e c d 1 2 b D2 D3 E1 f 5 E2 F G1 2 1 G2 G3 H
2 e I1 1 I2 J 17 12 K1 12 K2 L 2 2 6 13 9 M1 M2 N1 P-1 O-1 1 O-2 2 O-3 P-2 2 P-3 N2 O P R-0 R-2 R-4 R-1 R-3 R-5 Q R S 1
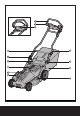
1. Upper handle 2. Safety bail 3. Safety key 4. Lower handle 5. Handle height adjustment lever 6. Locking cam lever 7. Safety guard 8. Battery housing cover 9. Side-discharge cover 10. Cutting height adjustment lever 11. Grass collection bag 12. Mulching plug (See K1) 13. Side-discharge chute (See M1) 14. Screw knob (See C2) 15. Battery pack (See B) 16. Charger (See B) 17. Work mode dial (See L) 18. CHARGED INDICATOR LIGHT (GREEN) (See B2) 7 19.
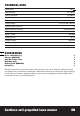
TECHNICAL DATA Power input 36V Deck diameter 19’’ (48cm) Cutting diameter 18"(46cm) Front wheel diameter 7" (178mm) Rear wheel diameter 8-1/4" (210mm) Cutting height 1.5”-3.5” (38 – 88mm) Cutting height positions 6 Grass collection capacity 1.6bushels(55L) Battery type Lead acid Battery model WA3220 Charging time 16 hrs Charger model WA3722 Charger rating Input: AC 120V~60Hz,45W Output: 42.5V 1.0A Machine weight 8 41.1kg (90.
SAFETY INSTRUCTIONS WARNING! Some dust created by power sanding, sawing, grinding, drilling and other construction activities contains chemicals known to the state of California to cause cancer, birth defects or other reproductive harm. Some examples of these chemicals are: • Lead from lead-based paints, • Crystalline silica from bricks and cement and other masonry products, and • Arsenic and chromium from chemically-treated lumber.
SUPPLEMENT SA-BATTERY-OPERATED LAWN MOWERS a) Do not charge lawn mower in rain, or in wet locations. b) Do not use battery-operated lawn mower in rain. c) When replacing batteries, all batteries should be replaced at the same time. Mixing fresh and discharged batteries could increase internal cell pressure and rupture the discharge battery(ies). (Applies to products employing more than one separately replaceable primary battery.
12. 13. 14. 15. 16. 17. 18. the machine, removing grass catcher, or unclogging the discharge guard. Operate machine only in daylight or good artificial light. Do not operate machine while under the influence of alcohol or drugs. Never operate mower in wet grass. Always be sure of your footing; walk; never run. Disengage the drive system, if so equipped, before starting the engine (motor). If the machine should start to vibrate abnormally, stop the engine (motor) and check for the cause immediately.
for which it is intended. 1.2 Preparation a) Thoroughly inspect the area where the equipment is to be used and remove all stones, sticks, wires, bones, and other foreign objects. b) Do not operate the equipment when barefoot or wearing sandals. Always wear substantial footwear. c) Disengage the self-propelled mechanism or drive clutch on units so equipped before starting the motor. d) Never attempt to make a wheel height adjustment while the motor is running.
SYMBOLS Safety alert Read the operator’s manual Blade continues to rotate after the machine is switched off. Wait until all machine components have completely stopped before touching them. Do not expose to rain or water Do not burn Do not dispose of batteries. Return exhausted batteries to your local collection or recycling point. Contains lead-acid battery. Battery must be recycled or disposed of properly.
14 power. Note: if the battery is defective, the red light on the charger will flash. The lights will only function when the charger is connected to both the battery and wall receptacle. 7. The charger is a smart charger and can stay connected to the battery and wall receptacle for extended periods of time without fear of damaging the battery or charger. The charger will automatically cycle on and off periodically to ensure the battery is fully charged.
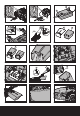
horizontal position. 4) Release the safety guard to lock the grass bag into position. Lift the handle slightly to ensure the grass bag is installed securely. REMOVING/EMPTYING Lift the safety guard and hold it up. The grass bag will drop automatically. 6. ADJUSTING THE CUTTING HEIGHT (See H) Warning! Stop, release safety bail and wait until the motor stops before adjusting height. The blade will continue to rotate after the machine is switched off, a rotating blade can cause injury.
4) The safety guard is spring loaded. When you release it, the guard will return to the closed position. Note: The Pacesetter™ drive system will operate with or without the mower blade turned on. 4. INSTALLING MULCHING PLUG (See K2) 1) Turn the mower off, wait until the blade stops and remove the safety key. 2) Raise the safety guard and hold it up. 3) Slide the mulching plug (12) into the discharge opening until it is firmly in contact with the deck.
to provide nutrients to the lawn. Please review the following recommendations for optimum mulching performance. 1) Avoid mowing when the grass is wet from rain or dew. Wet grass may form clumps which interfere with the mulching action and reduce runtime. The best time to mow grass is in the late afternoon when the grass is dry and the newly cut area will not be exposed to direct sunlight.
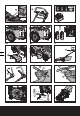
3. Sharpen cutting edges on both ends of the blade to keep it balanced, removing equal amounts of material from both ends. TO SHARPEN BLADE IN A VISE (See O) 1. Be sure the switch lever is released, the blade has stopped and the safety key removed before removing the blade. 2. Remove blade from mower. See instructions for removing and attaching blade. 3. Secure blade O-1 in a vise O-2. 4. Wear safety glasses and heavy work gloves. 5.
Problem Solution 2. Motor stops while mowing. A. Release switch lever to turn mower off. Remove safety key, turn mower over and check that blade is free to turn. Clear any obstruction. If not free, return to an authorized servicer. Blade should turn freely. B. Raise cutting height of wheels to highest position and start mower. C. Has battery been fully charged? Plug in charger and wait for green light to come on. D. Avoid overloading the mower.
Designed in Italy. Made in China Conçu en Italie. Fabriqué en Chine Diseñado en Italia. Fabricado en China Copyright © 2010, Positec. All Rights Reserved.