INSTALLATION GUIDE
Original instructions Installation guide EN P03
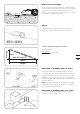
WARNING: Read all safety warnings and all instructions. Failure to follow the warnings and instructions may result in electric shock, fire and/or serious injury. Carefully read the instructions for the safe operation of the machine. Save all warnings and instructions for future reference. How to install your Landroid® The installation Landroid® of is easy. The entire process only takes a little time, depending on the size of your garden. If you are like us, you hate wasting time to mow your lawn.
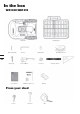
In the box WR130E WR131E Landroid® Base fixing nails Charging base Hex key Spare blades Boundary wire reel 4 EN Wire pegs Get Started Power adapter Warranty statement Connector Battery From your shed Scissors Hammer Tape Distance gauge*
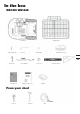
In the box WR141E WR144E Landroid® Base fixing nails Charging base Hex key Spare blades Boundary wire reel 5 EN Wire pegs Get Started Power adapter Connector Warranty statement Distance gauge* Battery From your shed Scissors Hammer Tape
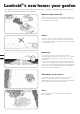
Landroid®'s new home: your garden Let's start by having a closer look at Landroid®’s new home - your lawn - highlighting the areas where it can safely go and areas Landroid® should avoid. Obstacles that can be hit When hitting any obstacle that’s rigid, stable and taller than 10cm - such as a wall or a fence - Landroid® will stop and redirect away from the obstacle. Stones Stones too heavy to be moved by your Landroid® can be safely hit.
Depressions and bumps In case of large bumps (higher than 2cm) or dips (wider than 10cm and deeper than 2.5cm), please determine if the blades would touch the ground or if Landroid® would get stuck. If this is the case, either make the inclines smoother or exclude these areas from Landroid®’s operation. Max.10cm Max.2cm Max.2.5cm Slopes Your Landroid® has the ability to safely climb slopes up to 35% (20°)**, so please avoid areas steeper than this.
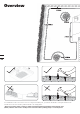
Overview > 26cm > 26cm > 26cm > 26cm 8 > 26cm EN Your Landroid® needs to know where to mow. Using the boundary wire, you'll define Landroid®'s working area and form an invisible fence. This wire will also guide Landroid® to its charging base.
> 1.5m >1m > 1.5m > 26cm >1m > 26cm >10cm > 10cm 75cm 75cm > 26cm 9 EN >1m >90º 0m >90º <90º hangar, can lead to navigational disturbances of robotics lawn mowers.” If your neighbor also uses a Landroid®, you must keep a space of at least 1 metre between your boundary wire and your neighbor's.
Installation 1 Place the charging base Find a flat surface for the charging base, the place should be dry and out of direct sun light and the adapter can be mounted on the wall. Landroid®’s charging base can be placed against the wall or fence, with the charging components facing your lawn. If possible, place the charging base in the shade, and batteries are better recharged in a cool place. Make sure the adapter and electrical outlet are always kept in a dry place.
2 a b Charge your Landroid® before the first operation WR130E WR131E a b When connecting the power cord of the charging base to the adapter, align the notch on the power cord (b) with the groove on the adapter (a). Connect the adapter to the electrical outlet. The LED on the charging base will turn on in red color. Manually dock Landroid® into the charging base while Landroid® is powered off. The green light on the charging base will turn green and Landroid® will begin to charge.
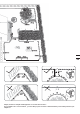
In the case of two islands that are close to each other, it would be convenient to lay out the wire as illustrated in the picture. Landroid® can travel freely over the boundary wire between the areas and the mowing boundary. >1m >1m >1m 12 EN If your lawn has multiple areas connected to each other by a corridor, it should be at least 1 meter wide. If the corridor is narrower than 1 meter, Landroid® will have difficulty travelling between.
4 > 26cm Complete the entire boundary wire setup > 1.5m > 26cm > 26cm >1m > 1.5m > 26cm > 26cm >1m > 26cm >10cm > 10cm > 26cm 75cm 75cm OUT WIRE > 26cm Lay down the boundary wire around the working area as the illustration shown. After pegging the boundry wire, please take your Landroid® away from the charging base. Lead the boundary wire back to the charging base, leave a length of the boundary wire (OUTwire) around 80cm and cut it off.
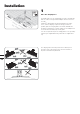
Verification Before it starts mowing for the first time, make sure Landroid®'s working area is clear of objects such as toys and branches... 1 Set the cutting height to the maximum level (50mm (WR130E WR131E) / 60mm (WR141E WR144E)). WR130E WR131E WR141E WR144E 14 2 EN Place your Landroid® a few meters in front of the charging base. 3 Only for reference Press until Landroid® turns on. For the first use, input the default PIN code 0000 by pressing for four times when the number 0 is blinking.
4 Press then to send Landroid® back to the charging base. ® Landroid will follow the boundary wire to the charging base. Only for reference 5 Fine tune the outline shape of the boundary wire if necessary. NOTE: If the boundary wire is broken during the testing or you need to extend the boundary wire, please refer to “Joining the Boundary Wire” in Owner’s Manual for instructions. Check the status of the LED light indicator on the charging base to make sure the connection is OK.
Setting First please set the height to a desired grass level after cut and you can do the program setting manually or using mobile App. NOTE: When doing the program setting manually, Landroid® will enter the standby page if it does not receive any input from the user within 30 seconds. 1 Change PIN code To change the PIN code, keep pressing both and buttons at the same time for 5 seconds. The icon will be blinking, and “ ” will be rolling flashing.
3 Set work area for 3 seconds. When the icon is blinking, Keep pressing press . A number will be blinking on the display, for example, , which is the lawn area. The working time will be automatically set according to the size of your garden. Use or to set the lawn area (the area will increase / decrease by 50m2 each time the / is pressed), and press to confirm. Then Landroid® will enter the standby page.
App Your Landroid® is able to connect with smartphone. Using Landroid® App for your smartphone, you can change your Landroid®'s general settings, and view the machine's status and error messages. Checklist before connecting your App to Landroid® Step 1: Check your smart phone 1. Make sure the Wi-Fi that your smart phone connected is 2.4GHz instead of 5GHz. Example: 2. Make sure the APP installed on your smart phone is the latest version. Step 2: Check your Landroid® 1.
Fig. 3 To connect smartphone to your Landroid®: Step 1: To download the Landroid® App, scan the QR code below or download it from Playstore (GoogleAndroid), AppleStore (Apple-iOS) or our website www.worx.com. for 3 seconds, the icon will be blinking. Use or to choose the icon , Step 2: Keep pressing to confirm. then press 19 EN Step 3: Enter the Landroid® APP, and then follow the instructions to connect to your Wi-Fi. *The Serial No. can be found at the rear of Landroid® as shown. NOTE: 1.
www.worx.