
Operation Manual


9
Lithium-Ion Cordless Drill/Driver EN
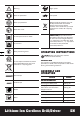
OPERATION
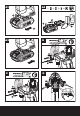
Rotating the Dual Chuck See Fig. D
FORWARD/REVERSE
ROTATION CONTROL
WARNING: Never change
the direction of rotation
when the chuck is rotating, wait
until it has stopped!
See Fig. E1,
E2, E3
TWO-SPEED GEAR CONTROL
WARNING: To prevent
gear damage, always
allow the chuck to come to a
complete stop before changing
gears.
See Fig. F
Drilling/driving Torque Setting See Fig. G
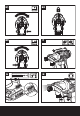
ON/OFF SWITCH
WARNING: Do not
operate for long periods at
low speed because excess heat
will be produced internally.
See Fig. H
USING THE LED LIGHT(See Fig. H)
WARNING: To turn on the light, press the On/
Off Switch and make sure the Forward/Reverse
Rotation Control is on right/left position.
The LED Light is also a battery capacity indicator. It
will flash when power gets low.
LED lighting increases visibility-great for dark or
enclosed area. LED is also a battery capacity indicator.
It will flash when power gets low.
The tool and battery pack are equipped with a
protection system. When the LED Light is quickly
flashing and turn off, the system will automatically
cut off power to the tool to extend battery life. The
tool will automatically stop during operation if the
tool and/or battery pack are placed under one of the
following conditions:
• Overloaded: The tool is operated in a manner that
causes it to draw an abnormally high current. In this
situation, release the Trigger Switch on the tool and
stop the application that caused the tool to become
overloaded. Then pull the Trigger Switch again to
restart.
• Overheated: Under the condition above, if the
tool does not start, the Tool and Battery Pack are
overheated. In this situation, let the Tool and Battery
Pack cool before pulling the Trigger Switch again.
• Low battery voltage: The remaining Battery
capacity is too low and the tool will not operate. In
this situation, remove and recharge the Battery Pack.
TROUBLESHOOTING
1. WHY DOES THE DRILL NOT TURN ON WHEN
YOU PRESS THE SWITCH?
The Forward/Reverse Rotation Control, which is on
top of the trigger, is positioned in the lock function.
Unlock the Forward/Reverse Rotation Control by
putting it into the required rotation position. Push
the trigger and the drill will start to rotate.
2. THE DRILL STOPS BEFORE THE SCREW IS
COMPLETELY TIGHTENED. WHY?
Verify the torque position of the Electronic Torque-
Adjusting Dial. Find the Electronic Torque-Adjusting
Dial (7) at the end of the soft grip handle. Position
1 is the lowest torque (screw driving force) and
position 11 is the highest torque (screw driving
force). Position
is for drilling operation. Regulate
the Electronic Torque-Adjusting Dial to a higher
position to reach better result.
3. REASONS FOR DIFFERENT BATTERY PACK
WORKING TIMES
Charging time problems, and having not used a
Battery Pack (8) for a prolonged time will reduce the
Battery Pack working time. This can be corrected
after several charge and discharge operations by
charging & working with your drill. Heavy working
conditions such as large screws into hard wood will
use up the Battery Pack energy faster than lighter
working conditions. Do not re-charge your Battery
Pack below 0°C(32°F) and above 45°C (113°F)word
as this will affect performance.
4. WHY DRILL BITS CAN NOT BE INSERTED
INTO THE COLLET ?
Only 1/4” hex bits will work with this collet. We
recommend that you use the dills/bits like those
supplied with your Switchdriver.
5. WHY DOES THE DRILL NOT WORK AFTER
ROTATING THE DUAL CHUCK?
The drill can work only when the Dual Chuck is in
right position as shown in Fig. H. When the Dual
Chuck reaches proper position, you can hear a
“click” sound.