SAFETY AND OPERATING MANUAL Impact drill WX312 WX312.
GENERAL POWER TOOL SAFETY WARNINGS WARNING! Read all safety warnings and all instructions. Failure to follow the warnings and instructions may result in electric shock, fire and/or serious injury. Save all warnings and instructions for future reference. The term “power tool” in the warnings refers to your mains-operated (corded) power tool or battery-operated (cordless) power tool 1 Work area safety a) Keep work area clean and well lit. Cluttered or dark areas invite accidents.
4) Power tool use and care a) Do not force the power tool. Use the correct power tool for your application. The correct power tool will do the job better and safer at the rate for which it was designed. b) Do not use the power tool if the switch does not turn it on and off. Any power tool that cannot be controlled with the switch is dangerous and must be repaired.
chuck or drill bit. Your hand may be lacerated. 10. When installing a drill bit, insert the shank of the bit well within the jaws of the chuck. If the bit is not inserted deep enough, the grip of the jaws over the bit is reduced and the loss of control is increased. 11. Do not use dull or damaged bits and accessories. Dull or damaged bits have a greater tendency to bind in the workpiece. 12.
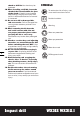
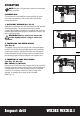
1 2 3 9 4 6 8 Impact drill 5 7 WX312 WX312.
1 CHUCK (WX312) 2 DEPTH GAUGE 3 DRILL/ HAMMER DRILL FUNCTION SELECTOR 4 FORWARD AND REVERSE ROTATION CONTROL LEVER 5 SWITCH LOCK ON BUTTON 6 VARIABLE SPEED CONTROL 7 ON/OFF SWITCH 8 AUXILIARY HANDLE 9 KEYLESS CHUCK(WX312.1) * Not all the accessories illustrated or described are included in standard delivery. TECHNICAL DATA WX312 WX312.
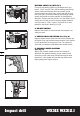
OPERATION 1 NOTE: Before using the tool, read the instruction 2 book carefully. INTENDED USE The machine is intended for impact drilling in brick, concrete and stone as well as for drilling a in wood, metal and plastic. C2(See Fig. A) 1. AUXILIARY HANDLE Slide the handle onto the drill and rotate to the desired working position. To clamp the auxiliary handle rotates the handgrip clockwise. To loosen the auxiliary 2 handle rotate the hand grip anti-clockwise. Always use the auxiliary handle.
KEYLESS CHUCK (9) (WX312.1) First pull the locking sleeve (a) backward until you hear a “click” sound. Then, while holding the locking sleeve, rotate and loosen the front section of the chuck to open the chuck jaws. Insert the drill bit into the chuck jaws, and while holding the locking sleeve, rotate and tighten the front section in the opposite direction. Ensure that the drill bit is in the center of the chuck jaws. Finally, push the locking sleeve forward until you hear a “click” sound.
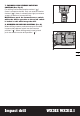
7. FORWARD AND REVERSE ROTATION CONTROL (See Fig. F) For drilling use forward rotation marked “ ” (lever is moved to the left). Only use reverse rotation marked “ ” (lever is moved to the right) to remove screws or release a jammed drill bit. NOTE: Never move the forward/reverse switch whilst the drill in operation or the on/off switch is locked as this will damage the drill. 8.
WORKING HINTS FOR YOUR DRILL 10 1. Drilling masonry and concrete Select the drill/impact action selector switch to the “hammer symbol” position. Tungsten carbide drill bits should always be used for drilling masonry, concrete etc with a high speed. 2. Drilling steel Select the drill/impact action selector switch to the “drill symbol” position. HSS drill bits should always be used for drilling steel with a lower speed. 3. Pilot holes When drilling a large hole in tough material (i.e.
Copyright © 2014, Positec. All Rights Reserved.