
Operation Manual


9
Nickel-Cadmium
Impact drill
WX369.3 WX369.4
When using the drill in the HI speed range, the speed will
increase and the drill will have less power and torque.
Gear I
Low speed range: for screwdriving or working with large
drilling diameter
Gear II
High speed range: for working with small drilling diameter
WARNING: To prevent gear damage, always allow
the chuck to come to a complete stop before
changing the direction of rotation or the two-speed gear
control.
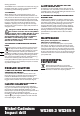
6. CHUCK ADJUSTMENT
To open the chuck jaws, rotate the front section of the chuck.
Insert the drill bit between the chuck jaws and rotate the front
section in the opposite direction. Ensure the drill bit is in the
center of the chuck jaws. Finally, firmly rotate the front chuck
section in the opposite directions. Your drill bit is now clamped
in the chuck.
7. TORQUE ADJUSTMENT AND HAMMER OR DRILLING
CONTROL (See fig. D-1 & D-2)
(Screw driving force of your drill driver)
The torque is adjusted by rotating the torque adjustment ring.
The torque is greater when the torque adjustment ring is set on
a higher setting. The torque is less when the torque adjustment
ring is set on a lower setting.
When drilling in masonry and concrete choose the hammer
position
.
When drilling in wood, metal, plastic and screwdriver choose
the drill position
.
Make the setting as follows:
1 - 4 for driving small screws
5 - 9 for driving screws into soft material
10 - 14
for driving screws into soft and hard material
15 - 19 for driving screws into hard wood
20
for driving larger screws
for heavy drilling
for drilling in masonry and concrete
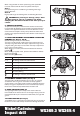
8. AUTOMATIC SPINDLE LOCK (See Fig. E)
The automatic spindle lock allows you to use it as a regular
screwdriver. You can give an extra twist to firmly tighten a
screw, loosen a very tight screw or continue working when the
battery energy has expired. For manual screwdriver purposes,
the chuck is automatically locked when the tool is off.
9. USING THE SIGHT LIGHT (5)
The sight light allows you to keep a clear view under less
illuminated circumstances. To turn on the light simply press the
on/off switch. When you release the on/off switch, the light will
go out.
10. LEVEL DRILLING (See Fig. F)
The Bubble level is recessed in the motor housing on the top of
the drill. It can be used to keep the drill level during horizontal
B
C
D1
D2
A
F
E