
Operation Manual


10
WX800 WX800.9
Lithium-Ion cordless
angle grinder
xINR18/65-y: Cylindrical lithium
Ion battery cells with max diameter
of 18mm and max height of 65mm;
“x” represents a number cells serial
connected, blank if 1; “-y” represents a
number of cells paralleled connected,
blank if 1.
OPERATING INSTRUCTIONS
NOTE: Before using the tool, read the
instruction book carefully.
INTENDED USE:
The machine is intended for cutting, roughing and
brushing metal and stone materials without using
water. For cutting metal, a special protection guard
for cutting (accessory) must be used.
ASSEMBLY AND OPERATION
Action Figure
BEFORE OPERATION
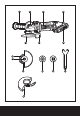
Removing the battery pack See Fig. A1
Charging the battery pack See Fig. A2
Installing the battery pack
WARNING: When
replacing the battery
pack, do not insert the
battery until the Grinding/
Cutting Disc comes to a
complete stop!
See Fig. A3
ASSEMBLY
Assembling Auxiliary Handle See Fig. B
Assembling Grinding/Cutting
Disc
See Fig. C1,
C2, C3
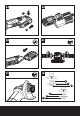
Adjusting Wheel Guard
NOTE: Before any work on
the machine itself, remove
the battery pack. For work
with grinding or cutting
discs, the protection guard
must be mounted. Use the
correct type of disc for your
application. If the power
tool is intended to perform
cutting off operations, a
guard specific for this op-
eration must be fitted.
The coded projection on the
wheel guard ensures that only a
guard that fits the machine type
can be mounted.
Open the clamping lever (13).
Place the wheel guard with
coded projection into the coded
groove on the spindle of the
machine head and rotate to
the required position (working
position).
To fasten the wheel guard, close
the clamping lever (13).
The closed side of the
wheel guard must always
point to the operator.
See Fig. D
OPERATION
Using On/Off Switch See Fig. E
Hand Grip Areas See Fig. F
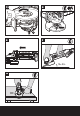
Rough Grinding
WARNING! Never use a
cutting disc for
roughing.
Cutting See Fig. G
WORKING HINTS FOR YOUR
ANGLE GRINDER
1. Always start at no load to achieve maximum
speed then start working.
2. Do not force the disc to work faster, reducing the
Disc’s moving speed means longer working time.
3. Always work with a 15-30 angle between disc and
workpiece. Larger angles will cut ridges into the
workpiece and affect the surface finish. Move the
angle grinder across and back and forth over the
workpiece.
4. When using a cutting disc never change the
cutting angle otherwise you will stall the disc
and angle grinder motor or break the disc. When
cutting, only cut in the opposite direction to the
disc rotation. If you cut in the same direction as
the disc rotation the disc may push itself out of
the cut slot.