
Instruction manual


8 World Precision Instruments
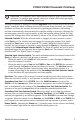
Typical Setups
Most of the time, you will use one of two setups on the PicoPump:
Purpose
2nd Vent Port
Selector Switch*
Solenoid Input
Selector Switch** Result
Hold a cell or reverse
fi ll a pipette
Vac Vent (PV820)
Vac (PV830)
Vacuum applied at the Eject port
until solenoid is engaged
Normal operations Vac Hold • Vacuum available at the
Secondary Vent Port
• Positive hold pressure applied at
the Eject port until solenoid is
engaged.
*On the PV820, this is the Hold Pressure port, and on the PV830, it is the Vacuum port.
** On the PV820, this switch is not labeled (hold/vent), and on the PV830, it is the Vent switch (vac/
hold).
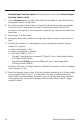
Solenoid Controls
You control the duration of the eject pressure burst using the solenoid controls on the
right side of the instrument panel. Once the timing is setup, you may initiate the pressure
burst in one of three ways:
• Push the Start button.
• Apply +5V at the External Trigger Input Connector.
• Depress an optional foot switch (WPI #3260).
NOTE: A green lamp next to the Eject pressure gauge illuminates for as long as the
pressure solenoid is open (active/energized).
Start Button
Stop Button
S
S
n
n
Range Switch
R
R
R
R
R
Duration Switch
Period Dial
External Monitor
Output
Footswtich
Connector
Ex
E
E
E
External Trigger
Input Connector
I
Fig. 8—The solenoid controls the timing, duration and start/stop of the eject pressure.
Start/Stop Buttons–Press the Start button to initiate a timed sequence (timed mode) or
to manually eject pressure (gated mode). Press the Stop button to manually abort a timed
sequence.