
Instruction manual


PV820/PV830 Pneumatic PicoPump
World Precision Instruments 11
Pressure Input–Connect the Pressure Input (located at the back of the instrument) to
a suitable source of pressure, such as a compressed gas tank or an air line, using 0.25˝
OD tubing supplied. Pressure may be anywhere in the range of 0–150 PSI. Connect
this 0.25˝ OD tubing to the quick connect fi tting. A 0.25˝ female NPT fi tting is supplied
for connecting to a nitrogen regulator on a N
2
tank. Recommended gases are dry air,
nitrogen or argon.
!
CAUTION: Never use corrosive gases. PV800 series instruments are not designed
for use with oxygen.
!
CAUTION: If an air pressure line containing oil or water vapor is used, an external
fi lter is recommended to prevent excessive contamination of the internal
pneumatic components.
!
CAUTION: The precision regulators used in this instrument continuously vent a
small amount of supply pressure as a part of their normal function. To prevent
waste of gas, always turn off the main supply pressure when the PicoPump is not
in use.
Assembling the PicoNozzles
The PicoPump comes with a PicoNozzle Kit version 2 (#5430-ALL) which includes two
PicoNozzles and tubing to connect the holders to the pressure and vacuum ports. (Fig. 5
on page 4) Use one PicoNozzle for pressure, and the other for vacuum.
NOTE: If you prefer the original PicoNozzles, they may be purchased as an option for
use with the PicoPumps. See “Legacy PicoNozzle Kits” on page 4.
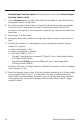
Handle Tubing
Tubing connected
to the barb
Body Gasket Cap
Pipette
Fig. 11—The 5430-ALL (version 2) must be properly assembled.
1. Slide the superthane tubing through the handle and connect it to the barb of the
body. Be careful so that the barb does not break when attaching or removing the
tubing. Then, slide the handle over the body and screw it in place.
2. Place a gasket of the correct size in the cap. Refer to the table below. Then, insert the
blunt end of the micropipette (pulled capillary glass) into the cap through the gasket
and into the body. Screw the cap in place. The screw cap and rubber gasket fi rmly
hold the glass micropipette.