
Installation & Operation Manual


ADAPTER INSTALLATION
1. Mount the Adapter onto a flat surface using the supplied screws or
the adhesive strips. Place the Adapter away from the water heater for
stronger signal strength.
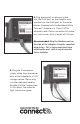
For spacing, the Adapter must be within 5 feet of a 120V outlet and
must be within reach of the ethernet port on the front of the water
heater. The supplied ethernet cable is 7 feet long, however an ethernet
cable (CAT5e) up to 100 feet long will work as well.
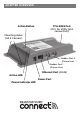
The action button and front label of the Adapter must be visible and
easily accessible during installation.
If using the screws, please do not screw the Adapter into the water
heater. Use the screws and anchors supplied with the adapter.
The stencil in the back of
this manual can be used
for spacing of the holes.
For best use, we suggest
mounting the Adapter
horizontally and using all
four screws.
If using the interlocking strips, attach one strip to each end of the back of
the Adapter by peeling one side of the interlock tape and pressing onto
the Adapter. Once the strips are firmly attached to the Adapter, peel the
other side of both strips so the adhesive is visible. Line up the location of
the Adapter, then firmly press and hold the Adapter onto the flat surface
for 10 seconds.