GUIDE® EasIR-0 Thermal Camera User Manual Wuhan Guide Infrared Co., Ltd. No. 26 Shucheng Rd, Hongshan District, Wuhan 430070 P. R. China Telephone: +86-27-8767 1991 Facsimile: +86-27-8767 1927 Email: overseas@guide-infrared.com Internet: www.guide-infared.com © Wuhan Guide Infrared Co., Ltd.
The Quality Management System of Wuhan Guide Infrared Co., Ltd. is approved to ISO9001:2000 for the design and manufacturing, stockholding, in-house repair and site servicing of non-contact temperature measuring instrumentation. Wuhan Guide Infrared Co., Ltd. reserves the right to make changes and improvements on any of the products described in this manual without prior notice. GUIDE® EASIR-0 Thermal Camera complies with current European directives relating to electromagnetic compatibility and safety.
Table of the Contents Table of the Contents ........................................................................................................... 1 Introduction .......................................................................................................................... 1 Precautions .......................................................................................................................... 1 Maintenance .......................................................................
User Manual Introduction This publication provides the necessary information required to safely operate the GUIDE® EASIR-0 Thermal Camera. It is important to fully check all equipment with which you have been supplied. The equipment should be used, maintained and serviced by suitably trained personnel, capable of carefully following the procedures and guidelines given in this User Manual. All User Manuals and leaflets should be read thoroughly before proceeding with operation of the equipment.
User Manual Calibration and Repair Philosophy To ensure the accuracy and reliability of the GUIDE® EASIR-0 Thermal Camera, it is highly recommended that the instrument be calibrated at 12 monthly intervals. Calibration or repair for the instrument can be obtained by either contacting the address/ telephone number on the cover of this User Manual, or by email to the following addresses: overseas@guide-infrared.com Caution The GUIDE® EASIR-0 Thermal Camera does not incorporate any user serviceable parts.
User Manual USB driver Guide IrAnalyser® Software User manual Options Sun Shield Technical Specification Imaging Performance THERMAL Detector type: Uncooled FPA microbolometer (160× 120 pixels, 25μm) Spectral Range: 8-14μm Thermal Sensitivity: ≤100mk at 30℃ Field of View/ Focus: 20.6°X 15.5°/ 11mm Focus: motorized Image Presentation External Display: 3.
User Manual Battery Operating Time: Over 2 hours continuous operation External Power Operation: AC adapter 110/ 220 VAC, 50/ 60Hz Environmental Specification Operating Temperature: 0℃ to 50℃ Storage Temperature: -10℃ to 60℃ Humidity: Operating and storing 10% to 95%, non- condensing Encapsulation: IP43 Shock: Operational: 25G, IEC 68-2-29 Vibration: Operational: 2G, IEC 68-2-6 Interfaces USB 2.0: Real-time image and measurement transfer to PC; Physical Characteristics Weight: 0.
User Manual Live images can be frozen to be static images Frozen images, comprising radiometric data, infrared image can be saved into 2GB SD card or the built-in flash memory in standard JPG format. SD card can accommodate 2000 images and the built-in flash memory can store 200 images. Image Playback Images saved into SD card or the built-in flash memory can be replayed on the camera. Temperature measurement can be done on replayed images.
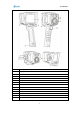
User Manual 1 LCD Display 2 Charging Indicator 3 Function Softkeys 4 Microphone 5 Battery Cover 6 Speaker (EASIR-4 only) 7 Visual Camera (EASIR-2/4 only) 8 Laser(EASIR-2/4 only) 9 IR Lens 10 Trigger Button 11 USB Interface 12 Video Interface(EASIR-2/4 only) 13 AC Adapter/Charging Input Terminal 14 SD Card Slot 6
User Manual EASIR-0 Charging Instruction How to use the batteries Insert the batteries, the indicator will not flicker at once. Press button to make the red indicator flicker , after 2 seconds , the indicator will alternatively flickers as green and red and stop when entering the self-check interface.(If the camera is powered on when battery is low, the red indicator will flicker quickly and power off automatically.
User Manual press shortly to enter spot analysis mode ↑/← ↓/→ - Press to switch between the up/down or left/right - Press or L/R / U/D to adjust the value of X or Y’s coordinate.. - Press T to exit the spot analysis and return the real-time IR mode.
User Manual Press T again to exit frozen mode and return to the real-time IR mode, or Press to save the image and return to live thermal image Main menu operation On the non-menu mode, press to bring up Main menu, the following info will be displayed on the screen: Parameter File Setup Press T in the main menu to return real-time IR mode; On the main menu mode, press to enter sub-menu of parameter setting: Emiss Tamb Distance Palette RelHum ↑ On the sub-menu mode, press ↓ OK to confirm
User Manual Default Language Tunit TimeDate AlarmTemp ↑ On the sub-menu mode, press ↓ Ok to confirm selecting the highlighted option and enter the next sub-menu, press T to exit main-menu operation and return real-time IR mode.
User Manual Press to enter Manual mode and to adjust Tmin and Tmax manually. Press to increase the Tmax value, press to decrease the value, press to switch to Tmin adjustment mode. The same operation for Tmin adjustment. Press to enter Auto mode and Tmin and Tmax will adjust automatically according to the change of scenery. Reviewing and Deleting Stored Images To view stored images on the SD card: Press Press the softkey labeled “File” to reveal the review menu “Filelist”.
User Manual Changing the Temperature Units The EASIR-0 will display temperature in Fahrenheit or Celsius. To change the temperature units: Press Press the softkey labeled Setup Press the softkey labeled Tunit Press to display main menu for Celsius or for Fahrenheit. Doing spot analysis EASIR-0 supports single spot measurement.
User Manual Distance: To set the proper distance from target, the distance range is from 0.1 meter to 50 meters. Relative Humidity: To set relative humidity percentage value between 0 and 100 according to the practical environment. Transferring Data from the Camera to PC Before transferring data from the EasIR-0 camera to PC, ensure that the PC offers USB2.0 interface and the USB driver for the camera has been successfully installed in the PC.
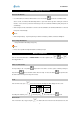
User Manual Installation starts. When getting to the step as shown below, choose “Continue anyway” to proceed further. Installation continues and finishes quickly. Click button Finish.
User Manual Go to Device Manager to check and confirm whether the driver has been successfully installed. If there is “GUIDE EASIR-0” listed under Universal Serial Bus Controller, it indicates the driver has been properly installed and you can transfer data from the camera to PC now.