SPI CORP User Manual Sierra Pacific Innovations Corp 6620 S. Tenaya Way BLDG #100 Las Vegas, NV 89113 www.raz-ir.com 702-369-3966 HQ 702-369-3977 FAX accounting@x20.
The Quality Management System of Wuhan Guide Infrared Co., Ltd. is approved to ISO9001:2000 for the design and manufacturing, stockholding, in-house repair and site servicing of non-contact temperature measuring instrumentation. Wuhan Guide Infrared Co., Ltd. reserves the right to make changes and improvements on any of the products described in this manual without prior notice. SPI RAZ-IR MAX Thermal Camera complies with current European directives relating to electromagnetic compatibility and safety.
Table of the Contents Table of the Contents......................................................................................................... 1 Introduction ........................................................................................................................ 1 Precautions........................................................................................................................ 1 Maintenance ...............................................................................
User Manual Introduction This publication provides the necessary information required to safely operate the SPI® RAZ-IR MAX Thermal Camera. It is important to fully check all equipment with which you have been supplied. The equipment should be used, maintained and serviced by suitably trained personnel, capable of carefully following the procedures and guidelines given in this User Manual. All User Manuals and leaflets should be read thoroughly before proceeding with operation of the equipment.
User Manual Calibration and Repair Philosophy To ensure the accuracy and reliability of the SPI® RAZ-IR MAX Thermal Camera, it is highly recommended that the instrument be calibrated at 12 month intervals. Calibration or repair for the instrument can be obtained by either contacting the address/ telephone number on the cover of this User Manual, or by email to the following addresses: overseas@guide-infrared.com or repair@raz-ir.
User Manual • 6 AA rechargeable batteries and battery charger • AC Adapter & cable • USB extension cable • USB driver • RAZ-IR Analyser Software • User manual • Carry case & strap ® Options • 30mm Tele lens • 7mm wide angle lens • Extended temperature range up to +350! • Sun Shield Technical Specification Imaging Performance THERMAL Detector type: Uncooled FPA microbolometer (160! 120 pixels, 25µm) Spectral Range: 8-14µm Thermal Sensitivity: "100mk at 30! Field of View/ Focus:
User Manual Measurement Features: Automatic correction based on distance, relative humidity, atmospheric transmission and external optics Optics Transmission Correction: Auto, based on signals from sensors Image Storage Type: Removable 2GB SD card & built-in memory File Format: JPG with analysis records Voice Annotation: Up to 60 seconds Laser Locator Classification Semiconductor A1 GalnP Diode Laser Power System Battery Type: AA rechargeable battery, field-replaceable, AA Alkaline battery als
User Manual • 2.0 Megapixels CMOS delivers an extremely crisp visual image. • Auto Gate Technology works as both a shutter and intelligent lens cap. The external shutter design prevents all disturbing heat radiation caused by internal electronics to deliver crisp and uniform images. • Auto focus function enables the auto focus of IR and visual image by simply pressing one button. • Ultra large capacity SD memory card and built-in flash memory offer easy in-field image storage. • High-speed USB2.
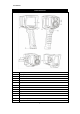
User Manual Parts Described 1 LCD Display 2 Charging Indicator 3 Function Softkeys 4 Microphone 5 Battery Cover 6 Speaker 7 Visual Camera 8 Laser 9 IR Lens 10 Trigger Button 11 USB Interface 12 Video Interface 13 AC Adapter/Charging Input Terminal 14 SD Card Slot 6
User Manual SPI® RAZ-IR MAX Charging Instruction Note: ! “slow flicker” in the text is about 1Hz, “quick flicker” is about 3Hz ! How to operate the camera with the AC Adapter ! Connect the AC Adapter to the AC adapter terminal (13) on the side of the camera. The red indicator light will blink when the adapter is connected to the camera. To turn on the camera hold the button for 3 seconds until the indicator light blinks alternately green and red.
User Manual Note: ! When charging, a blinking red indicator light means there is an error in the charging process. Verify that the batteries are correctly inserted into the camera and meet the battery requirement. Make sure the batteries are not exceeding the highest temperature limitation.$the limitation is about 50!% Charging the batteries while the power is ON ! - Power on while using the batteries, then connect the camera with the adapter, the red indicator light will blink slowly.
User Manual Use the appropriate button to focus. NEAR for closer objects, FAR let the camera select the appropriate image focus. to In many cases it may be necessary to fine-tune the AUTOFOCUS with the NEAR and FAR buttons to achieve optimal image quality. the for distant objects and AUTO button to focus FAR and press the Press the button to focus NEAR, press button to engage auto focus. Press the trigger “T” button to exit any menu.
User Manual Manual calibration On the non-menu mode, keep pressing "T" button and then press button to run shutter calibration Image frozen and save On the non-menu mode, press T to freeze the image, the following info will be displayed on the screen: Save Voice Visual /IR Press T again to exit frozen mode and return to the real-time IR mode, or ! Press to save the image and return to live thermal image ! Press to add the voice annotation, the following info will be displayed on the screen xx s
User Manual Manual Emiss Tamb Distance Palette RelHum Laser " On the sub-menu mode, press $ OK to confirm selecting the highlighted option and enter the next sub-menu, press T to exit main menu operation and return to real-time IR mode. ! On the main menu mode, press to enter file operation sub-menu : Filelist Del All Help About " On this sub-menu mode, press $ Ok to enter next sub-menu, press T to exit main-menu operation and return real-time IR mode.
User Manual Thermal camera focusing There are two methods to adjust focus: motorized and automatic To motorizedly focus: ! Aim the lens at the target ! Press ! Press the softkey labeled “Far” and “Near” until the image on the LCD is as clear as possible to activate the menu To automatically focus: ! Aim the lens at the target ! Press ! Make sure the target is in the middle of the LCD, and then press the softkey labeled “Auto” until the image on the to activate the menu LCD is as clear as poss
User Manual The SPI® RAZ-IR MAX could be displayed in full visual mode, full thermal mode and the confusion mode, they could be switched.
User Manual ! Press the softkey labeled “Yes”. Adding Voice Annotation to Saved Data Voice annotation can only be added to an image prior to storing it. After capturing an image, the Image Capture menu appears. To add a voice annotation to the image: ! Press the softkey labeled “Voice”. ! Press the softkey labeled “Record” to start the recording. ! Speak into the Imager’s microphone opening. When done recording, press the softkey labeled “Stop”.
User Manual How to get accurate temperature? There are a lot of factors affecting temperature accuracy. Here is a brief introduction to some typical parameters: emissivity, background temperature, distance, humidity and etc. Note: To get accurate temperature, you shall hold the camera stably and focus the camera well. ! Emissivity: All objects radiate infrared energy.
User Manual ! When viewing the live image, you can still use the buttons to control the camera. ! After viewing the live image, power off the camera, monitor (or recording device) and disconnect the cable. Note: It is required to power off the camera before connecting it to a monitor or a recording device. Transferring Data from the Camera to PC • Before transferring data from the SPI® RAZ-IR MAX camera to PC, ensure that the PC offers USB2.
User Manual ! Choose “Install from a list or specific location (advanced)” and include the folder where you save the driver program. Then Click button next to go further. ! Installation starts. When getting to the step as shown below, choose “Continue anyway” to proceed further.
User Manual ! Installation continues and finishes quickly. Click button Finish. ! Go to Device Manager to check and confirm whether the driver has been successfully installed. If there is “GUIDE SPI® RAZ-IR MAX ” listed under Universal Serial Bus Controller, it indicates the driver has been properly installed and you can transfer data from the camera to PC now.
User Manual 19