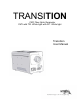
TRANSITION CMY Fiber Optic Illuminator CMY with TW -White light with WT -White light Transition User Manual
Table of Contents Declaration of Conformity………………………………………………..3 Safety Notice………………………………………………………………4 Introduction to Transition…………………………………………………7 Transition Quick Start configuration…………………………………….8 Transition Specifications…………………………………………………9 Fixture Setup and Configuration……………………………………..…10 DMX / RDM Setup and Operation……………………………………...12 Display Messages………………………………………………………..13 Service…………………………………………………………………….15 Flash Reprogramming…………………………………………………...
Safety Notice SAVE THESE INSTRUCTIONS READ AND FOLLOW ALL INSTRUCTIONS This manual gives step-by-step instructions for preparation, setup, and operation of the Transition TM Fiber Illuminator. There is a potential risk of fire, electric shock or injury to persons if the product is not used as instructed. The Transition Fiber Illuminator is to be used in an indoor environment only. WARNING: When using electrical appliances, use basic precautions, including: Read this manual before connecting power.
Intro to the Transition 6
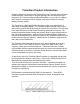
Transition Product Introduction Wybron is pleased to announce the introduction of the Transition fiber illuminator. Contained within a small easy to integrate package and ultra bright fiber optic illuminator, the Transition brings quality and durability to your venue. In addition, the Transition is designed to be an integral component of Wybron’s industry leading Infotrace system. The Transition is a high specification performance fiber optic illuminator in a small easy to integrate package.
Transition Quick Start Configuration 1. Connect the Equipment a) Connect fiber bundle common end to the Transition output port. b) Connect the Transition to a DMX source with a 5-pin cable c) Connect to AC power (110 – 240 VAC 50/60Hz) 2.
Transition Specifications Model 8670: Transition CMY Fiber Illuminator Features: No lamp optimization required Rubber feet for cabinet or countertop installation Durable all metal construction Output supports fiber bundles ranging from 17 – 30 mm dia. High output 150W UHI compact arc source Legendary Wybron Reliability Dimensions: Height: 7.750” Width: 5.625” Length (including fiber port): 13.500” Weight: 8.
Fixture Setup and Configuration Installing the Lamp DANGER: Disconnect fixture from line voltage before replacing lamp. CAUTION: Lamp and lamp mounting surfaces are hot! Allow lamp to cool 10 minutes before replacing Lamp Specifications Lamp socket / base: G22 Part# UHI-S150DW/A/UVP UHI-S150DM/A/UVP CDM150/T6/830 CDM150/T6/942 Figure 1.
Maximum ambient temperature (ta) may not exceed 40˚C (104˚F) Keep objects at least 2” (50mm) from sides of the fixture. Keep objects at least 6” from the top of the fixture. Cabinet or Closet Mounting The Transition may be mounted in a closet or cabinet on a hard surface such as wood, laminate, or metal. Do not mount the Transition on soft surfaces such as linoleum or fabric. Maximum ambient temperature (ta) may not exceed 40˚C (104˚F) Keep objects at least 2” (50mm) from sides of the fixture.
DMX / RDM Setup and Operation Controls and Indicators Transition controls and indicators as follows: o A three character seven-segment display o 4 push buttons: Menu, (+), (-), and Enter o Power (red) and signal (green) indicator LED’s The seven-segment display shows the address number (1-508) and the Demo mode (OFF, d1, d2). It also displays any error messages that are covered in the service section of the manual. The Menu button allows the user to switch between address and demo mode selection.
Display Messages Normal Messages 680 Ini Displayed for 1 second after power is applied. This is the RDM manufacturer device identification number Indicates that the unit is initializing the diachronic filters 001 – 508 The first DMX address Transition will respond to. Adr Top menu item. Pressing ‘Enter’ here will allow the current DMX address to be changed. DEn Top menu item. Pressing ‘Enter’ here will allow the current DMX control/ Demo control state to be changed. OFF Demo modes are off.
EEP Err An attempt to write to non-volatile memory failed. The unit will continue to respond to commands. SEr Err The RDM unique ID has been corrupted. The unit will operate normally but should not be used in an RDM environment. Contact dealer or factory for assistance. RDM Functionality Transition is compliant with the RDM v1.0 standard and can be used with the Wybron Info-Trace system or other RDM systems.
Service Lamp Replacement DANGER: Disconnect fixture from line voltage before replacing lamp. WARNING: Lamp and lamp mounting surfaces are hot! Allow lamp to cool before replacing. Disconnect fixture from AC power. Remove lamp plate by removing mounting screws as shown in figure 1.1 and pull lamp assembly straight back from reflector. Grasping lamp by the base remove old lamp from the socket. CAUTION: Touching the glass lamp envelope can reduce lamp life. Handle new lamps with a clean cloth.
Cleaning the Color Filters It is recommended that the color filters be only cleaned with low-pressure air without disassembling the color filters from the motor shafts. If the color module must be disassembled to clean the dichroic filters take careful note of the location and offset height of the individual color flags.
Flash Reprogramming Transition firmware can be updated as new firmware versions become available through the DMX/RDM port using an Infogate gateway and the Infogate application. Transition firmware updates can be found at www.wybron.com. Specific instructions for upgrading firmware in Transition and other Wybron equipment can be found in the Infogate User Manual, Firmware Upgrades section.
Warranty Information WYBRON, INC. warrants to the original owner or retail customer that for a period of one year from date of delivery of a portable system or energization of a permanently installed system (up to a maximum of 18 months from delivery) its products will be free from defects in materials and workmanship under normal use and service.
Figure 2.1 Figure .