
Installation Guide

PREPARATION
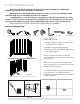
1. Construct a plumb stud pocket. Refer to the
specication sheet. (gure 1)
2. Install the rough plumbing. (gure 2)
(figure 1)
(figure 2)
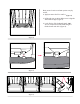
(figure 3)
3. Place the drain into the bathtub. Apply silicone
to the drain. (gure 3)
Note: Your tub will be delivered with the
overow installed and drain in its location but
not tightened.
Make sure you properly seal and tighten the
drain assembly prior to connection and ensure
that the silicone has cured.
The overow drain is integrated into the inner
body of the tub so no additional drain or
installation is required. Test drain for leaks prior
to nal installation.
TOOLS and ITEMS REQUIRED
ALCOVE TUB INSTALLATION
Warning: Due to rough handling during shipping or on the job site, do not install this product
until a thorough inspection and water test has been completed.
Check bathtub for correct model and size. Carefully inspect the tub for any damage (i.e., chips,
scratches, cracks). If at any point during the pre-installation inspection and water test, you discover a
problem with the bathtub or piping system, DO NOT INSTALL the unit and contact us immediately.
All pre installed parts must be checked and retightened before installation.
Note: If you purchased a brushed nickel trim kit, it must be installed before installing the
bathtub (brushed nickel trim not available on all models).
Tape measure
Pencil
Electric Drill
Spirit Level
Silicone sealant Gloves Protective Eyewear
Ruler