
Installation Guide

WC-WHE009-42
Overmount Installation Guide
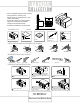
PACKING LIST
Main cabinet / 1 Counter / 1 Sink / 1
Install screws
and cover / 2
Install screws / 8
Metal bracket / 2
42″
• Prior to installation please check received
items against the "Packing List".
Please report any missing items to your
retailer immediately.
• Protect all surfaces from sharp objects,
high heat sources,direct prolonged
sunlight and chemical hazards.
• Professional installation recommended.
INSTALLATION AND ADJUSTMENT OF HINGES
REQUIRED TOOLS NOT IN BOX
12
300m
m
"
-
CH
N
install
Tape Measure Pencil Electric Drill Phillips Screwdriver Adjustable Wrench Spirit Level Silicone sealant
remove
adjust height adjust laterally adjust depth
1 Drill holes to match stud placement
in wall.
2 Installer must cut appropriately sized
hole in back of cabinet to accomodate
existing placement of hot&cold wall valves
and drain
Cut hole in
back of cabinet
3 Matching holes may be predrilled
in wall
5 Install the counter.
Seal around the top of
cabinet with clear or white
silicone sealant
6 Install the sink
and pop-up drain. Seal
around the base of the sink
with clear or white silicone sealant.
INSTALLATION INSTRUCTIONS
OPTIONAL OPTIONAL
4 Attach vanity to wall.