
User Guide

EXP-SW-0x01-8K
WyreStorm Essentials 8K60 2x1 and 4x1 HDMI Switcher
Quickstart Guide
WyreStorm recommends reading through this document in its entirety to become familiar with the product’s features prior to starting the
installation process.
IMPORTANT! Installation Requirements
IMPORTANT! Wiring Guidelines
The use of patch panels, wall plates, cable extenders, kinks in cables, and electrical or environmental interference will have an adverse effect on HDMI
transmission limiting performance. Steps should be taken to minimize or remove these factors completely during installation for best results. WyreStorm
recommends using high quality WyreStorm Essentials 8K HDMI cables such as WyreStorm Essentials to ensure the highest content performance
available.
• Visit the product page to download the latest rmware, document version,
additional documentation, and conguration tools.
• Read through the Wiring and Connections section for important guidelines
before creating or choosing premade cables.
Copyright © 2022 WyreStorm Technologies | wyrestorm.com
EXP-SW-0x01-8K Quickstart Guide | 220118
INT: +44 (0) 1793 230 343 | US: 844.280.WYRE (9973)
support@wyrestorm.com
In the Box
1x EXP-SW-0201-8K or EXP-SW-0401-8K
1x DC 12V PSU (US, UK, EU, AU)
1x IR Receiver Cable
1x IR Remote
1x 3-Pin Phoenix Connector (EXP-SW-0401-8K only)
2x Mounting Brackets (with screws)
1x Quickstart Guide (This Document)
Wiring and Connections
WyreStorm recommends that all wiring for the installation is run and terminated prior to making connections to the switcher. Read through this section in its
entirety before running or terminating the wires to ensure proper operation and to avoid damaging equipment.
RS-232 Wiring
The EXP-SW-0401-8K uses a 3-pin RS-232 with no hardware flow control.
Most control systems and computers are DTE where pin 2 is RX, this can vary
from device to device. Refer to the documentation for the connected device
for pin functionally to ensure that the correct connections can be made.
3rd Party Device
Pin 1 TX (Transmit) ---> To ---> RX (Receive)
Pin 2 RX (Receive) ---> To ---> TX (Transmit)
Pin 3 G (Ground) ---> To ---> G (Ground)
WyreStorm Connector
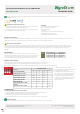
EDID Dip Switch Settings
The dipswitch on the splitter allows for changing the EDID management and downscaler on/off function.
Use the table below to congure the splitters EDID mode based on the application’s requirement.
When setting a dipswitch setting, power off the unit before making a change. Once set, the unit can be powered back on.
1. “-” indicates no adjustment is needed.
2. Reboot the device after setting the DIP switch
to make the settings take effect.
3. 3. Fixed EDIDs only include uncompressed
FRL video data. To transmit DSC compressed
FRL video, please use COPY EDID settings.
4. Fixed EDIDs all support audio formats up to
PCM 2CH and compressed audio up to 7.1CH.
Fixed EDIDs do not support HBR (High Bit
Rate) audio formats.
Function
DIP Switch Position
1 2 3 4
Auto-Copy EDID (Default) Up Up Up -
Fixed 4K@120Hz 4:4:4 10bit Up Up Down -
Fixed 8K@30Hz 4:4:4 10bit Down Up Down -
Fixed 8K@60Hz 4:2:0 10bit Down Down Down -
Fixed 4K@60Hz 4:4:4 8bit Up Down Up -
Fixed 1080P@60Hz Up Down Down -
Input audio extraction to S/PDIF
(Default)
- - - Up
ARC audio extraction to S/PDIF - - - Down
Troubleshooting
No or Poor Quality Picture (snow or noisy image)
• Verify that power is being supplied to all devices in the system and that they are powered on.
• Verify that all HDMI connections are not loose and are functioning properly.
• If transmitting 8K, verify that the HDMI cables used are 3D or 8K rated.
• Ensure the EDID of the unit is correct. See EDID DIP Switch Settings for correct switch positions.
Troubleshooting Tips:
WyreStorm recommends using a cable tester or connecting the cable to other devices to verify functionality.