Installation Guide Wyse C Class Conversion to WES7 ® Wyse® USB Firmware ToolTM Release 1.10 Issue: 102910 PN: 883887-17L Rev.
Copyright Notices © 2010, Wyse Technology Inc. All rights reserved. This manual and the software and firmware described in it are copyrighted. You may not reproduce, transmit, transcribe, store in a retrieval system, or translate into any language or computer language, in any form or by any means, electronic, mechanical, magnetic, optical, chemical, manual or otherwise, any part of this publication without express written permission.
Contents 1 Introduction 1 Kit Contents 1 Overview 2 Wyse Technical Support 2 Related Documentation and Services Wyse Online Community 2 2 2 Installing C90LE and C90LEW Thin Client Flash and RAM 3 Requirements 3 Procedures 3 What’s Next 5 3 Installing WES7 Firmware 7 Requirements 7 Procedures 7 Troubleshooting 13 USB Keys - Troubleshooting Boot Issues 13 SanDisk Cruiser Flash Drives - Troubleshooting Partition Issues 13
iv Contents This page intentionally blank.
1 Introduction This guide provides step-by-step instructions to convert C90LE thin clients from XPe to WES7 and C90LEW thin clients from WES2009 to WES7. Caution WES7 firmware requires C class thin clients to have a minimum of 4 GB flash and 2 GB RAM. Tip After converting your thin clients, obtain any available firmware update at http://www.wyse.com/serviceandsupport/support/downloads.asp.
2 Chapter 1 The Conversion Software Assembly DVD-ROM contains: • A PDF of this Reference Guide • Wyse USB Firmware Tool Release 1.10 • C Class WES7 Conversion Image folder containing the following files: · bios.img · cmos.img · commandsXml.xml · CRC.Txt · initrd.pxe · mbr.img · par1.img · vmlinuz Overview To convert your C class thin clients to WES7: 1.
2 Installing C90LE and C90LEW Thin Client Flash and RAM This chapter contains information for users of Wyse C90LE and C90LEW thin clients who must install new flash and RAM. If you are installing firmware only, you can skip this chapter and proceed to"Installing WES7 Firmware." Requirements • Small Phillips screwdriver • Needle-nose pliers • (Optional) Plastic alignment tools or equivalent for prying Warning Flash and RAM modules may be susceptible to damage by Electro-Static Discharge (ESD).
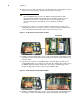
4 Chapter 2 4. Lift the top cover to remove it and expose the main board as shown in Figure 3. Notice that the rear of the thin client is positioned at the bottom of the photo. Warning Flash and RAM modules may be susceptible to damage by Electro-Static Discharge (ESD). All industry-standard cautions should be followed to avoid ESD. Before you remove or install a module, touch any metal part of the chassis and keep that contact with the chassis during the installation process. 5.
Installing C90LE and C90LEW Thin Client Flash and RAM 9. Replace the top cover in the reverse order as described in steps 4 and 3. 10.Attach any support feet. 11. Reconnect the video display, keyboard, mouse, network cable, and power adapter to the thin client before connecting to an electrical outlet. Caution Do not turn on the thin client. The thin client is ready to re-image, however the flash module does not contain an operating system.
6 Chapter 2 This page intentionally blank.
3 Installing WES7 Firmware This chapter includes the requirements and procedures you need to install and use Wyse® USB Firmware ToolTM to update your thin client to WES7 firmware.
8 Chapter 3 Step 3: Use Wyse USB Firmware Tool to Configure a Single USB Key to Install Firmware 1. Double-click the shortcut to run the tool and open the Wyse USB Firmware Tool wizard (the welcome page provides the product version and description, and a link to view the Wyse end user license agreement). Figure 6 Wyse USB Firmware Tool wizard 2. Click Next to open the Select an Option dialog box. Figure 7 Configuration options 3.
Installing WES7 Firmware 9 4. Select the Windows Embedded Standard 7 OS type option. 5. Select the Update Firmware operation to perform option. Tip Although the Preserve data partition check box is automatically selected to preserve any existing data partition, you can clear the check box if you want to remove the existing data in the data partition. 6. Select all three contents options (OS Image, BIOS, and CMOS). 7. Click Next to open the browse dialog box. Figure 9 Browse for image file 8.
10 Chapter 3 Figure 11 Prepare USB drive 11. Select the USB key onto which you want the configurations (you can use Refresh as needed to recognize an inserted USB key), and then click Next. The progress bars show the overall progress and task progress. 12.After configuration, click Finish to close the wizard and then remove the configured USB key for use (you will use the configured USB key on your target devices).
Installing WES7 Firmware 11 Step 5: Verifying Thin Client Operation After the thin client reboots, you can verify the Version and that your general client information is correct. Figure 12 Client Information (blank example) 1. On the General tab of the Client Information window (Start > All Programs > Wyse Client Information), verify the following: • Version is 9.01 Build 0806. 2. Click OK to close the Client Information window. The thin client is ready for operation and setup by an administrator.
12 Chapter 3 Step 6: Attach a Wyse Conversion Label and Microsoft License Label on Each Converted Thin Client The conversion kit is supplied with Wyse Conversion Labels and Microsoft License Labels that must be attached to each thin client as shown in Figures 13 and 14. Be sure you have purchased the amount of labels you need. Caution Failure to install the labels may cause delays in service and support.
Installing WES7 Firmware 13 Troubleshooting This section contains general troubleshooting information. USB Keys - Troubleshooting Boot Issues Due to different manufacturing processes on USB keys (and the variety of them), not all brands have been tested with the Wyse USB Firmware Tool. If you experience problems booting from a configured USB key, it is recommended that you try a different brand of USB key.
Installation Guide Wyse® C Class Conversion to WES7 Issue: 102910 Written and published by: Wyse Technology Inc.