User Guide 2.5” USB SATA HDD External Enclosure Model No.: XM-EN2251-BK XM-EN2251U3-BK For the most up-to-date information, please visit www.x-mediausa.com Version 1.
.5” USB SATA HDD External Enclosure Contents Package Contents ........................................................................................................... 3 Chapter 1 Product Overview …….………………….….……………………….………………………… 3 1.1 Introduction ……………………….…………………………………….………………….. 3 1.2 Features …….………………….….…..……………………………………………………… 4 1.3 System Requirement ………………...……………………………….…………………. 4 Chapter 2 Installation Guide ………………..…………………………………………..………………….. 4 2.1 Hardware Installation …………….………..……….
2.5” USB SATA HDD External Enclosure Package Contents The following items should be found in the package: Note: XM-EN2251-BK or XM-EN2251U3-BK External Enclosure case USB 2.0 Cable for XM-EN2251-BK or USB 3.0 Cable for XM-EN2251U3-BK User Guide Carrying Pouch The above list is for reference only. The actual content may differ according to the product you purchased. Please save the original packaging material for future reference.
2.5” USB SATA HDD External Enclosure 1.2 Features Support most 2.5” SATA I/II/III HDD USB 2.0 data transfer rate up to 480Mbps (Model: XM-EN2251-BK) USB 3.0 data transfer rate up to 5Gbps (Model: XM-EN2251U3-BK) Tool Free case design for easy installation USB Bus-Powered PC and MAC compatible Hot Swappable, Plug and Play LED indicator 1.3 System Requirement 2.
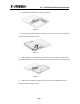
2.5” USB SATA HDD External Enclosure 2. Gently lift up the top cover as shown on Figure 2. Figure 2 3. Place your 2.5” SATA hard disk into the Enclosure and then push the hard disk into Enclosure SATA interface connector. Figure 3 4. Slightly align the top cover from the end of Enclosure to make sure it aligns with the middle plastic frame, then push down from front side on top cover to close the case. Figure 4 5.
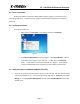
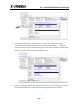
2.5” USB SATA HDD External Enclosure 2.2 Driver Installation No driver installation is required for USB enabled computer systems, as this enclosure uses natively installed driver. Supported operating systems should automatically detect and install the enclosure. 2.3 Verifying Installation To verify the installation: 1. Right click the icon Computer on the desktop, and then click Manage Figure 5 2. The Computer Management screen will appear.
2.5” USB SATA HDD External Enclosure 2. Locate the Disk that says it is “Unallocated”, then right-click in the section that says “Unallocated” and a new window will pop up, then select “New Partition”. Follow the instructions in the wizard to complete setting up the drive. Once completed, the Disk should show up as “Healthy” with a drive letter assigned (i.e.: G:). 3.