X-Micro Digital Photo Frame 100 User’s Manual V1.
INFORMATION TO USER Product Name: X-Micro Digital Photo Frame 100 Model Name: XPFA-STD, XPFA-128, XPFA-256, XPFA-512, This device complies with Part 15 of the FCC Rules. Operation is subject to the following two conditions:(1)this device may not cause harmful interference,and (2) this device must accpt any interference received, including interference that may cause undesired operation. Conforms to the following EMC Product Testing Specifications FCC part 15.109, Class B-Residential Emissions at 3 meters.
Copyright Copyright 2006 by X-Micro Technology Corp., All rights reserved. No part of this publication may be reproduced, transmitted, transcribed, stored in a retrieval system, or translated into any language or computer language, in any form or by any means, electronic, mechanical, magnetic, optical, chemical, manual or otherwise, without the prior written permission of XMicro Technology Corp. Disclaimer X-Micro Technology Corp.
Index English………………………………………………………………………4 German………………………………………………………………………12 French…………………………………………………….…………………21 Dutch……………………………….…………..……………………………29 Spanish………………………………………………………………………37 Italian………………………………………………………………………….
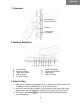
ENGLISH 1. Overview SD/MMC/Sony Memory Stick Slot USB Port DC IN Plug for AC Adapter 2. Buttons Definition A. B. C. D. E. Power button Left Arrow button Right Arrow button Manual button Up Arrow button F. G. H. I. Down Arrow button Circular Arrow button Scale button USB Connector 3. How To Use 1. Using the AC Adapter that shipped with your Digital Photo Frame connect the AC Adapter to the plug labeled “DC In” on the Photo Frame. 2.
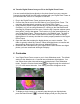
Transfer Digital Photos from your PC to the Digital Photo Frame You can transfer digital photos directly to the photo frame from your computer. Connect the wide end of the USB cable enclosed with your Digital Photo Frame to your Windows ME, 2000 or XP computer’s USB slot. 1. Plug in the Digital Picture Frame and press power to turn it on. 2. Connect the narrow end of the USB cable to your Digital Photo Frame. The computer will automatically recognize your Digital Photo Frame. 3.
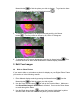
Manual button to find the photo you wish to display. To go back to Auto- Slideshow mode press the Auto-Slideshow button . Aplicando zoom 2 X a PICT0025.JPG 3. To rotate a digital photo by 90 degree intervals push the Left Arrow button . You may rotate an image by 90, 180 or 270 degrees. Rotation: 90 Degrees … 4. To change the LCD screen brightness press the Up Arrow button function will work in either Auto-Slideshow or Manual display mode. .
4. Press the Right Arrow button on the display. and Hide Image in Slideshow will appear Hide Image In Slideshow 5. If you want to reverse this choice press the Right Arrow button Show Image in Slideshow will appear on the screen. again and Show Image In Slideshow 6. Press the Auto-Slideshow button to restart the Auto-Slideshow mode. Starting Slideshow … Copy a Photo The Digital Photo Frame allows you to copy a digital photo from removable media to the built-in memory in the Photo Frame.
1. Enter Manual display mode by pressing the Manual button Manual button . Use the to find the photo you want to copy. 2. Use the Down Arrow button to call up the Function Menu. Make sure that Copy Image to Built-in Memory is highlighted. If not use the Down Arrow to scroll through the Menu. 3. Use the Right Arrow button to select the function highlighted in yellow and the Photo Frame will return to the photo you have selected. 4. Press the Right Arrow button will appear on the screen.
Photo Frame, the Photo Frame will delete photos from the last-inserted removable media. 1. Enter Manual display mode by pressing the Manual button Manual button . Use the to find the photo you want to delete. 2. Use the Down Arrow button to call up the Function Menu. Make sure that Delete Image From Media is highlighted. If not use the Down Arrow to scroll through the Menu. 3.
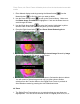
4x to view in Auto-Slideshow or Manual mode. In addition you are able to pan and scan the image to highlight the specific image you want to see. 2. Enter Manual display mode by pressing the Manual button Manual button . Use the to find the photo you want to zoom. to call up the Function Menu. Make sure 3. Use the Down Arrow button that Enter Zoom Mode is highlighted. If not use the Down Arrow to scroll through the Menu. 4.
select the desired photo. Press the scale 16:9 button once to crop photo by 5 percent. The max crop is 35 percent ,if the photo is cropped by 35 percent , the scale of length and width is 16:9. 13. Press the Auto-Slideshow button to return to the Auto-Slideshow mode.
GERMAN 1. Übersicht SD/MMC/Sony Memory Stick-Steckplatz USB-Anschluss Gleichstrom-eingang für das Netzteil 2. Tastenbeschreibung A. B. C. D. E. Stromschalter Links-Pfeiltaste Rechts-Pfeiltaste Manuell-Taste Auf-Pfeiltaste F. G. H. I. Ab-Pfeiltaste Kreis-Pfeiltaste Skalierungstaste USB-Anschluss 3. Verwenden i. ii. Verbinden Sie das dem Digitalbildrahmen beigelegte Netzteil mit dem als "DC In" gekennzeichneten Anschluss am Bildrahmen.
iii. Drücken Sie den Stromschalter Ihre Digitalbilder an. . Der Digitalbildrahmen zeigt daraufhin Übertragen von Digitalbildern von Ihrem PC zu dem Digitalbildrahmen Sie können Digitalbilder direkt von Ihrem Computer zu dem Bildrahmen übertragen. Verbinden Sie das größere Ende des dem Digitalbildrahmen beigelegten USB-Kabels mit einem USB-Anschluss an Ihrem Windows ME-, 2000- oder XP-Computer. 1. Drücken Sie den Stromschalter am Digitalbildrahmen, um ihn einzuschalten. 2.
Sechs Sekunden Verzögerung 2. Um ein einziges Bild anzuzeigen oder die Digitalbilder manuell zu wechseln, drücken Sie bitte die Manuell-Taste . Im Manuell-Anzeigemodus können Sie durch Drücken der Manuell-Taste das gewünschte Bild suchen. Drücken Sie die Auto-Diashow-Taste Diashowmodus zu wechseln. , um in den Auto- Die Diashow wird gestartet… 3. Durch Drücken auf die Links-Pfeiltaste können Sie ein Digitalbild jeweils um 90 Grad drehen. Sie können ein Bild um 90, 180 oder 270 Grad drehen.
5. Bearbeiten Ihrer Bilder Aus- oder Einblenden der Bilder Sie können folgendermaßen ein Foto auf dem Digitalbildrahmen verstecken oder wieder anzeigen lassen. 1. Wechseln Sie durch Drücken der Manuell-Taste Anzeigemodus. Verwenden Sie die Manuell-Taste versteckende Bild zu suchen. in den Manuell, um das zu , um das Funktionsmenü aufzurufen. 2. Drücken Sie die Ab-Pfeiltaste Stellen Sie sicher, dass die Funktion Show/Hide Image in Slideshow [In der Diashow einblenden/ausblenden] aktiviert ist.
6. Drücken Sie die Auto-Diashow-Taste zu starten. , um den Auto-Diashowmodus neu Die Diashow wird gestartet… Kopieren eines Bildes Der Digitalbildrahmen erlaubt Ihnen ein Digitalbild von einem Wechseldatenträger in den integrierten Speicher des Bildrahmens zu kopieren. Sie können ebenfalls ein Digitalbild von dem integrierten Speicher in den Wechseldatenträger kopieren. 1. Wechseln Sie durch Drücken der Manuell-Taste Anzeigemodus. Verwenden Sie die Manuell-Taste kopierende Bild zu suchen.
5. Drücken Sie die Rechts-Pfeiltaste. Der Text Copying Selected Image to Built-in Memory [Ausgewähltes Bild in den integrierten Speicher kopieren] wird auf dem Bildschirm angezeigt. Ihr Bild wird von dem Wechseldatenträger in den integrierten Speicher des Bildrahmens kopiert. Ausgewähltes Bild in den integrierten Speicher Löschen eines Bildes Der Digitalbildrahmen erlaubt Ihnen ein Digitalbild von einem Wechseldatenträger oder dem integrierten Speicher des Bildrahmens zu entfernen.
Löschtaste zur Bestätigung drücken... 5. Drücken Sie die Rechts-Pfeiltaste. Der Text Deleting Selected Image [Ausgewähltes Bild löschen] und anschließend die Meldung Image Deleted Successfully [Bild erfolgreich gelöscht] wird auf dem Bildschirm angezeigt. Ausgewähltes Bild löschen … 6. HINWEIS: Sie können mit Hilfe der Manuell-Taste ein weiteres zu löschendes Bild suchen.
4. Verwenden Sie die Rechts-Pfeiltaste, um Ihre Auswahl der gelb markierten Funktion zu bestätigen. Der Bildrahmen zeigt daraufhin das ausgewählte Bild an. 5. Drücken Sie noch einmal die Rechts-Pfeiltaste [Zoom/Schwenken]-Menü wird geöffnet. . Das Zoom Pan PICT0025.JPG mit 2X zoomen , um den gewünschten 6. Verwenden Sie die Ab-Pfeiltaste Vergrößerungsfaktor 2x, 3x oder 4x zu markieren. 7. Drücken Sie die Rechts-Pfeiltaste . Das Bild wird daraufhin mit dem ausgewählten Vergrößerungsfaktor angezeigt. 8.
Rechts-Pfeiltaste . Drücken Sie immer wieder auf die Manuell-Taste , um das gewünschte Bild auszuwählen. Drücken Sie einmal die Skalierung 16:9-Taste , um das Bild um 5 Prozent zuzuschneiden. Das Bild darf maximal um 35 Prozent zugeschnitten werden. Wenn das Bild um 35 Prozent zugeschnitten ist, dann ist die Skalierung der Länge und Breite 16:9. 13. Drücken Sie die Auto-Diashow-Taste zurückzukehren.
FRENCH 1. Vue d'ensemble Fente SD/MMC/Sony Memory Stick Port USB Prise DC IN pour adaptateur AC 2. Définition des boutons A. B. C. D. E. Bouton d'alimentation Bouton fléché gauche Bouton fléché droite Bouton manuel Bouton fléché haut F. G. H. I. Bouton fléché bas Bouton fléché circulaire Bouton d'échelle Connecteur USB 3. Comment utiliser 1. A l'aide de l'adaptateur AC livré avec votre cadre photo numérique, branchez l'adaptateur AC sur la prise marquée “DC In” sur le cadre photo. 2.
3. Appuyez sur le bouton d'alimentation , le cadre photo numérique commence à afficher vos photos numériques. Transférez vos photos numériques à partir de votre PC vers votre cadre photo numérique. Vous pouvez transférer vos photos numériques directement vers le cadre photo à partir de votre ordinateur. Branchez l'extrémité large du câble USB fourni avec votre cadre photo numérique sur le slot USB de votre ordinateur Windows ME, 2000 ou XP. 1.
Délai de six secondes 2. Pour afficher une image unique ou pour faire défiler manuellement vos photos . En mode d'affichage numériques, appuyez sur le bouton Manuel manuel, vous pouvez appuyer sur le bouton Manuel pour trouver la photo que vous voulez afficher. Pour revenir en mode Diaporama Auto, appuyez sur le bouton Diaporama Auto . Démarrage du diaporama… 3. Pour faire pivoter la photo numérique par intervalles de 90 degrés, appuyez sur le bouton fléché gauche ou 270 degrés. .
5. Éditer vos Images Montrer ou cacher des Photos Si vous voulez cacher ou réintroduire une photo pour l'affichage sur votre cadre photo numérique, vous pouvez le faire de la façon suivante. 1. Passez en mode d'affichage Manuel en appuyant sur le bouton Manuel Utilisez le bouton Manuel . pour trouver la photo que vous voulez cacher. 2. Utilisez le bouton fléché bas pour appeler le menu Fonction. Assurezvous que Show/Hide Image in Slideshow (Montrer/Cacher l'image dans le diaporama) est cochée.
Démarrage du diaporama… Copier une photo Le cadre photo numérique vous permet de copier une photo numérique à partir du média amovible vers la mémoire intégrée du cadre photo. Vous pouvez copier une photo numérique à partir de la mémoire intégrée vers le média amovible. 1. Passez en mode d'affichage Manuel en appuyant sur le bouton Manuel Utilisez le bouton Manuel . pour trouver la photo que vous voulez copier. 2. Utilisez le bouton fléché bas pour appeler le menu Fonction.
Copie de l'image sélectionnée vers la mémoire intégrée Supprimer une photo Le cadre photo numérique vous permet de supprimer une photo numérique à partir du média amovible ou de la mémoire intégrée. REMARQUE: Si vous avez un média amovible inséré dans le cadre photo numérique, le cadre photo supprime les photos de ce média et non de la mémoire intégrée. Si vous voulez supprimer des photos de la mémoire intégrée, enlevez tous les médias amovibles du cadre photo.
5. Appuyez de nouveau sur la flèche droite et Deleting Selected Image (Suppression de l'image sélectionnée) suivi de Image Deleted Successfully (Suppression d'image réussie) apparaît à l'écran. Suppression de l'image sélectionnée … 6. REMARQUE: Vous pouvez utiliser le bouton Manuel pour trouver une autre photo à supprimer.
6. Utilisez le bouton fléché bas vous préférez, 2x, 3x ou 4x. pour sélecter le taux d'agrandissement que 7. Appuyez sur le bouton fléché droite zoom que vous avez choisi. et la photo s'affiche avec le taux de 8. Si vous voulez inverser ce choix, appuyez sur le bouton Manuel pour revenir au menu de déplacement zoom. 9. Si vous êtes satisfait de l'image zoomée, utilisez les boutons haut, bas, droite, gauche pour repérer l'image exacte que vous voulez afficher dans votre cadre photo.
DUTCH 1. Overzicht SD/MMC/Sony Memory Stick-sleuf USB-poort Gelijkstroomingang voor wisselstroomadapter 2. Definitie knoppen A. B. C. D. E. Voedingsknop Knop pijl links Knop pijl rechts Knop handmatig Knop pijl omhoog F. G. H. I. Knop pijl omlaag Knop cirkelvormige pijl Knop schaal USB-aansluiting 3. Gebruiksaanwijzing 1. Sluit de wisselstroomadapter die bij uw digitale fotolijst is geleverd aan op de aansluiting met de benaming "DC In" op de fotolijst. 2.
Digitale foto's overdragen van uw pc naar de digitale fotolijst U kunt digitale foto's rechtstreeks vanaf uw computer overdragen naar de fotolijst. Stop het brede uiteinde van de USB-kabel die bij uw digitale fotolijst is geleverd, in de USB-aansluiting van een computer die werkt met Windows ME, 2000 of XP. 1. Sluit de digitale fotolijst aan en druk op de voedingsknop om de lijst in te schakelen. 2. Sluit het smalle uiteinde van de USB-kabel aan op uw digitale fotolijst.
2. Druk op de knop Handmatig om één foto weer te geven of handmatig door uw digitale foto's te bladeren. In de handmatige weergavemodus kunt u op de knop Handmatig drukken om de foto te zoeken die u wilt weergeven. Druk op de knop Automatische diavoorstelling keren naar de automatische diavoorstellingsmodus. om terug te Diavoorstelling wordt gestart… om een digitale foto met een interval van 90 3. Druk op de knop Pijl links graden te draaien. U kunt een foto 90, 180 of 270 graden draaien.
2. Gebruik de knop Pijl omlaag om het functiemenu te openen. Zorg ervoor dat de optie Show/Hide Image in Slideshow (Foto weergeven/verbergen in diavoorstelling) is ingeschakeld. Als dat niet het geval is, druk dan op de Pijl omlaag om door het menu te schuiven. 3. Gebruik de knop Pijl rechts om de functie die in het geel is gemarkeerd te selecteren. De fotolijst zal terugkeren naar de foto die u hebt geselecteerd. 4. Druk op de knop Pijl rechts .
Een foto kopiëren Met de digitale fotolijst kunt u een kopie maken van een digitale foto vanaf een verwisselbaar medium naar het interne geheugen van de fotolijst. U kunt ook een digitale foto kopiëren vanaf het interne geheugen naar een verwisselbaar medium. 1. Ga naar de handmatige weergavemodus door de op de knop Handmatig te drukken. Gebruik de knop Handmatig kopiëren. om de foto te zoeken die u wilt 2. Gebruik de knop Pijl omlaag om het functiemenu te openen.
Een foto verwijderen Met de digitale fotolijst kunt u een digitale foto verwijderen van een verwisselbaar medium of van het interne geheugen. OPMERKING: Als er verwisselbare media in de digitale fotolijst zijn geplaatst, zal de fotolijst foto's van deze media verwijderen en niet uit het interne geheugen. Als u foto's uit het interne geheugen wilt verwijderen, moet u alle verwisselbare media uit de fotolijst verwijderen.
Geselecteerde foto verwijderen… 6. OPMERKING: U kunt de knop Handmatig gebruiken om een andere foto die u wilt verwijderen, te zoeken. U blijft in de modus Foto verwijderen tot u een andere selectie maakt in het functiemenu of tot de digitale fotolijst opnieuw in de automatische diavoorstellingsmodus wordt geplaatst door op de knop Automatische diavoorstelling te drukken. Zoom 1. Met de digitale fotolijst kunt u de manier waarop uw digitale foto's worden weergegeven, aanpassen.
6. Gebruik de knop Pijl omlaag om de vergrotingsfactor van uw voorkeur te markeren. U hebt de keuze tussen 2x, 3x en 4x. en de foto wordt weergegeven in de door u 7. Druk op de knop Pijl rechts gekozen zoomfactor. 8. Als u deze keuze wilt ongedaan maken, drukt u op de knop Handmatig om terug te keren naar het menu voor het zoomen en pannen. 9.
SPANISH 1. Información general Retardo de seis segundos Ranura para tarjetas SD, MMC y Sony Memory Stick Puerto USB Enchufe de ENTRADA DE CC para el adaptador de CA 2. Definición de los botones A. B. C. D. E. Botón Encendido Botón Dirección izquierda Botón Dirección derecha Botón Manual Botón Dirección arriba F. G. H. I. Botón Dirección abajo Botón Dirección circular Botón Escala Conector USB 3. Uso 1.
3. Presione el botón Encendido . El Marco digital para fotografías comenzará a mostrar las fotografías digitales. Transferir fotografías digitales desde su PC al Marco digital para fotografías Puede transferir fotografías directamente al marco para fotografías desde su PC. Conecte el extremo ancho del cable USB incluido con el Marco digital para fotografías a la ranura USB del equipo en el que está instalado el sistema operativo Windows ME, 2000 o XP. 1.
Retardo de seis segundos 2. Para mostrar una sola imagen o recorrer manualmente las fotografías digitales, presione el botón Manual . En el modo de visualización Manual puede presionar el botón Manual para buscar la fotografía que desea mostrar. Para volver al modo de presentación automática de diapositivas, presione el botón del mismo nombre . Iniciando presentación de diapositivas … 3. Para girar una fotografía digital en intervalos de 90 grados, presione el botón Dirección izquierda .
5. Editar imágenes Ocultar o mostrar fotografías Si desea ocultar o volver a mostrar una fotografía para verla en el Marco digital para fotografías, puede hacerlo siguiendo el procedimiento que se describe a continuación: 1. Entre en el modo de visualización Manual presionado el botón del mismo . Utilice el botón Manual nombre desea ocultar. para buscar la fotografía que 2. Utilice el botón Dirección abajo para abrir el menú Function (Función).
6. Presione el botón Presentación automática de diapositivas el modo del mismo nombre. para reiniciar Iniciar presentación de diapositivas… Copiar una fotografía El Marco digital para fotografías permite copiar una fotografía digital desde el medio extraíble en la memoria integrada del primero. Puede copiar una fotografía digital desde la memoria integrada en el medio extraíble. 1. Entre en el modo de visualización Manual presionado el botón del mismo nombre . Utilice el botón Manual desea copiar.
memoria integrada) aparecerá en la pantalla. La fotografía se copiará desde la memoria extraíble en la memoria integrada del marco para fotografías. Copiando la imagen seleccionada en la memoria integrada Eliminar una fotografía El Marco digital para fotografías permite eliminar una fotografía digital del medio extraíble o de la memoria integrada. NOTA: si tiene un medio extraíble insertado en el Marco digital para fotografías, éste eliminará las fotos de dicho medio y no las de la memoria integrada.
Presione de nuevo el botón Eliminar para confirmar la operación… 5. Presione de nuevo el botón Dirección derecha; los mensajes Deleting Selected Image (Eliminando la imagen seleccionada) e Image Deleted Successfully (Imagen eliminada correctamente) aparecerán en la pantalla. Eliminando la imagen seleccionada… 6. NOTA: puede utilizar el botón Manual para buscar otra fotografía que desee eliminar.
está resaltada. En caso contrario, utilice el botón Dirección abajo para desplazarse por el menú. 4. Utilice el botón Dirección derecha para seleccionar la función resaltada en amarillo. El marco para fotografías mostrará la foto seleccionada. 5. Presione el botón Dirección derecha zoom y panorámica. de nuevo para mostrar el menú de Aplicando zoom 2 X a PICT0025.JPG 6. Utilice el botón Dirección abajo desea: 2x, 3x o 4x. para resaltar el índice de ampliación que 7.
(Volver a la vista de imagen) y presione el botón Dirección derecha para mostrar fotografías. Presione el botón Manual repetidamente para seleccionar la fotografía que desea. Presione el botón de escala 16:9 una vez para recortar la fotografía un 5 por ciento. El recorte máximo es de un 35 por ciento. Si la fotografía se recorta un 35 por ciento, la escala de la longitud y la anchura será de 16:9. 13.
ITALIAN 1. Panoramica Alloggio SD/MMC/Memory Stick Sony Porta USB Presa DC IN (ingresso CC) per Adattatore CA 2. Definizione dei tasti A. B. C. D. E. Tasto alimentazione Tasto freccia sinistra Tasto freccia destra Tasto Manuale Tasto freccia su F. G. H. I. Tasto freccia giù Tasto freccia Circolare Tasto Scale (Scala) Connettore USB 3. Uso 1. Collegare l’adattatore CA fornito in dotazione alla Cornice digitale alla presa denominata “DC In” (ingresso CC) della cornice. 2.
Trasferire le foto digitali dal PC alla Cornice digitale Le foto digitali possono essere trasferite direttamente dal computer alla cornice. Collegare l’estremità più larga del cavo USB, fornito in dotazione alla Cornice digitale, alla porta USB del computer Windows ME, 2000 o XP. 1. Collegare la cornice digitale alla corrente elettrica ed accenderla usando l'interruttore d'alimentazione. 2. Collegare l’estremità più piccola del cavo USB alla Cornice digitale.
2. Per visualizzare una sola immagine, oppure per passare manualmente tra le foto digitali, premere il tasto Manuale . In modalità di visualizzazione Manual (Manuale), premere il tasto Manuale per trovare la foto che si vuole visualizzare. Premere il tasto Auto-Slideshow (Presentazione automatica) automatica). per tornare alla modalità Auto-Slideshow (Presentazione Avvio presentazione … 3. Premere il tasto freccia sinistra per ruotare di 90 gradi, ad ogni pressione, la foto digitale.
2. Usare il tasto la freccia giù per richiamare il menu Function (Funzioni). Assicurarsi che la voce Show/Hide Image in Slideshow (Mostra/Nascondi immagine dalla presentazione) sia selezionata. Diversamente usare la freccia giù per scorrere nel menu. 3. Usare il tasto freccia destra per selezionare la funzione evidenziata in giallo; la Cornice digitale tornerà alla foto che è stata selezionata. 4.
Copiare le foto La Cornice digitale consente di copiare le foto digitali da un supporto rimovibile alla memoria integrata della cornice. Si possono anche copiare le foto digitali dalla memoria integrata ai supporti rimovibili. 1. Premere il tasto Manuale per accedere alla modalità di visualizzazione Manual (Manuale). Usare il tasto Manuale vuole copiare. per trovare la foto che si 2. Usare il tasto la freccia giù per richiamare il menu Function (Funzioni).
Eliminare le foto La Cornice digitale consente di eliminare le foto digitali dai supporti rimovibili oppure dalla memoria integrata. NOTA: se nelIa Cornice digitale è inserito un supporto rimovibile, saranno le foto del supporto e non quelle della memoria integrata ad essere eliminate. Per eliminare le foto della memoria integrata è necessario rimuovere tutti i supporti rimovibili dalla Cornice digitale.
Eliminazione in corso dell’immagine selezionata … 6. NOTA: usare il tasto Manuale per trovare un’altra foto da eliminare. Si resterà in modalità Delete Image (Eliminazione immagini) finché si sceglie un’altra selezione dal menu Function (Funzioni), oppure fino a quando la Cornice digitale non è rimessa in modalità Auto-Slideshow (Presentazione automatica) premendo il tasto Auto-Slideshow (Presentazione automatica). Zoom 1.
Ingrandimento 2X dell’immagine PICT0025.JPG 6. Usare il tasto freccia giù preferito tra 2x, 3x o 4x. 7. Premere il tasto freccia destra d’ingrandimento scelto. per evidenziare il fattore d’ingrandimento e la foto sarà visualizzata con il fattore 8. Per annullare questa azione, premere il tasto Manuale per tornare al menu Zoom Pan (Panoramica zoom). 9.
13.
PORTUGESE 1. Vista Geral Ranhura para Estilete de Memória SD/MMC/Sony Porta USB Ficha DC IN para Adaptador de AC 2. Definição dos Botões A. B. C. D. E. Botão Corrente Botão Seta para a Esquerda Botão Seta para a Direita Botão Manual Botão de Seta para Cima F. G. H. I. Botão de Seta para Baixo Botão de Seta Circular Botão de Escala Conector USB 3. Como Usar 1.
3. Pressione o botão Power , o Quadro Fotográfico Digital começará a mostrar as suas fotos digitais. Transfira Fotos Digitais do seu PC para o seu Quadro Fotográfico Digital Pode transferir directamente fotos digitais para o quadro fotográfico do seu computador. Conecte a extremidade larga do cabo USB incluído com o seu Quadro Fotográfico Digital à ranhura USB do seu computador com Windows ME, 2000 ou XP. 1. Ligue a ficha do Quadro de Imagem Digital e pressione o botão Power para o ligar. 2.
Intervalo de Seis Segundos 2. Para visualizar uma imagem simples ou para passar manualmente pelas fotos . No modo de visualização Manual, digitais, pressione o botão Manual pode pressionar o botão Manual para encontrar a foto que deseja visualizar. Para voltar ao modo Auto-Slideshow (Apresentação Automática de Diapositivos) pressione o botão Auto-Slideshow (Apresentação Automática de Diapositivos) . A Iniciar a Apresentação de Diapositivos … 3.
5. Edite as suas Imagens Ocultar ou Mostrar Fotos Se quiser ocultar ou reintroduzir uma foto para visualização no seu Quadro Fotográfico Digital pode fazê-lo da forma seguinte. 1. Entre no modo de visualização Manual pressionando o botão Manual Use o botão Manual . para encontrar a foto que deseja ocultar. 2. Use o botão da Seta para Baixo para chamar o Menu Function (Função). Certifique-se de que Show/Hide Image in Slideshow (Mostrar/Ocultar Imagem na Apresentação de Diapositivos) está marcada.
6. Pressione o botão Auto-Slideshow (Apresentação Automática de Diapositivos) para reiniciar o modo Auto-Slideshow (Apresentação Automática de Diapositivos). A Iniciar a Apresentação de Diapositivos … Copiar uma Foto O Quadro Fotográfico Digital permite-lhe copiar uma foto digital do meio amovível para a memória incorporada no Quadro Fotográfico. Pode copiar uma foto digital da memória incorporada para cima do meio amovível. 1.
para a Memória Incorporada). A sua foto foi copiada da memória amovível para a memória incorporada no Quadro Fotográfico. A Copiar a Imagem Seleccionada para a Memória Incorporada Eliminar uma Foto O Quadro Fotográfico Digital permite-lhe eliminar uma foto digital de qualquer um dos meios amovíveis ou da memória incorporada. NOTA: Se tiver um meio amovível inserido no Quadro Fotográfico Digital, o Quadro Fotográfico eliminará as fotos desse meio e não da memória incorporada.
Pressione Novamente o Botão Delete para Confirmar … 5. Pressione novamente a Seta para a Direita e aparecerá no ecrã Deleting Selected Image (A Eliminar a Imagem Seleccionada) seguido por Image Deleted Successfully (Imagem Eliminada com Sucesso). A Eliminar a Imagem Seleccionada … 6. NOTA: Pode usar o botão Manual para encontrar outra foto a eliminar.
4. Use o botão da Seta para a Direita para seleccionar a função destacada a amarelo e o Quadro Fotográfico voltará à foto que seleccionou. 5. Pressione novamente o botão Seta para a Direita Zoom Pan (Zoom Panorâmico). e aparecerá o Menu A efectuar o zoom de PICT0025.JPG em 2X para destacar o ratio de ampliação 6. Use o botão da Seta para Baixo desejado: 2x, 3x ou 4x. 7. Pressione o botão da Seta para a Direita ratio de zoom que escolheu. e a foto será visualizada com o 8.
para cortar a foto em 5 por cento. Se a foto for cortada em 35 por cento, a escala de comprimento e largura é 16:9. 13.
RUSSIAN 1. Обзор Разъем для карт памяти SD, MMC, Sony Memory Stick USB-порт Разъем питания постоянного тока для блока питания 2. Описание клавиш A. B. C. D. E. Кнопка питания Кнопка Влево Кнопка Вправо Кнопка ручного режима Кнопка Вверх F. G. H. I. Кнопка Вниз Кнопка с круговой стрелкой Кнопка масштабирования Разъем USB 3. Порядок использования 1. Подключите блок питания, поставляемый вместе с цифровой фоторамкой, к разъему, обозначенному надписью «DC In», фоторамки. 2.
Передача цифровых фотографий с компьютера на цифровую фоторамку. Цифровые фотографии можно передавать с компьютера непосредственно на цифровую фоторамку. Подсоедините широкий конец USB-кабеля, поставляемого с фоторамкой, к разъему USB компьютера, на котором установлена ОС Windows ME, 2000 или XP. 1. Подключите цифровую фоторамку к электросети и нажмите кнопку питания, чтобы включить ее. 2. Подсоедините узкий конец USB-кабеля к цифровой фоторамке. Компьютер автоматически распознает цифровую фоторамку. 3.
6-секундная задержка 2. Для отображения одного изображения или для переключения . Для поиска фотографий вручную нажмите кнопку ручного режима фотографии, которую необходимо отобразить, в ручном режиме отображения нажмите кнопку ручного режима . Для переключения в режим автоматического слайд-шоу нажмите кнопку автоматического слайд-шоу . Начало слайд-шоу... 3. Для поворота фотографии на 90 градусов нажмите кнопку Влево Фотографии можно поворачивать на 90, 180 и 270 градусов. . Поворот на 90 градусов...
5. Изменение изображений Скрытие или отображение фотографий Скрыть или открыть для отображения фотографию в цифровой рамке можно описанным ниже образом. 1. Переключитесь в ручной режим нажатием кнопки ручного режима помощью кнопки ручного режима необходимо скрыть. .С выберите фотографию, которую 2. Нажатием кнопки Вниз вызовите меню Function (Функция). Убедитесь, что установлен флажок Show/Hide Image in Slideshow (Отображать/скрыть изображение в слайд-шоу).
6. Нажмите кнопку автоматического слайд-шоу режим автоматического слайд-шоу. для переключения в Начало слайд-шоу… Копирование фотографии Цифровая фотокамера позволяет копировать цифровые фотографии со съемного носителя во внутреннюю память фоторамки. Также цифровые фотографии можно копировать из внутренней памяти на съемный носитель. 1. Переключитесь в ручной режим нажатием кнопки ручного режима . Для поиска фотографии, которую необходимо скопировать, используйте кнопку ручного режима . 2.
5. Повторно нажмите кнопку «Вправо» и на экране отобразится сообщение Copying Selected Image to Built-in Memory (Копирование выбранного изображения во внутреннюю память). Фотография будет скопирована со съемного носителя во внутреннюю память фоторамки. Копирование выбранного изображения во внутреннюю память… Удаление фотографии Цифровая фоторамка позволяет удалить цифровую фотографию из внутренней памяти и со съемного носителя. ПРИМЕЧАНИЕ.
Повторно нажмите кнопку удаления для подтверждения... 5. Повторно нажмите кнопку Вправо, на экране отобразится сообщение Deleting Selected Image (Удаление выбранного изображения), а затем Image Deleted Successfully (Изображение удалено). Удаление выбранного изображения... 6. ПРИМЕЧАНИЕ. Для выбора следующей фотографии, которую необходимо удалить, используйте кнопку ручного режима.
масштабирования). Если этот флажок не установлен, используйте кнопку Вниз для прокрутки пунктов меню. 4. Для выбора выделенного желтым цветом пункта нажмите кнопку Вправо, фоторамка переключится к выбранной фотографии. 5. Нажмите кнопку Вправо повторно, отобразится меню масштабирования и панорамирования. Увеличение PICT0025.JPG в 2 раза 6. С помощью кнопки Вниз выберите значение коэффициента увеличения – в 2, 3 или 4 раза. 7.
нажимайте кнопку ручного режима . Один раз нажмите кнопку отображения в масштабе 16:9 для обрезания фото на 5%. Максимальная величина обрезания – 35%, при соотношение ширины и длины будет составлять 16:9. 13. Нажмите кнопку автоматического слайд-шоу режим автоматического слайд-шоу.
http://www.x-micro.