
User Guide

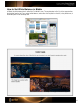


HSL Sliders
One way to describe colors is by Hue, Saturation, and Lightness (or Brightness). Most photo editing applications
offer HSL sliders to help you make specific color edits to these three characteristics.
• Hue is the main attribute of color that distinguishes it from others, such as red, yellow and green.
• Saturation describes how vivid or pure a color is.
• Lightness describes a color’s lightness or darkness.
Treat your profile as a starting point, then use the color and tone rendering controls to make specific adjustments.
In Camera Raw, these sliders are located in the “Hue-Saturation-Luminance” tab. In Lightroom, they can be found
in the “Develop” dialog.
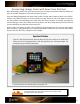
Visual Comparison
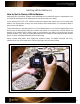
Visually comparing the colors in an image to a physical target will help you make educated color decisions. These
steps are written for Lightroom
but are almost identical in Photoshop.
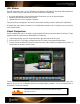
1. In the Develop window, select the Target tool from the upper left corner of the HSL panel.
2. Roll over the colors. They roughly correspond with the HSL sliders in the Lightroom
Develop dialog.
3. To select a color and make edits, either hold down the mouse button and move the target tool up or down, or
use the sliders or numbers in the HSL panel.
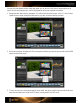
Further visual color matching is possible with the ColorChecker Color Rendition patches. When doing visual color
matching, be sure to use a calibrated monitor and controlled lighting conditions, such as a viewing booth, to
illuminate the ColorChecker Passport.
See the “Why Color Management?” section to learn more about the benefits of
calibrating your devices.