
User Guide


Highlight Clipping Correction
The Highlight Clipping patches can help verify whether you are holding details in the highlights and shadows. In
Adobe applications, use these patches along with the clipping preview to see if you are losing details. Here’s how to
do this in Lightroom
and Camera Raw.
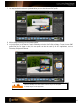
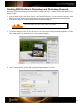
1. In the Histogram window, click on the triangles in the
corners to turn on the clipping preview for the shadow
and highlight areas.
2. Roll over the patches to check for blow out. There
should be a difference in value from one patch to the
next, and none of the values should be at 255 or
100%.
While editing an image, settings like brightness, exposure
and contrast can affect these values. If after adjusting
these settings you notice you have lost some highlight
detail, try using the Recovery tool to darken the highlight
without darkening the rest of the image. If these
adjustments do not bring back the highlight details, the shot was probably too over-exposed and can't be recovered.
Shadow Clipping Correction
Use the Shadow Clipping patches to verify whether you are holding details in the shadows. This is how it’s done in
Lightroom
and Camera Raw.
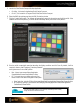
1. In the Histogram window, click on the triangles in
the corners to turn on the clipping preview for the
shadow and highlight areas.
2. Roll over the patches to check for blow out. There
should be a difference in value from one patch to
the next, and none of the values should be at 0.
Editing brightness, exposure, blacks and contrast can
affect these values. You may be able to open up
shadow details with the Fill Light tool, which will lighten
mostly in the shadow areas. If you unable to bring back
the details, the shot was probably too under-exposed.
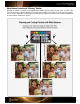
Warming and Cooling with White Balance
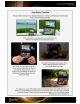
In addition to the white balance patch, the ColorChecker Creative Enhancement target includes blue patches for
warming portraits and red patches for cooling landscape images. Just like using lens filters with film, you can warm
up portraits to make flesh tones look healthier. Or if you’re shooting outside, you can alter the white point to achieve
richer blues and greens in a landscape.
Choosing a blue or red tint actually creates a new “neutral” to allow for a little more creativity. When you select a
warming or cooling patch, the white balance values will be corrected to the neutral values shown in the preview
window of whichever photo editing software you are using. For example, when selecting a warming patch, the
actual patch is a blue tint. The software will balance that sample patch to neutral, and all other colors will shift
slightly to the opposite of blue, which is yellow. Then, if you select a patch that is more blue, it will shift all of the
colors to more yellow.