
User Guide


The Complete Photo Workflow
There are many ways to use ColorChecker Passport in a digital photography workflow to improve both quality and
productivity. Here are a couple of examples to help you get started with either a Raw or JPEG workflow.
Raw Workflow
One of the touted benefits of the Raw workflow is that you can wait to make a lot of your decisions until you process
your Raw files. Although the back panel of your camera may not provide a very accurate preview, it can be
improved if you do a custom white balance.
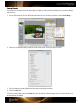
1. If you choose, set the in-camera white balance. This will not change any of the actual Raw data, but it can
speed up processing by providing a good suggested white balance for your images when you open them in
your Raw processing software.
See the “How to Set In-Camera White Balance” section for the steps.
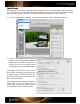
2. Capture the ColorChecker Passport, including the ColorChecker Classic and Creative Enhancement targets in
one image. When shooting Raw, you can do this anytime during the shoot.
See the “Tips for Capturing the ColorChecker Classic Target” and “Positioning
Options” for specific information.
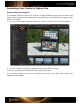
3. Capture your images under the same lighting conditions that you shot the targets. Each time you change light
conditions, shoot the targets again.
4. If you choose, use the ColorChecker Classic to build a custom DNG profile that encompasses your
camera/lighting/lens combination.
See the “Creating Profiles” section for instructions.
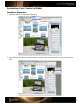
5. In the Raw processing software, select a DNG profile.
See the “Creating Profiles” section for more information about DNG profiles.
6. Select a white point. To use the custom in-camera white balance from when the image was shot, select As
Shot.