
User Guide


Camera Calibration and DNG Profiles
It all begins with the camera. If it doesn’t capture accurate color, how can you expect realistic reproduction?
The challenge lies in the fact that different cameras “see” color differently, and the way they capture it varies from
brand to brand. Different lenses have different color characteristics, which creates a bigger problem when you start
mixing camera and lens brands. But the truth is, even two camera models from the same manufacturer can capture
colors differently. Custom profiles will reduce the differences so they behave more alike. Adobe calls these profiles
DNG profiles or Camera Profiles and they are selected in the Camera Calibration sections of their Camera RAW
and Lightroom software.
Creating a custom white balance with the ColorChecker White Balance target will ensure you’re starting with
accurate color. Shooting a physical reference will make color corrections quicker, plus allow you to assign them to a
large batch of images for greater productivity. Before you know it, you’re working in a color-managed workflow.
Anyone who shoots color critical work, including studio product photography, fine art reproduction and high quality
portrait photos, can benefit from color management. Photographers who shoot large numbers of images on various
cameras - weddings, youth sport teams, yearbooks, and organization photo directories - will especially reap the
benefits of consistent color across different cameras.
Cameras that capture JPEG can benefit from improved in-camera white balance with ColorChecker targets for
further color fine-tuning, but cameras that shoot in a RAW format can benefit even more from custom profiles.
Why Custom DNG Profiles?
Most manufacturers offer standard profiles with their cameras, and your RAW processing software may even offer a
profile for your exact model. But if you are looking for true, accurate color, you need to create a custom profile
based on the RAW output from your camera in your shooting conditions.
Although it is possible to get the color you want through custom image editing, the faster, easier and more
consistent method is to start with good color from a custom profile; then apply your subjective edits.
Custom profiles can be especially useful when editing a lot of images that all need to be consistent, like from a big
event or a catalog shoot. If you are shooting an event with multiple cameras, ColorChecker Passport will minimize
color differences by providing a starting point for each image in all of the cameras. Then, back at the studio, you
can make all of your creative color edits from the same starting point.
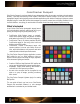
ColorChecker Passport’s Desktop Application is based on an advanced profiling technology that provides excellent
results with only 24 patches. To build a profile, simply photograph the ColorChecker Classic under even lighting;
ideally the same lighting you are using for your photo shoot. The ColorChecker Passport Desktop Application also
offers an option for an adaptive dual-illuminant DNG profiles to provide for better color across a wider range of
lighting conditions.
See “The Software” section for more information about capturing the
ColorChecker targets.