
User Guide


Color Management in a RAW Workflow
In the past, most camera calibration solutions required a controlled and consistent studio environment to obtain a
good profile, and usually only worked for TIFF or JPEG image formats. However, many of today’s photographers
are taking advantage of their camera’s full capabilities by capturing images in RAW format. ColorChecker Passport
has opened the door for these photographers by making the RAW calibration and profiling experience fast and
easy.
Shooting RAW provides greater flexibility to color-adjust images based on how a particular camera captures color.
A calibrated RAW workflow minimizes color differences between cameras and lenses, adapts for mixed lighting,
and makes it possible to color match across different scenes. You also have a greater capability to calibrate and
correct color because you’re starting with a consistent foundation. And shooting RAW enables you to apply color
management to a large number of files, automatically.
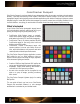
Adobe RAW processing software can make use of the ColorChecker Passport’s custom DNG profiles. If your RAW
processing application does not support custom DNG profiles, you can still use ColorChecker targets to provide a
physical reference for color editing. The target offers such things as exposure evaluation and one-click white
balancing for RAW editing packages that support these features.
Camera Calibration with Adobe
®
Photoshop
®
Lightroom
®
ColorChecker Passport comes with a Lightroom plug-in, which provides fast, automatic and reliable RAW camera
calibration to build DNG and dual-illuminant DNG profiles and installs them automatically. The profiles you create
can be used in Lightroom and Photoshop, as well as any other Adobe Camera RAW (ACR) program.
Adobe Camera RAW 4.5 and higher now supports custom DNG profiles, and is supported by Photoshop (CS3 and
later) and Elements 7 and up. Using the Lightroom plug-in with Lightroom 2 or higher, you can work seamlessly and
build custom DNG profiles without switching between multiple applications. Plus, Lightroom attempts to
automatically detect the ColorChecker target in your image, so most times you won’t even need to crop.
See “The Software” section for more information about Lightroom and its use
with ColorChecker Passport.
Benefits of a Calibrated Display
Have you ever wondered why the colors you see on your monitor don’t match the scene you photographed? That’s
because what you see on-screen is only as accurate as your display. Over time, the color performance of monitors
changes – phosphors and liquid crystals begin to fade, and the display’s colors will drift. Calibrating and profiling will
optimize your monitor’s settings and bring back the true colors.
Since your monitor is the only place for you to view your digital data in its native form, working on a calibrated
monitor can be indispensable for previewing edits and making color-critical decisions. Seeing colors as they’ll print
will save you the time associated with trial-and-error editing.
If you’re going to take the time to make custom DNG profiles, it just makes sense to take this easy step to ensure
you’re seeing true colors so your edits are actually making the changes you want.