
User Guide


White Balance
Starting with an accurate white balance is critical in any photo workflow because it ensures the colors you are
capturing are true and provides a point of reference for post-shoot editing. With ColorChecker Passport, you can
easily edit the white balance to achieve a custom warmer or cooler look.
What is White Balance?
Light comes in many different qualities and colors. Daylight can appear bluish or yellowish. Artificial indoor lighting
can range from a warm, yellowish tungsten light to the greenish hue you see in offices and shops. Since the human
eye does a great job of compensating for all of these different color light sources, our perception adjusts without us
really noticing. However, since cameras see light literally, these subtle shifts can pose a problem.
When using film, photographers have to select a specific film type or change filters on their lenses to make sure
their whites were actually white and their grays remained gray. In some cases, a photographer might even use a
filter to artificially add warmth to an image. This process is what we now call “white balancing”.
Digital cameras make white balancing easier, but they aren’t perfect. Most include a range of preset white balance
settings, such as tungsten, fluorescent, daylight, flash, cloudy, and shade. These settings are based on averages,
so they don’t necessarily represent the actual lighting you are shooting under, and they can’t easily or accurately
account for mixed or blended lighting.
Out-of-the-box, your digital camera’s “Auto White Balance” is pretty good at correcting for ambient light color, but it
can be fooled. For example, a camera may not be very accurate at selecting a white balance under low lighting, and
may even add a color cast.
The ColorChecker White Balance target provides a starting point for all edits, reducing the time and effort required
to get accurate color. Plus, camera previews and software histograms can be judged more precisely. Without a
standard reference like the ColorChecker Passport, you’ll spend a lot more time color correcting each image
manually.
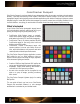
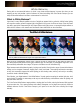
The Effect of White Balance
The only difference between these images is the applied white balance.