PlateScope™ User Guide
PLATESCOPE CE Declaration Manufacturer's Name: X-Rite, Incorporated Authorized Representative: X-Rite, Incorporated Siemensstraße 12b • 63263 Neu-Isenburg • Germany Phone: +49 (0) 61 02-79 57-0 • Fax: +49 (0) 61 02 -79 57-57 Model Name: Model No.
PLATESCOPE Proprietary Notice The information contained in this manual is derived from patent and proprietary data of X-Rite, Incorporated. The contents of this manual are the property of X-Rite, Incorporated and are copyrighted. Any reproduction in whole or part is strictly prohibited. Publication of this information does not imply any rights to reproduce or use this manual for any purpose other than installing, operating, or maintaining this instrument.
PLATESCOPE Table of Contents Introduction and Setup How to Use this Manual Packaging Applying Power Power Modes Instrument’s Internal Clock Charging the Batteries Attaching the AC Adapter Connecting the USB Cable User Interface Main Screen Overview Battery Gauge Instrument Controls Taking a Measurement Configuration Mode Accessing Configuration Mode Idle Screen Setting Time and Date Format Language Setting Units Setting Plate Setting Information Mode Load Defaults Calibration Mode Calibrating the Instru
PLATESCOPE Introduction and Setup The PlateScope instrument accurately measures even the most difficult low-contrast, chemistryfree and processless plates. The PlateScope also maintains accuracy in extreme highlights and shadows.
PLATESCOPE Applying Power The Select button is used to initiate the instrument from a power down state. Simply press the button to turn on the instrument. If the instrument does not power up after pressing the Select button, the batteries may require charging. Refer to Charging the Batteries. When first powered up, the instrument goes through a diagnostics test before the main menu appears.
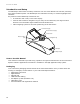
PLATESCOPE Charging the Batteries Your new PlateScope comes in a discharged condition and must be charged before use (up to 4 hours for full charge). Upon initial use (or after a prolonged storage period), the batteries (X-Rite P/N SE15-38) may require three to four charge/discharge cycles before achieving maximum capacity. It is normal for a battery to become warm during charging and discharging. It is important to condition (fully discharge and then fully charge) the battery every two to three months.
PLATESCOPE Connecting the USB Cable IMPORTANT: You must install the PQS software before connecting the instrument to your computer. NOTE: FOR WINDOWS USERS: During software installation on a Windows system, you may be instructed by the operating system that the software you are installing has not passed the Windows Logo testing. Please ignore this warning by clicking the Continue Anyway button. 1. Install the PQS application if not already installed. 2.
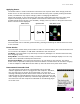
PLATESCOPE User Interface Main Screen Overview When the instrument is powered-up, the main (top level) screen appears after the diagnostics test is complete. The main screen consists of the title bar and operation modes. The title bar at the top displays the battery gauge and a USB icon. The USB icon appears when the instrument is plugged into the computer. The title bar also displays the mode of operation the instrument is in when not at the main screen.
PLATESCOPE Instrument Controls The instrument controls are used to navigate the screen, configure options, and perform measurements. Top View Left measure button Right measure button Select button Navigation ring Navigation Ring The navigation ring is used to move the focus of the highlight around the screen. Pressing on the left side of the ring moves the focus to the next available control to the left. Pressing on the right side of the ring moves the focus to the next available control to the right.
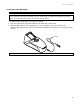
PLATESCOPE Taking a Measurement Below is an example of how to perform a typical measurement. Each mode will be explained in greater detail on the following pages. 1. Select the mode (Spot, Strip, or Calibration) from the main screen. 2. Press a Measure button to activate targeting mode. Targeting enables you to view the sample through the display screen for positioning. 3. Locate the instrument on the sample using the reticule in the display screen for positioning.
PLATESCOPE Configuration Mode Configuration mode is used to adjust and view the instrument’s settings. Certain icons display the current settings. Selecting the icon takes you to a different screen to change the setting. You should set the configuration before using the instrument for the first time. However, you can go back and change these settings at any time. Accessing Configuration Mode 1. From the Main screen, use the Navigation Ring to move the highlight focus to the Configuration icon. 2.
PLATESCOPE Idle Screen Setting This screen is used to set the amount of nonuse time that elapses before the display returns to the splash screen. The setting can be 30 seconds, 60 seconds or 90 seconds. To adjust the idle screen time setting: 1. From the Configuration screen, use the Navigation Ring to move the highlight focus to the Idle Screen Setting icon. 2. Press the Select button. Exit 30 seconds 60 seconds 90 seconds 3.
PLATESCOPE Time and Date Format The Time and Date Format screen allows you to adjust the date format and view the instrument’s current time and date. The clock is automatically set by the software application when the instrument is plugged into the computer. The date format control has a variety of format settings available. To access the time and date format screen: 1. From the Configuration screen, use the Navigation Ring to move the highlight focus to the Time and Date Format icon. 2.
PLATESCOPE Language Setting This screen is used to set the language that is displayed on the instrument. To select the language: 1. From the Configuration screen, use the Navigation Ring to move the highlight focus to the Language Setting icon. 2. Press the Select button. Exit Language selected Scroll bar indicates additional languages are available 3. Use the Navigation Ring to move the highlight focus to the desired language icon.
PLATESCOPE Units Setting This screen is used to set the displayed units. The setting can be set to inches (in) or centimeters (cm). To adjust the units: 1. From the Configuration screen, use the Navigation Ring to move the highlight focus to the Units Setting icon. 2. Press the Select button. Exit Inches Centimeters 3. Use the Navigation Ring to move the highlight focus to in, or cm icon. 4. Press the Select button to change your setting. A checkmark appears next to the selected setting. 5.
PLATESCOPE Plate Setting This screen is used to select the plate type that the instrument will be measuring. To select the plate: 1. From the Configuration screen, use the Navigation Ring to move the highlight focus to the Plate Setting icon. 2. Press the Select button. Exit Plate database version number Plate selected Scroll bar indicates additional plate selections are available 3. Use the Navigation Ring to move the highlight focus to the desired plate icon.
PLATESCOPE Information Mode This screen contains technical information about the instrument, and an option to restore the configuration settings to their factory defaults. The information area lists the serial number, cal plaque number, firmware date code, and BIOS version. The system status should display “OK” if the instrument is working properly. If an error is present, a number would be displayed indicating the problem.
PLATESCOPE Calibration Mode You only need to calibrate the instrument if the measurement performance is in question, if it has been dropped or if it received an excessive jarring. A calibration is completed by measuring a variety of patches on the calibration card. NOTE: Make sure you use the calibration card that was supplied with the instrument for calibrating. Do not substitute a calibration card from another instrument.
PLATESCOPE 5. Press a Measure button to take the measurement. The screen displays a “checkmark” over the patch icon if the patch was successfully measured. Checkmark indicates a successful measurement Delete patch measurement Next arrow NOTE: If a minus symbol (-) appears in the patch location instead of a checkmark, you will need to re-measure the patch. If you would like to re-measure the patch, use the Navigation Ring to move the highlight focus to Delete icon and press the Select button. 6.
PLATESCOPE 10. Press the Measure button or use the Next Arrow icon to active targeting mode. 11. Locate the instrument’s target window on the 10% patch of the 175 LPI step wedge using the reticule icon in the screen for positioning. 12. Press the Measure button to take the measurement. The screen displays a checkmark over the 10% patch if it was measured successfully. 13. Repeat steps 10 - 12 until the remaining five patches on the 175 LPI step wedge have been measured.
PLATESCOPE Spot Measurement Mode The spot measurement mode is used to take measurements on an offset plate and display the results. A graphical representation of the measured area displays in the screen and can be zoomed on for better viewing. Refer to Zoom Mode operation later in this section. The spot measurement screen displays the title bar at the top, measurement data in the center, and current settings at the bottom. Measuring a Spot 1.
PLATESCOPE Substrate Type (Plate or Paper ) Used to select offset plate or printed paper substrate. Illumination Option (Red, Green, Blue, White (RGB), UV, IR, and Auto) The instrument has a multiple illumination (LED) system to ensure maximum contrast when measurement varying substrates (foreground/background colors). Lighting can be set to auto or one of the manual modes. In auto mode, the instrument automatically detects the best contrast for the material.
PLATESCOPE Zoom Mode The image area of the last sample measured can be zoomed for easier viewing. The instrument supports two times (x2) and four times (x4) zoom modes. To zoom on an image: 1. Use the Navigation Ring to move the highlight focus to the Zoom icon. 2. Press the Select button to enter the zoom mode. Exit Zoomed image Zoomed amount (x2 or x4) 3. To change the zoom amount, use the Navigation Ring to move the highlight focus to the Zoom amount icon. 4.
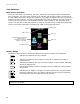
PLATESCOPE Strip Measurement Mode The strip measurement mode is used for measuring a defined “seven patch” strip in sequential order. Data is displayed for each patch as it is measured. The instrument can store data for a total of 20 strips. You must delete the stored data after 20 strips in order to make additional strips measurements. See Deleting Stored Strips later in this section. Once stored, strip data can be downloaded to the PQS application.
PLATESCOPE NOTE: The settings cannot be changed once the measurement sequence has started. All patches must be deleted before settings can once again be changed. See below for patch deletion information. Location indicator Positioning reticule Measurement area Substrate Dot screen Exposure setting Image Illumination 6. Locate the instrument’s target window on the 2% patch of the target strip using the reticule icon in the screen for positioning.
PLATESCOPE If a mistake was made and you would like to re-measure the patch, use the Navigation Ring to move the highlight focus to Delete icon and press the Select button. The last measurement taken on the strip will be deleted. Each patch is deleted individually, starting with the last measured. 8. Press the Measure button or use the Next Arrow icon to activate targeting mode. 9.
PLATESCOPE Deleting the Stored Strip Data Stored strip data is deleted from the main strip screen. All stored strips are deleted at one time; individual strips cannot be deleted. The number of strips stored is displayed in the title bar of the main strip mode screen. To delete the stored strip data: 1. From the main Strip mode screen, use the Navigation Ring to move the highlight focus to the Delete icon. Strips stored (e.g. 2 out of 20) Delete strips 2. Press the Select button.
PLATESCOPE Appendices Service Information The instrument is covered by a one-year limited warranty and should be referred to an authorized service center for repairs within the warranty period. X-Rite provides repair service to their customers. Because of the complexity of the circuitry, all repairs should be referred to an authorized service center. X-Rite will repair any instrument past warranty.
PLATESCOPE Cleaning the Instrument Your instrument requires very little maintenance to achieve years of reliable operation. However, to protect your investment and maintain reading accuracy, a few simple-cleaning procedures should be performed from time to time. General Cleaning The exterior of the instrument may be wiped clean with a cloth dampened in water or mild cleaner. NOTE: DO NOT use any solvents to the clean the instrument, this will cause damage to the cover.
PLATESCOPE Replacing the Battery Pack Use only X-Rite battery pack (NiMH) P/N SE15-38; other types may burst causing personal injury. 1. Unplug the AC adapter and interface cable from the instrument if connected. 2. Carefully rest the instrument on its side. 3. Remove the two screws securing the battery cover in place. 4. Remove the battery access cover and set aside. Battery pack Red wire White wire Connector Battery cover Screw (2) 5. Remove the old battery pack and unplug the connector. 6.
PLATESCOPE Troubleshooting Prior to contacting X-Rite support department for instrument problems, try the applicable solution(s) described below. If the condition persists, contact us using one of the methods listed in the Service Information section. Problem Cause Solution Instrument not responding. Instrument is in power down mode. Press and hold the Select button for 3 seconds to wake up the instrument. Batteries are very low or bad. Charge the batteries.
PLATESCOPE Screen Messages Screen messages can appear on the display during error conditions or for informational purposes. All messages are accompanied by a long beep. The message is cleared from the instrument screen by navigating to the checkmark (√) icon and pressing the Select button. Because some messages are longer than what can be displayed at once, a scroll bar appears on the right side of the screen. Simply press the bottom of the Navigation Ring to view the remainder of the message.
PLATESCOPE Instrument Specifications General Targeting/Measurement Array Patent-pending split-beam integrated color targeting and precision optical system Light Source Patent-pending wide spectral multi-point LED illumination Measurement Time approx. 2 second per measurement Calibration Factory-calibrated to custom X-Rite wedge. Supplied with calibration wedge to correlate several devices to each other. Measurement Range 2.00 - 98.00% Measurement Accuracy ± 0.5 for AM screening ± 1.
Corporate Headquarters - USA 4300 44th Street SE Grand Rapids, Michigan 49512 Phone 1 800 248 9748 or 1 616 803 2100 Fax 1 800 292 4437 or 1 616 803 2705 Corporate Headquarters - Europe Althardstrasse 70 8105 Regensdorf Switzerland Phone (+41) 44 842 24 00 Fax (+41) 44 842 22 22 Corporate Headquarters - Asia Room 808-810 Kornhill Metro Tower, 1 Kornhill Road Quarry Bay, Hong Kong Phone (+852) 2 568 6283 Fax (+852) 2 885 8610 Please visit www.xrite.com for a local office near you. P/N XRD60-500 Rev.