TM TM Owner’s Manual X10.com, a Division of X10 Wireless Technology, Inc.
Read First Contents FCC Caution THIS DEVICE COMPLIES WITH PART 15 OF THE FCC RULES. OPERATION IS SUBJECT TO THE FOLLOWING TWO CONDITIONS: (1) THIS DEVICE MAY NOT CAUSE HARMFUL INTERFERENCE, AND (2) THIS DEVICE MUST ACCEPT ANY INTERFERENCE RECEIVED, INCLUDING INTERFERENCE THAT MAY CAUSE UNDESIRED OPERATION.
Introduction Introduction, cont. Congratulations! You’re now the proud owner of the newest technology in tablets. Powered by Android 4.0.1 (Ice Cream Sandwich), the X10 AirPad 7P is equipped with a powerful 1.2 GHz Allwinner A10 Cortex A8 processor, it has a brilliant color screen, 4 GB onboard memory (plus an additional 32 GB with microSD card, not included), a built-in camera/video recording device, and access to thousands of Apps in the Amazon Market.
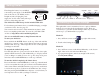
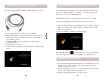
Getting Started Getting Started, cont. First charge the battery in your AirPad, connect the power supply to the POWER jack on the side of your AirPad (not the headphone jack) and plug the power supply into an AC outlet. It may take up to 4 hours to fully charge the unit. ON/OFF VOL+ The plug does not go all the way in, this is normal. The AirPad does NOT charge via the included USB cable. For best battery performance leave your AirPad charging overnight or when not in use. See also page 21.
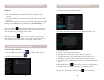
Accessing the Settings section, cont. Method 3 Setting the Date and Time, cont. 3. Scroll down and touch Date & time. 1. On your Home screen, Touch the time (bottom right of the screen). 2. Touch the Settings icon in the bottom right of the screen, under the time. A pop-up menu appears where you can select Airplane Mode, WiFi Settings, Screen Brightness, Notifications, System Settings, etc. The back symbol at the bottom left hand corner of the screen takes you back one screen each time you touch it.
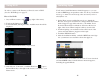
Using Wi-Fi Installing Apps In order to connect to the Internet you’ll need to turn on Wi-Fi. (See also Wi-Fi Hotspot on page 18. How to Use Wi-Fi 1. On your Home screen, touch (top right of the screen). 2. Touch on the Settings icon. 3. Touch WiFi OFF (it changes to ON). Available networks will be displayed. You’ll want to install the Amazon Android Appstore so you can download FREE Apps, and purchase other ones. Note you will first need to go to amazon.
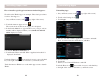
Installing Apps, cont. Uninstalling Apps How to install a typical App from Amazon Android Appstore Uninstalling Apps We will use the Kindle App as an example. These basic procedures work for other Apps too. 1. On your Home screen, touch 1. On your Home screen, touch (top right of the screen). (top right of the screen). 2. Touch on the Settings icon. 3. Touch Apps. 2. Touch the Amazon Appstore icon. The screen shown at the bottom of page 11 is displayed. 3.
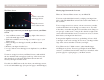
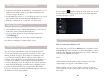
Moving Apps between screens Moving Apps between screens, cont. Moving Apps between the 5 screens The Home Screen. There are 5 discrete Home screens on your AirPad 7P. Touch to access the main Apps Screen. Swipe the screen to access other screens. Copying App icons from your main Apps screen to your Home Screen 1. On your Home screen, touch (top right of the screen) to access the main Apps screen. 2. Find and touch the icon for the App you want to copy to your Home screen. 3.
Transferring files from your PC You will need the included USB A to Mini-B cable to do this: Transferring files from your PC, cont. Your AirPad will now appear as two different Removable Storage Devices in “My Computer” on your PC - one for the main device memory, and one for the MicroSD card. Transfer files like you would transfer from any drive to another. Once you are finished transferring files, follow these steps: 1. Click on the Safely Remove Hardware icon in your PC’s System Tray, next to the clock.
How to watch Movies or Videos 1. Download video files from the Internet, or transfer them to your AirPad from your PC or laptop. (See Transferring files from your PC on pages 16 & 17). 2. On the main Apps screen, or on your Home screen if you copied the icon there, find and touch the Super-HD Player icon. 3. Find and touch the movie or video file you want to play. Recently Used Apps If you touch the symbol in the bottom left of the screen, your most recently viewed Apps pop up.
Managing your AirPad Managing your AirPad, cont. Using an external microSD card How to move Apps to a microSD Card, cont. You can add more memory to your AirPad by purchasing a microSD card, they come in various capacities. Hold the card parallel to the slot (not at an angle) and push it in. You will feel a slight resistance before it seats itself. 4. Touch Move to SD card, the button changes to Moving. After it’s moved, or if the App is already on the SD card, you will see an option to Move to tablet.
Resetting to Factory Settings If you play around and install a bunch of Apps to get familiar with your AirPad you might want to know how to put your AirPad back to its factory condition. Follow these instructions to do this: 1. On your Home screen, touch the hard Menu key, to the bottom right of the screen, below the hard Home key. 2. A pop-up menu appears (at the bottom right of the screen). Touch System settings. 3. Touch Backup and reset 4. Touch Factory data reset. Specifications CPU: 1.