Model MT12A Mini Timer Owner's Manual X10.com, a division of X10 Wireless Technology, Inc. 3824 North 5th St.
Contents Introduction ................................................................................................... 3 Quick Tour ...................................................................................................... 5 How to program a timed event .................................................................. 6 Special programming buttons ................................................................... 6 Setting up the Mini Timer ..................................................
Introduction The X10 Mini Timer controls up to 8 X10 Modules automatically or instantly. You can have your outside lights as well as inside lights and appliances go on and off at preset times to give your home a lived-in look while you are away. You can program your Modules to go on and off at the same time every day or you can set your radio to wake you up “Once” only, for an early morning flight.
Introduction How it works The Mini Timer plugs into any AC outlet in your home and transmits digitally encoded signals over your house wiring instantly or at the times you set. These signals are received by the X10 Modules. You Plug a lamp up to 300 watts into a Lamp Module, an appliance such as a radio, fan, or coffee pot into an Appliance Module and replace important indoor or outdoor security lights up to 500 watts with the Wall Switch Module (modules sold separately).
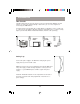
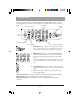
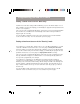
Quick Tour Let’s quickly review the functions of each part of the keyboard (you can go to page 7 for a step by step tutorial if you prefer). Referring to the diagram below and the cutaway sections that follow you will see that the keyboard on the Mini Timer consists of 7 basic areas. 2. ON/OFF Buttons 3 Time Adjust Rocker 1. Mode Switch 4. Set Alarm 5. All Units Off Button 6. Mode Button 7. All Lights On Button 1. Mode Switch.
Quick Tour How to Program a timed event 1. Place the mode switch in “Prog Set/Review” position. 2. Advance to the desired time. 3. Set the 1-4/5-8 switch to the desired position. 4. Press any of the 4 ON or OFF buttons to set an On or Off time for that Module. This will program the Mini Timer to turn that Module on (or off) at that time every day. 5. Advance to another time, and press another ON or OFF button as desired. 6. Set the Mode switch back to RUN. Special Programming Buttons 1. Mode button.
Setting up the Mini Timer Setting the clock Plug the Mini Timer into any convenient AC outlet. Fit two AA alkaline batteries in the battery compartment to protect the time and program for up to 48 hours in the event of a power outage. If the battery is low, dead, or not installed, the low battery indicator will show in the display. When you first plug in the Mini Timer the display will flash.
Setting up the Mini Timer Setting something to happen every day at the same time. After you have installed all of your Modules and checked that they are working instantly from the Mini Timer you are ready to program timed events. 1. Set the Mode Switch to the “Prog Set/Review” position. 2. Set the 1-4/5-8 switch as desired. 3. Press the “Time” advance rocker key to advance to the desired on or off time. When you first press the rocker the time will advance by 1 minute.
Programming ON and OFF times Setting a timed event to occur Once only If (within 4 seconds after setting an On or Off time) you press the “Mode” button once or twice until Once shows in the display, you will modify the program for that particular Unit Code to occur only Once. The event you have programmed will happen (at the time you have programmed) within the next 24 hours, and will then be automatically cleared from memory and will not happen again the next day.
Programming ON and OFF times Reviewing timer events Set the Mode Switch in the “Prog Set/Review” position. If no events exist in memory 0:00 is displayed, otherwise the first event found in memory is displayed. If (while in Prog/Review Mode) one of the 4 module ON (or OFF) buttons is pressed without modifying the current time, and no events are in memory for that module, 0:00 is displayed.
Programming ON and OFF times If the display shows FULL If FULL is displayed when you try to enter a programmed time, this means that you have tried to enter an additional time when you have already used up all the available memory. Cancel one or more of your set times by pressing a number ON (or OFF) button, then press Clear to clear that event. Then enter another timer event. See note at bottom of page 8.
Alarm settings Setting the Alarm Buzzer With the “Wake” switch in the “ON” position, any program you set for Module number 1 will also set the internal alarm buzzer. A bell icon will show in the display to indicate that a time for the Buzzer is set. For example: If you connect your bedside lamp to a Lamp Module set to Unit Code 1 and then program Module number 1 for an On time of 7:00 AM - At 7:00 AM your bedside lamp will turn on and the internal buzzer in the Mini Timer will sound.
Alarm settings Suspending the wake up function If you set channel 1 for an On time of 7:00 AM and number 1 is your bedside lamp, at 7:00 AM every day, your bedside lamp will turn on and the internal buzzer will sound. If you turn the Buzzer switch off on Friday nights the buzzer will not wake you up the next morning but your bedside lamp will still turn on. To suspend the program for channel 1 turn the Buzzer switch to OFF, AND place the Mode switch in the “Clock Set” position.
Setting up the Lamp Module Setting The Lamp Module’s Code (modules sold separately) UNIT CODE DIAL Using a small screwdriver, set the red House Code dial to the same letter as your Mini Timer. Set the Black Unit Code dial to any unused number. HOUSE CODE DIAL Ratings The Lamp Module can be used to control an incandescent lamp rated up to 300W. It is NOT suitable for other types of lamps such as fluorescent or energy saving lamps, low voltage lamps, or lamps that include a dimmer control.
Setting up the Appliance Module Setting The Appliance Module’s Code (modules sold separately) UNIT CODE DIAL Using a small screwdriver, set the red House Code dial to the same letter as your Mini Timer. Set the Black Unit Code dial to any unused number. HOUSE CODE DIAL Ratings The Appliance Module can be used to control an incandescent lamp rated up to 500W. It can also control other types of lamps such as fluorescent or energy saving lamps, low voltage lamps, or lamps that include a dimmer control.
Troubleshooting 1. If a particular Module won’t go on or off from the buttons on the Mini Timer: Check that you have power to the outlet controlling the Module and the switch on the light or appliance is ON. Check that the Unit Code and Housecode on the Module are set correctly. Try plugging the Module and the Mini Timer into the same outlet. If the Module doesn’t work in ANY outlet, not even with the Module and the Mini Timer in the same duplex receptacle (top and bottom) the Module may be defective.
Accessories ON OFF 1 2 1 3 13 A 5 M 9 4 E I 5 6 7 Remote Switch 8 .A.C .O . M .E . K . . G I 15 1-8 1 3 13 9-16 5 11 7 9 UNIT O A C M E K G I HOUSE Lamp Module Modules A wide range of switch and control modules are available from X10, all of which can be controlled from the Mini Timer. Modules available include replacement wall switches, X10 controlled AC outlets, screw-in lamp modules, plug-in lamp and appliance modules and many others.
NOTES 18
NOTES 19
X10 Wireless Technology, Inc. Limited One Year Warranty X10.com, a division of X10 Wireless Technology, Inc. (X10) warrants X10 products to be free from defective material and workmanship for a period of one (1) year from the original date of purchase at retail. X10 agrees to repair or replace, at its sole discretion, a defective X10 product if returned to X10 within the warranty period and with proof of purchase. If service is required under this warranty: Call 1-800-442-5065, visit www.x10.