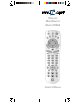
WIRELESS MOUSEREMOTE MODEL UR86A OWNER’S MANUAL
READ THIS FIRST! Safety Considerations Remember to exercise good common sense when using your X10 wireless MouseRemote for home automation applications. There can be some unexpected consequences if not used with care. For example, an empty coffee pot can be remotely turned on. If that should happen, your coffee pot could be damaged from overheating. If an electric heater is turned on by remote control while clothing is draped over it, a fire could result.
CONTENTS INTRODUCTION ................................................5 BATTERY INSTALLATION ..................................6 SETTING UP YOUR MOUSEREMOTE ..................7 B UTTON DESCRIPTIONS ........................... 7 B UTTON DEFAULTS ................................. 9 MOUSE OPERATION ............................... 10 SOFTWARE INSTALLATION ....................... 10 USB RECEIVER INSTALLATION ............... 10 MOUSE SOFTWARE CONFIGURATION ....... 11 T YPICAL APPLICATION S CENARIO ...........
Here are just some of the things you can do with your X10 MouseRemote... • Control your entire audio/video and lighting setup for the ultimate Home Theater experience. • Turn on lights at night to scare away intruders if you hear a noise. • Start the coffee from your bedroom when you wake up. SETTING UP YOUR MOUSEREMOTE BUTTON DESCRIPTIONS INDICATOR LIGHT The indicator light (LED) illuminates when a key is pressed (if the key is available in the selected mode).
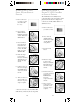
LEARN Used to learn codes from existing remotes. 0-9 Used as with your original remote and to enter device codes. Can also be configured to perform PC functions. ENT Used to confirm certain entries. A-B Used as a TV/VCR button. UP/DOWN/LEFT/RIGHT CURSORS Used to navigate menu functions OK Selects a function. MENU Used for menu selections on DBS receivers. EXIT Exits from the Menu function. A, B, C, D BUTTONS Special function buttons.
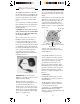
MOUSE OPERATION The UR86A MouseRemote works with the wireless USB receiver (CM19A). The remote control sends wireless RF signals (from up to 40 ft. away) to the receiver which is connected to your PC’s USB port. Or, if you already own X10’s ShowTime ™ PC to TV Photo Viewer, the VT37A that came with it, also acts as a receiver for the MouseRemote. CAUTION: Do not use both receivers at the same time. If you own ShowTime use the receiver that came with it and do not use the CM19A.
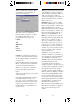
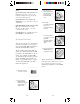
When you right-click on a button that is programmable a window like the one shown below is displayed. This window lets you configure the button for what you want it to do. There are 6 different things that you can program a button to do. These are: Launch Web Multimedia Edit System Advanced Launch lets you launch any application you choose from the button. For example: To set up button number 1 to launch your word processor: Launch the MouseRemote from the Start Menu, or from its shortcut.
TYPICAL APPLICATION S CENARIO Here’s a typical scenario that gives you an idea of what you can do with the power of the MouseRemote: Program a couple of Web Sites into the numeric keys (e.g. 1 for www.x10.com, 2 for www.x10.com/support, etc.), then sit back in your armchair and press the PC button followed by the appropriate number button to launch your Web Browser and go to the address you programmed.
SETTING UP FOR TV, VCR, CABLE, CD, AND SATELLITE RECEIVER 1. Turn on the device you want to control (TV, VCR, cable box, etc.). USING AUX TO CONTROL A SECOND TV, VCR, CABLE BOX OR SATELLITE RECEIVER The AUX button is normally used to control an audio component such as a CD player, but it can also be configured to control a second TV, VCR, cable box or satellite receiver. 1. Turn on the device you want to control. 2. Press and hold SETUP until the LED indicator lights steadily. Release the SETUP button.
Notes: If your audio/video component does not respond, try the other codes for your brand. If it still doesn’t respond, try the Code Search method below. If some buttons do not operate your equipment, try one of the other codes for your brand. If the LED blinks rapidly when you enter the code, you may have entered an invalid code. Recheck the code in the code list and try again. 3. Press the mode button that matches the equipment you want to control. The LED blinks once. 4.
IDENTIFYING CODES FOUND USING THE SEARCH PROCEDURE LEARNING 1. Press and hold SETUP until the LED indicator lights steadily. Release Setup button. Your UR86A Remote has the codes for most TVs, VCRs, etc. in its code library. However, if the code for your particular device is not found in the library, you can learn these codes from your existing remote.
HOME AUTOMATION 7. Repeat steps 5 and 6 for each button you want to learn. 8. When you’ve finished learning all the keys, press SETUP. Notes: Make sure you have fresh batteries in both remotes before learning. Take care not to move either remote while pressing the buttons. Experiment with the distance between the remotes if you have a problem learning. Some remotes do not have their LED in the center so you might need to experiment with the side-to-side position of the remotes relative to each other.
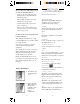
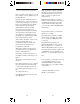
HOUSE CODES AND UNIT C ODES UNIT CODE DIAL INSTALLING HOME AUTOMATION COMPONENTS TRANSCEIVER MODULE HOUSE CODE DIAL Each Module has a specific address made up of a House Code (red dial on the face of the Module) and a Unit Code (black dial on the face of the Module). The Controller first sends an address and then a command on the AC power lines. Only the Module with a matching address will execute the command. If more than one Module has the same address, both Modules will execute the command.
LAMP MODULE The Lamp Module (sold separately) may be used to control any incandescent lamp rated up to 300W. It is not suitable for other types of lamps such as fluorescent or energy saving lamps, or lamps which include a dimmer control. Caution: Do not connect an appliance such as a coffee pot or heater to the Lamp Module. It may damage the Module and the appliance and could cause a fire hazard. 1. Set the House Code to ‘A’ and the Unit Code to ‘2.
CHANGING THE X10 HOUSE C ODE The MouseRemote defaults to House Code A, and in most cases you will not need to change this unless you are experiencing interference from a neighboring X10 system. 1. Press and release the X10 button. CONTROLLING AN IR MINI CONTROLLER (IR543) If you already own an IR Mini Controller, you will need to change the X10 Home Automation code in the remote to use it. The code for standard X10 Home Automation is 780. The code to control the IR543 Mini Controller is 781.
EXPANDING YOUR SYSTEM The modules illustrated below represent just a few of the wide range of X10 compatible modules you can choose from to expand your Home Automation system. They are available from electrical outlets, department stores and mail order catalogs. Switch entrance or garage lights on from your car with the convenient Keychain Remote KR21A. Replace your existing wall switches with the Wall Switch Module WS467. Installs like a regular dimmer. On/Off and Bright/Dim functions.
TROUBLESHOOTING The Transceiver doesn’t respond to the remote: • Check the House Code on the Transceiver is set to A. If you have changed the Housecode on the remote (see p. 28), check that it matches the Housecode on the Transceiver. • If you changed the code for the X10 button, change it back to code 780, see page 29. • Press the ON/OFF button on the front of the Transceiver to confirm it operates the equipment connected to it. Check that you have power to the AC outlet.
WARRANTY • You might have selected close from the Menu that comes up when you click on the tray icon. Select Start, then Programs, then Remote, then launch the MouseRemote, to again show the MouseRemote and its tray icon. • The X10 mouse driver has not been installed, or the MouseRemote has not been detected. Check in Device Manager that the driver has been installed and that all mouse connections have been made correctly. Note: mouse speed, etc.
X10.com a division of X10 Wireless Technology, Inc. 3824 North 5th St., Suite C, North Las Vegas, NV 89032 Web Site: www.x10.