SENTINEL™ OUTDOOR PROFESSIONAL PAN/TILT/ZOOM CAMERA SYSTEM MODEL VK79A INCLUDES SENTINEL PAN/TILT/ZOOM CAMERA (XC24A) AND DOME WITH REMOTE CONTROL (CR15A) OWNER’S MANUAL (Please keep for future reference)
INTRODUCTION CONTENTS Congratulations! You have purchased X10’s premier video surveillance solution. The Sentinel Pan/Tilt/Zoom Camera has superior image quality, a high powered zoom, and pan and tilt motion. You can operate the camera through walls using the supplied remote control. Introduction ........................................................................ 2 It comes with a weather resistant dome for outdoor mounting under an eve, on your patio, or deck, for example.
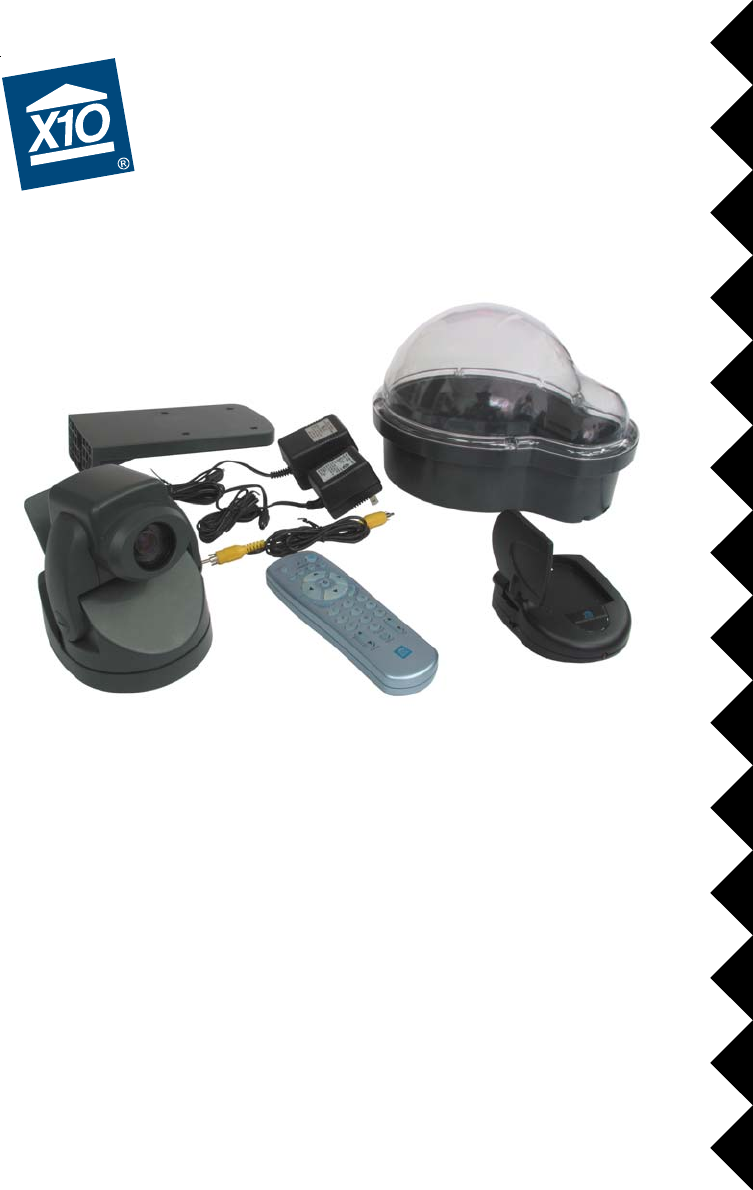
Basic Camera Setup BASIC CAMERA SETUP Your Sentinel Camera is ready to go out of the box! Follow these steps for a quick setup of your new camera. First you’ll set up and test the camera before you install the camera into the dome. Make sure you read this entire manual first in case you want to change a setting on the base of the camera before installing it in the dome. Connect the camera to power. Unpack these items.
Basic Camera Setup Basic Camera Setup Insert batteries into the remote. Remove the battery cover and put four (4) AAA batteries into the camera remote. Make sure to match the batteries to the + and – marks inside the battery case. 6 Connect the wireless video receiver to power. Put your video receiver in a convenient place near or on your TV. Plug its power supply into a standard wall outlet and the other end into the video receiver.
Basic Camera Setup Basic Camera Setup Connect the video receiver to your TV. Connect the video cable into the video-out jack on the video receiver and into the video-in jack on your TV. 8 Turn on the video receiver. Make sure the power switch on the video receiver is set to “ON.
Basic Camera Setup Basic Camera Setup Turn on your TV. Fine tune the antennas. Turn on your TV and select its video input. Use the Video or Select buttons on your TV remote control, or try channel 0 and then Channel Down. The camera’s picture should appear. Note, the picture will be upside down because the camera is intended to be mounted on a ceiling or overhang, after installing it into the dome. See page 22 if you want to flip the picture.
BASIC CAMERA OPERATION SECURE VIDEO CONNECTION SETUP Once you have the camera set up, you’re ready to start using it. It’s easy to get started. Here’s how you use the remote to control the camera: If you prefer a secure video connection, you can use a video cable to connect the camera directly to your TV. This setup does not use the wireless video receiver. 1. Turn off the camera’s wireless transmitter: Locate the transmission switch on the bottom of the camera (see picture below).
Secure Video Connection Setup 3. Connect the video cable: Plug one end of a video cable into the camera. Run the rest of the cable to your TV. 4. Connect the other end of the cable to the video-in jack on your TV. REMOTE CONTROL FEATURES Your Sentinel Camera includes many versatile and powerful features. This section will show you how to get the most from your camera. Stored Positions Your Sentinel Camera can remember nine locations, including vertical/ horizontal positions, and zoom settings.
Remote Control Features Mounting the Camera Clearing Stored Positions You can delete all stored positions. Here’s how: 1. Press and release C1. 2. Press and hold Setup until the C1 button lights green. You can install the Sentinel Camera into the supplied dome and mount it on a ceiling, or you can use the supplied mounting bracket to mount the complete assembly on a wall.
Mounting the Camera, cont. Camera should be installed into the base of the dome after knocking out the holes, knock out 3 holes for mounting on a ceiling or 1 hole for the wall mounting bracket: Mounting the Camera, cont. 4. Attach the camera to the base of the dome using the brass screw on the outside of the dome’s base. Mounting the camera on a ceiling 1. Knock out the three holes on the base of the dome using a screwdriver and hammer. 5. Plug the power and video cables into the camera. 2.
Mounting the Camera, cont. Mounting the Camera, cont. 5. Plug the power and video cables into the camera. Mounting the camera on a wall using the bracket provided 1. Knock out the ONE hole shown here on the base of the dome using a screwdriver and hammer. 6. Remove the lens cap (Don’t touch the lens). 7. Pass the cables through the hole in the mounting bracket and attach the bracket to a wall. 2. Put a black rubber washer on the inside of base of the dome and then insert a brass screw into the hole.
Additional Setup Options MULTI-CAMERA SYSTEMS Picture Orientation Vertical Orientation: If you choose not to mount the camera upside down. Here’s how to flip the picture vertically in the camera so that the display on the TV is the right way up: The Sentinel Camera System is designed so that you can use up to four cameras together. Follow the steps in this section to set up and use your additional cameras. 1. Press and release C1. Setting Up Multiple Cameras 2.
Multi-Camera Systems ADVANCED SETUP OPTIONS Controlling Multiple Cameras Changing the House Code for the Remote Pressing any camera button (C1, C2, C3 or C4) turns on that camera and turns the other cameras off. When you press a camera button, all of the camera controls on the remote– moving the camera, zooming, storing positions, etc.–apply to that camera. To use stored positions, press the button for the camera you want to control then follow the instructions for Stored Positions on page 15.
Advanced Setup Options ADVANCED ONSCREEN MENU OPTIONS Recording with a VCR Whether you have set up your camera to use the wireless receiver or the secure video connection, you can configure your Sentinel Camera so that you can record its video signal on your VCR. It’s easy: 1. Make sure your VCR is connected to play back on your TV. 2. Set up your camera according to the instructions on pages 4 thru 11 (for wireless transmission) or pages 13 and 14 (for secure connection). 3.
Advanced Onscreen Menu Options Advanced Onscreen Menu Options Iris Settings Backlight Compensation Iris settings control the amount of light let into the Sentinel camera. Changing these settings affect how bright your picture will be, and how the camera reacts to changes in lighting conditions. Your options are: Backlight compensation settings affect how the camera adjusts for light sources behind the camera’s view or focus.
Advanced Onscreen Menu Options Advanced Onscreen Menu Options Freeze, Automatic Gain Control & Sensitivity Color Settings The settings for Automatic Gain Control (AGC) affect the brightness and picture levels of the video produced by the camera. AGC amplifies existing video to help the camera reproduce a video signal at low light levels. Sensitivity controls adjust how the camera works in low light conditions.
Advanced Onscreen Menu Options Advanced Onscreen Menu Options Automatic Picture Control Lens Settings Automatic Picture Control (APC) changes the geometry of the picture produced by the camera. These changes are slight and it can be hard to notice how the picture is different. These settings control how the lens in the Sentinel Camera behaves during normal use. · H-GAIN: The Horizontal Gain setting adjusts the horizontal (left to right) line of the picture.
Advanced Onscreen Menu Options Picture Reversal Advanced Onscreen Menu Options Alarm Position You can set the Sentinel Camera to reverse, either horizontally, vertically the picture it produces. Or you can do both. · H. REV: Reverses the picture horizontally, or from left to right. Set this to “ON” if you want to use the camera like a mirror for viewing objects behind you. · V.
Advanced Onscreen Menu Options Advanced Onscreen Menu Options Onscreen Camera Label (ID) Restore Presets (defaults) The Sentinel Camera can display a title or label for the camera on screen. This can be useful when you have more than one camera and want to identify them easily. The settings in the PRESET menu work to set the camera back to its default configuration. This will discard any changes you made in any of the other video settings menus.
Advanced Onscreen Menu Options TROUBLESHOOTING · MARK: Selecting Mark ON puts a cross-hairs mark on the screen. If there’s no camera picture on your TV (wireless connection): 1. Make sure your Wireless Video Receiver is connected to power and turned On. Follow the step on page 27 to bring up the onscreen menu. Then use the Down arrow to select past the last item (PRESET), or the Up arrow to select past the first item (IRIS). Select MARK with the Right Arrow.
Troubleshooting Troubleshooting If there’s no camera picture on your TV (secure connection): 1. Select the appropriate video input on your TV. Usually you can select the input mode by pressing the VIDEO or INPUT button on the remote control. Or you might have to change the TV to Channel 0 or 2, and then use Channel Down to change video inputs. See your TV’s owner’s manual if you still aren’t sure how to change the video source. 2. Make sure your camera is connected to power and turned on.
Home Control HOME CONTROL Controlling X10 Modules The X10 button on the Sentinel Camera’s remote control is your gateway to a world of useful control and automation solutions built by X10. Why enter a dark room when there is a simple and affordable solution that can keep you safe and secure? From a simple remote control that can turn on a lamp, to a full-blown automation system, X10 provides you with all the products you need. Here’s how to control X10 modules with your Sentinel Remote Control.
FCC Caution THIS DEVICE COMPLIES WITH PART 15 OF THE FCC RULES. OPERATION IS SUBJECT TO THE FOLLOWING TWO CONDITIONS: (1) THIS DEVICE MAY NOT CAUSE HARMFUL INTERFERENCE, AND (2) THIS DEVICE MUST ACCEPT ANY INTERFERENCE RECEIVED, INCLUDING INTERFERENCE THAT MAY CAUSE UNDESIRED OPERATION.