
Battery Status Monitor Operator's Guide TM500A
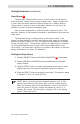


20 © 2001 Xantrex Technology Inc.
P/N 973-0012-01-02 Rev. A 05/01
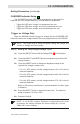
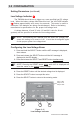
Step B Setting the Amperage Trigger Level
1B. Press the SELECT button until the Amperage LED (
A
) is illuminated.
2B. Press the SELECT and RESET buttons simulataniously until the LED
display flashes.
3B. Press the RESET button until the display indicates the desired
amperage.
4B. Press SELECT button to accept.
The selectable amperage values are from 1 to 99 amps.
The TM500A is now setup to trigger the CHARGED indicator LED ( )
when the voltage level equals or exceeds the value programmed in Step A
and the amperage level falls below the value programmed in Step B. When
these parameters are met, the CHARGED indicator LED flashes approximately
every four seconds. Whenever the current goes negative (discharge) the
timer resets to zero. The CHARGED indicator must be manually reset to turn
it OFF.
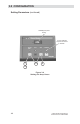
Setting Parameters (continued)
CHARGED Indicator Setup
(continued)
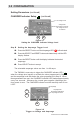
Figure 3-7
Setting the CHARGED Indicator Voltage Level
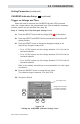
Figure 3-8
Trigger on Voltage and Amperage
14.4
Set Voltage Level
1A
4A
2A
Voltage LED
Illuminates to Indicate
the Voltage Function
is Selected
3A
44A
Set Amperage
Amperage LED
Illuminates to Indicate the
Amperage Function is
2B
3B
4B
1B
3.0 CONFIGURATION