Q800 PRO User Guide This product records videos while the vehicle is operating. Read and follow the instructions in this guide to properly use and maintain the product.
Before using the product About the product This product records videos while the vehicle is operating. Use this product only for reference when investigating incidents or road accidents. This product is not guaranteed to record or process cloud data for all events. The device may not record accidents with impacts that are too minor to activate the impact sensor or accidents with massive impacts that cause the vehicle’s battery voltage to deviate.
FCC Statement This device complies with Part 15 of the FCC Rules. Operation is subject to the following two conditions: (1) this device may not cause harmful interference, and (2) this device must accept any interference received, including interference that may cause undesired operation. This equipment has been tested and found to comply with the limits for a Class B digital device, pursuant to Part 15 of the FCC Rules.
Contents Safety information 6 4.5 Cloud service 27 4.5.1 Log in to the THINKWARE account 27 1. Product overview 9 4.5.2 Locating the vehicle 28 1.1 Included items 9 4.5.3 Setting Geo-Fence 29 1.1.1 Standard items 9 1.1.2 Accessories (sold separately) 9 4.5.4 Using the driving impact notification feature 31 4.5.5 Viewing driving impact videos on the cloud service 32 1.2 Part names 10 1.2.1 Front camera (main unit) - front view 10 1.2.2 Front camera (main unit) - rear view 11 1.2.
6.3 Setting recording features 43 6.3.1 Setting the continuous impact detection sensitivity 43 6.6 Configuring network function settings 50 6.6.1 Setting the network function 50 6.3.2 Setting the Super Night Vision feature 43 6.6.2 Setting sensitivity for driving impact notification 50 6.3.3 Setting parking mode 43 6.6.3 Setting driving impact video upload 50 6.3.4 Setting the impact sensitivity in parking mode 44 7. Accessing the product information 51 6.3.
Safety information Read the following safety information to properly use the product. Safety symbols in this guide "Warning" - Indicates a potential hazard which, if not avoided, may result in injury or death. "Caution" - Indicates a potential hazard which, if not avoided, may result in minor injury or property damage. "Note" - Provides useful information to help users better utilize the product's features.
Power supply • Do not operate or handle the power cable with wet hands. Doing so may result in electrocution. • Do not use damaged power cables. Doing so may result in electrical fire or electrocution. • Keep the power cable away from all heat sources. Failure to do so may cause the power cord insulation to melt, resulting in electrical fire or electrocution. • Use the power cable with the correct connector and make sure the power cable is connected securely and is firmly in place.
Other information about the product Product management and operation • Do not expose the product to direct sunlight or intense light. The lens or internal circuitry may fail otherwise. • Use the product at a temperature between 14°F and 140°F (-10°C to 60°C) and store the product at a temperature between -4°F and 158°F (-20°C to 70°C). The product may not function as designed and some permanent physical damages may result if it is operated or stored out of the specified temperature ranges.
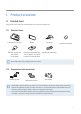
1. Product overview 1.1 Included items Ensure that all the items are included when you open the product box. 1.1.1 Standard items Front camera (main unit) Mount Car charger MicroSD memory card with adapter (consumable) Quick start guide & Warranty / CS information / User guide (stored in the microSD card) USB MicroSD card reader Adhesive cable holder The standard items may change without prior notice. 1.1.
Product overview 1.2 Part names 1.2.1 Front camera (main unit) - front view Voice recording button Press to enable or disable voice recording. GPS LED Indicates the GPS connection status. Manual recording button Press to start manual recording. Format button Press and hold to format the memory card. Recording LED Indicates the recording status. V-IN input port Used to connect the rear camera (optional). Wi-Fi LED Indicates the Wi-Fi connection status. DC-IN power port Used to connect the power cable.
Product overview 1.2.2 Front camera (main unit) - rear view Microphone Used for voice recording. Memory card slot Insert a memory card to save recordings. Reset button Insert the tip of a sharp object to reset the product when an error occurs. Security LED Indicates that video is being recorded. Mount connector Used to connect the mount. Front camera lens Records the front view. 1.2.3 Rear camera (optional) Adhesive mount Used to fix the rear camera in the vehicle.
Product overview 1.3 Removing and inserting the memory card Follow the instructions to remove the memory card from the product or to insert the memory card into the product. Removing the memory card Ensure that the product is turned off, and then gently push the bottom of the memory card with your fingernail. The lower part of the memory card will be exposed. Remove it from the product.
2. Installing the product 2.1 Installing the front camera (main unit) Follow the instructions to properly install the product. 2.1.1 Selecting an installation location Select an installation location that can record the entire view in front of the vehicle without obstructing the driver’s vision. Ensure that the front camera lens is located in the center of the windshield.
Installing the product 3 Remove the protective film from the adhesive mount, and then press the mount to the installation location. 2 1 4 2 Remove the product from the mount and push the mount against the windshield to ensure that the mount is firmly fixed. 1 5 Align the product to the mount, and then slide it into the locking position until you hear a click. • The product may fall and be damaged during vehicle operation if it is not firmly fixed to the mount.
Installing the product 2.1.3 Connecting the power cable When the engine and electrical accessories are turned off, connect the car charger. The hardwiring cable (optional) must be professionally installed to the vehicle by a trained mechanic. Connect the car charger to the product’s DC-IN power port and insert the cigar jack into the vehicle’s power socket. 1 2 The location and specifications of the power socket may differ by vehicle make and model. • Use the authentic THINKWARE car charger.
Installing the product 2.2 Installing the rear camera (optional) Refer to the following instructions to properly install the rear camera. 2.2.1 Selecting an installation location Select a location on the rear windshield where there is no defrost grid wire and the camera can record the entire rear view. • For vehicles with a sunshade attached to the rear windshield, you must select a location where using the sunshade will not interfere with camera operation.
Installing the product 2.2.2 Securing the rear camera Refer to the following instructions to secure the product to the installation location. 1 After determining the installation location, wipe the installation surface of the windshield with a dry cloth. Check the installation location before you secure the rear camera to the rear windshield. After securing the rear camera to the windshield, it is hard to remove the camera or change the installation location due to the strong adhesive.
Installing the product 2.2.3 Connecting the rear camera cable Power off the product and connect the rear camera cable to the front camera (main unit). 1 Connect one end of the rear camera cable to the front camera’s V-IN port. 2 Connect the other end of the rear camera cable to the rear camera's connection port. THINKW ARE For safe driving, arrange the cables to prevent the driver's vision from being obstructed or interfering with driving.
3. Using recording features 3.1 Turning the product on or off The product is turned on automatically and continuous recording starts when you turn on the ACC or start the engine. Wait until the product is completely booted up after turning it on, and then begin operating the vehicle. The video recording does not begin until the product is completely turned on (booted up). 3.2 Learning about file storage locations Videos are stored in the following folders according to their recording mode.
Using recording features During continuous recording, the product operates as follows. Mode Operation description Continuous recording During driving, videos are recorded in 1 minute segments and stored in the "cont_rec" folder. Incident continuous recording* When an impact to the vehicle is detected, a video is recorded for 20 seconds, from 10 seconds before the detection to 10 seconds after the detection, and stored in the "evt_rec" folder.
Using recording features If you do not want to use parking mode or you want to change the mode settings, from the mobile viewer, tap Dash Cam Settings> Record Settings. Refer to the following table to set theParking Mode options. Option Motion Detection No motion or impact detected Monitors movement in the area or impacts to the vehicle. Video will be recorded only when motion or an impact is detected.
4. Using the mobile viewer You can view and manage recorded videos and configure various product features on your smartphone. One of the following environments is required to use the THINKWARE CLOUD application: • Android 4.4 (KitKat) or higher • iOS 8.0 or higher 4.1 Connect the product to a smartphone 4.1.1 Connecting the product to an Android device 1 On your Android device, open the Play Store, and download and install THINKWARE CLOUD. 2 Run THINKWARE CLOUD. 3 Tap Dash cam connection is required.
Using the mobile viewer 4.1.2 Connecting the product to an iOS device Connecting via Wi-Fi 1 On your iOS device, open the App Store, and download and install THINKWARE CLOUD. 2 Run THINKWARE CLOUD. 3 Tap Dash cam connection is required. at the bottom of the screen. 4 Tap Wi-Fi Connection. 5 On the product, press the Wi-Fi ( ) button. 6 From the THINKWARE CLOUD, tap Next. The Wi-Fi Settings screen will appear. 7 From the network list, select the Wi-Fi network starting with "Thinkware.
Using the mobile viewer Connecting via hotspot 1 On your iOS device, open the App Store, and download and install THINKWARE CLOUD. 2 Run THINKWARE CLOUD. 3 Tap Dash cam connection is required. at the bottom of the screen. 4 Tap Hotspot Connection > Configure New Connection. 5 On the product, press the Wi-Fi ( ) button. 6 From the THINKWARE CLOUD, tap Next. The Wi-Fi Settings screen will appear. 7 From the network list, select the Wi-Fi network starting with "Thinkware.
Using the mobile viewer 4.2 Mobile viewer screen layout The following provides brief information about the mobile viewer’s screen layout. View the connected product or configure a new connection. View and play the recorded videos. View the product information. View main menu. View the cloud service menu. View notifications for firmware update, entering and departing GEO-Fence zones, and impacts. Move to the live view screen. View or configure the dash cam settings.
Using the mobile viewer 4.3 Playing recorded videos on the mobile viewer Follow the instructions to play recorded videos. The recording and the Advanced Driver Assistance System (ADAS) features of the product are disabled while checking the video file list or playing a video on the mobile viewer. 1 On your smartphone, run the Thinkware Cloud application and connect the product to the smartphone. 2 From the home screen of the mobile viewer, tap File List. The categories will be displayed.
Using the mobile viewer 4.5 Cloud service As long as the dash cam is connected to Internet, you can view your vehicle's location, receive notifications when entering and departing Geo-Fence zones, and detecting a strong impact. 4.5.1 Log in to the THINKWARE account Follow the instructions to log in to the THINKWARE account. • You must turn on the network function to use the cloud service. To turn on the network function, refer to "6.6.1 Setting the network function" on page 50.
Using the mobile viewer 4.5.2 Locating the vehicle The cloud service receives GPS information from your product and displays the location of your vehicle. Follow the instructions to locate your vehicle. Q800 PRO Tap . Your mobile phone's location is marked on the map. Tap the map to confirm your vehicle's location on the map. Your vehicle's location and direction is marked on the map. The last GPS information reception date and time are also displayed.
Using the mobile viewer 4.5.3 Setting Geo-Fence You can receive notifications when your vehicle enters to or departs from the Geo-Fence zones. Turning on the Geo-Fence notification Follow the instructions to turn on the Geo-Fence notification. Tap . Tap Push Notification Settings. Tap GEO-Fence Notification.
Using the mobile viewer Adding a Geo-Fence zone Follow the instructions to add a Geo-Fence zone. Q800 PRO Tap . Tap Set Geo-Fence. ➊ ➋ ➌ ➊ Tap the desired location on the map. ➋ Tap Radius and select a distance. ➌ Tap Notice and select when to receive notifications. 30 Tap . Tap +.
Using the mobile viewer 4.5.4 Using the driving impact notification feature You can receive notifications if any impacts occur to the vehicle. Follow the instructions to turn on the driving impact notification. Tap . Tap Push Notification Settings. Tap Driving Impact Notification.
Using the mobile viewer 4.5.5 Viewing driving impact videos on the cloud service You can view driving impact videos uploaded on the cloud service if an impact is detected while driving. Follow the instructions to view the driving impact videos. Q800 PRO Q800 PRO Q800 PRO Tap . Tap . Tap Driving Impact Video. Tap a driving impact video you wish to play. • To download driving impact videos from the cloud server, ➊ Tap ➋ Tap and select a video to download. Download.
5. Using the PC viewer You can view and manage the recorded videos and configure various product features on your PC. 5.1 System requirements The following are the system requirements for running the PC viewer. • Processor: Intel Core i5, or higher • Memory: 4 GB or more • Operating system: Windows 7 or later (64-bit is recommended), macOS X10.8 Mountain Lion or later • Other: DirectX 9.0 or higher / Microsoft Explorer version 7.
Using the PC viewer 5.2.2 PC viewer screen layout (for Windows) The following provides brief information about the PC viewer's screen layout. View or configure the dashcam settings, and set the language for the PC viewer. Visit the THINKWARE website. Display the current video in full screen. Tap the Back button ( ) to return to the previous screen. Open a file, or save a video with a different name. Displays the video file name. Displays the current video. Switch between the front and rear videos.
Using the PC viewer 5.2.3 Playing recorded videos on the PC viewer (for Windows) Follow the instructions to play recorded videos. 1 Turn off the product and remove the memory card. 2 Insert the memory card into a memory card reader connected to your PC. 3 Double-click the shortcut to the PC viewer ( ) to open the program. The video files in the memory card will be automatically added to the playlist in the bottom-right corner of the PC viewer screen. The playlist section layout is as follows.
Using the PC viewer 5.2.4 Video control menu overview (for Windows) The following provides brief information about the PC viewer's video control menu. ➐ ➑ ➒ ➓ ➊ Number 36 ➋ ➌ ➍ Item ➎ ➏ Description ➊ Play the previous file Play the previous file in the currently selected folder. ➋ Rewind by 10 sec. Rewind the video by 10 sec. ➌ Play/Pause Play or pause the selected video file. ➍ Stop Stop playing the current video. The progress bar will move to the beginning of the video.
Using the PC viewer 5.3 PC viewer for Mac 5.3.1 Installing the PC viewer (for Mac) You can download the latest PC viewer software from the THINKWARE website (http://www.thinkware.com/ Support/Download). The PC viewer installation file is stored in the root folder of the memory card that is provided with the product. Follow the instructions to install the PC viewer on your PC. 1 Insert the memory card into your PC using a SD card reader or SD card adapter provided. 2 Move the file named "dashcam_viewer_X.
Using the PC viewer 5.3.2 PC viewer screen layout (for Mac) The following provides brief information about the PC viewer's screen layout. Save the current scene. Set the speed unit. View or configure the dashcam settings. Switch between the front and rear videos. Set the language for the PC viewer. Print the current scene. Visit the THINKWARE website. Displays the current rear video. Displays the current front video. Right-click this pane to display the current video in full screen.
Using the PC viewer 5.3.3 Playing recorded videos on the PC viewer (for Mac) Follow the instructions to play recorded videos. 1 Turn off the product and remove the memory card. 2 Insert the memory card into your Mac using a SD card reader or SD card adapter provided. 3 Open the PC viewer. 4 Click and locate the memory card. The video files in the memory card will be automatically added to the playlist in the bottom-right corner of the PC viewer screen. The playlist section layout is as follows.
Using the PC viewer 5.3.4 Video control menu overview (for Mac) The following provides brief information about the PC viewer's video control menu. Q800 PRO ➊ Number 40 ➋ ➌ ➍ ➎ ➏ ➐ ➑ Item ➒ ➓ Description ➊ Play/Pause Play or pause the selected video file. ➋ Stop Stop playing the current video. The progress bar will move to the beginning of the video. ➌ Play the previous file Play the previous file in the currently selected folder.
6. Settings You can set the product features according to your needs and preferences using the mobile viewer or the PC viewer. The following procedures are based on the mobile viewer. The product will stop recording while configuring settings on the mobile viewer. 6.1 Managing the memory card 6.1.1 Partitioning the memory card You can partition the memory card to adjust the storage space for different types of video recordings. Refer to the following instructions to partition the memory card.
Settings 6.2 Setting the camera You can adjust the brightness of the front and rear view and flip the rear view image upside down. 6.2.1 Setting the brightness of the front camera You can set the brightness of the front view recording. Refer to the following instructions to set the brightness. 1 From the mobile viewer, tap Dash Cam Settings > Camera Settings. 2 From Brightness-front, select Dark, Mid, or Bright. The new setting is applied automatically. 6.2.
Settings 6.3 Setting recording features You can set and adjust various features for recording, including the detection sensitivity for recording when the product detects an impact during continuous recording. 6.3.1 Setting the continuous impact detection sensitivity You can set the detection sensitivity for recording when an impact is detected while driving. When you set the sensitivity, you must consider the road conditions, traffic situation, and your driving style.
Settings 6.3.4 Setting the impact sensitivity in parking mode You can set the detection sensitivity for recording when impact is detected while parking. Refer to the following instructions to set the parking impact sensitivity. 1 From the mobile viewer, tap Dash Cam Settings > Record Settings. 2 From Impact Sensitivity in Parking Mode, select the desired sensitivity. The new setting is applied automatically. 6.3.
Settings 6.3.8 Setting the battery cutoff voltage feature You can set the voltage limit to stop recording at when using the Low Voltage Off feature. Refer to the following instructions to set the voltage. • The battery cutoff voltage can be set only when the Battery Protection setting is set to Enabled. • If the Off voltage value is too low, the product may consume the battery completely depending on the conditions like the vehicle type or temperature.
Settings 6.4.2 Setting the mobile zone alert Follow the instructions to turn on or off the mobile zone alert. 1 From the mobile viewer, tap Dash Cam Settings > Road Safety Settings. 2 From Mobile Zone Alert, select Enabled or Disabled. The new setting is applied automatically. 6.4.3 Identifying the vehicle type Refer to the following instructions to initialize the ADAS calibration setting. 1 From the mobile viewer, tap Dash Cam Settings > Road Safety Settings.
Settings 6.4.6 Setting the lane departure detection speed You can change the lane departure detection speed. Refer to the following instructions to set the lane departure detection speed. 1 From the mobile viewer, tap Dash Cam Settings > Road Safety Settings. 2 From LDWS Speed, select the desired sensitivity. The new setting is applied automatically. 6.4.
Settings 6.5 Configuring the system settings This menu allows you to configure the hardware settings that are globally applied to the system during operation, such as the display language and screen brightness. 6.5.1 Setting the display language Select a language to display on the screen. Follow the instructions to select a language. 1 From the mobile viewer, tap Dash Cam Settings > System Settings. 2 From Language, select the desired language. The new setting is applied automatically. 6.5.
Settings 6.5.5 Setting the time zone Follow the instructions to set the time zone. 1 From the mobile viewer, tap Dash Cam Settings > System Settings. 2 From Time Zone, select the desired time zone. The new setting is applied automatically. 6.5.6 Setting the daylight saving time Follow the instructions to set the daylight saving time. 1 From the mobile viewer, tap Dash Cam Settings > System Settings. 2 From Daylight Saving, select Enabled or Disabled. The new setting is applied automatically. 6.5.
Settings 6.6 Configuring network function settings You can activate or deactivate network function and driving impact notification. 6.6.1 Setting the network function Follow the instructions to turn on or off the network function. 1 From the mobile viewer, tap Dash Cam Settings > Network Function Settings. 2 From Network Function, select Enabled or Disabled. The new setting is applied automatically. 6.6.
7. Accessing the product information New users may benefit from the basic product information that can be accessed from the Menu screen. 7.1 Viewing the product information From the mobile viewer, tap Dash Cam Info to view product information. The following product information will be displayed on the screen. • Model Name • Firmware Ver. • Safety Camera Ver. • Memory Size • LOCAL ID • GPS Info 7.
8. Upgrading the firmware A firmware upgrade is provided to enhance the product's features, operation or to increase stability. For optimal operation of the product, ensure that you keep the firmware up to date. Follow the instructions to upgrade the firmware. 1 On your PC, open a web browser and go to http://www.thinkware.com/Support/Download. 2 Select the product and download the latest firmware upgrade file. 3 Unzip the downloaded file. 4 Disconnect power to the product and remove the memory card.
10. Troubleshooting The following table lists the problems users may encounter while using the product and measures to resolve them. If the problem persists after taking the measures provided in the table, contact the customer service center. Problems Cannot power on the product Solution • Make sure the power cable (the car charger or the hardwiring cable) is connected to the vehicle and the product properly. • Check the vehicle’s battery level. The voice guide and/or buzzer do not sound.
11. Specifications To see the product specifications, refer to the following table. Item Specification Remarks Model name Q800 PRO Dimensions / Weight 107 x 60.5 x 30 mm / 104.5 g 4.2 x 2.4 x 1.18 inch / 0.
Specifications Item Specification Operating temperature 14 – 140℉ / -10 – 60℃ Storage temperature -4 – 158℉ / -20 – 70℃ Connection Interface 1 x V-IN port Remarks 55
Specifications Before contacting a service center Please back up all important data stored in the memory card. The data in the memory card may be deleted during repair. Every product requested for repair is regarded as a device that has had its data backed up. The customer service center does not back up your data. THINKWARE is not responsible for any loss, such as data loss.
http://www.thinkware.com Ver. 1.2 (July.