X-7 USB Recorder Version 3.
Revision Table Date August 2010 Version Initial Release Supersedes Important Customer Information The USB Recorder was designed to assist you with your daily tasks. It can be useful for authorizations, quote confirmation, verbal contracts, telephone interviews, training personnel or whenever you cannot find a pen and paper. It is important to read and understand all aspects of this manual and how to operate the X-7 USB Recording Device.
Table of Contents Application Control ............................................................................................................ 4 Zoom ........................................................................................................................... 4 Exit .............................................................................................................................. 4 Expand ...........................................................................................
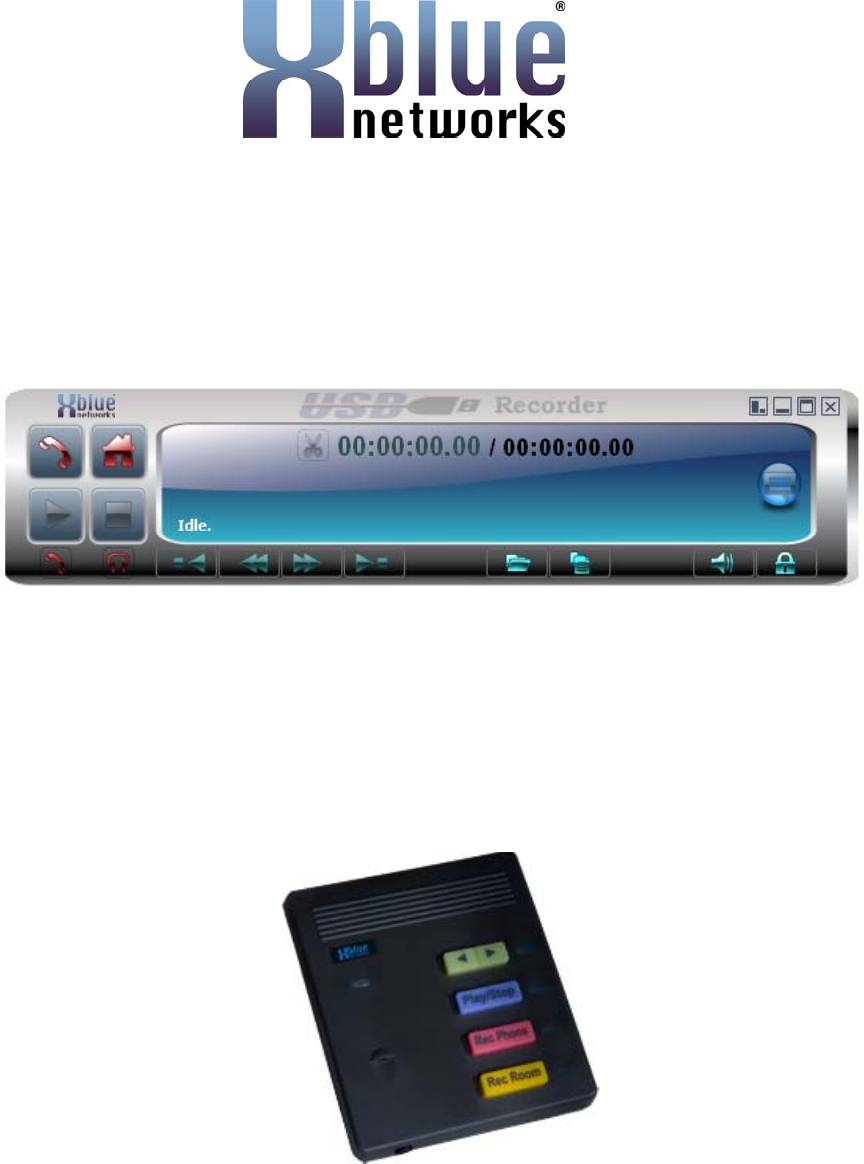
Application Control Zoom Click to access the mini player. Click zoom again to return to the full player Exit Click exit to close the application.
Click on the minimize icon to return to the player view Minimize Click the minimize icon to minimize to the tray.
Administration Logging In If a user or administrator has selected Login Required a login screen will appear when the application starts.
Click on the Admin tab ~7~
General Tab Login Needed. When checked, a Login is required before accessing the application Open to System Tray When the application starts it will automatically be minimized to the system tray Close to System Tray When selected, clicking on the Exit button will send the application to the system tray (same functionality of the minimize button). Auto Select Device Used when Multiple devices are connected to one computer.
Backup To: Folder - Select the folder where you want to backup your recordings. This folder can be on the local or on remote PC (ask your network admin on how to access a remote folder on your network). FTP - recordings will be backed up to the FTP server that has been configured for that recorder. See below for FTP configuration details.
Users Tab Profile Use this user before login If the "Login Required" and "Start to tray" options are selected this control will choose the highlighted user to be used before logging in.
Adding a new user User ID User name Role Rec. Prefix Password User Path User ID Name of User Admin – Full Access User – Limited Access Prefix to each audio file Enter a password for this user Select a path for this user’s audio files. Please note that any information specified here will override the information specified in the Main Data Location under the Admin => General tab. Note: To delete a user – highlight the user, and press the delete button on your keyboard.
Custom FTP Settings These settings will override the FTP settings specified in the "Enable FTP operation" under the Admin => General tab.
Player Options Start with Small player When the application starts it will start with the small player instead of the large player. Disable Box Keys When this option is selected the USB devices keys will not be functional. Use Outlook to send Mail Outlook will be used to send any audio files chosen to be emailed. View List LIFO When this option is selected, the newest recording will be shown first on the list. Compress Recordings Audio files will automatically be compressed.
Rewind Interval The number of seconds that the application will rewind the audio files when the rewind command is activated. Fast Forward Interval The number of seconds that the application will fastforward the audio files when the fast-forward command is activated. Minimum Record Length This parameter will determine the minimum number of seconds for an active recording (from phone or room) to be considered as a valid recording and to be saved as an audio file.
Centralized Profile Centralized profile is used by administrators of large installations that can create one user list with all the options being selected. Upload that profile to a centralized server and have all the new users download the profile so all recorders will be configured properly with one profile. http://www.xblue.com Enable Centralized Profile Update Activate the checkbox to enable Centralized Profile Update.
Auto Update Auto Update Enabled When checked, the system will automatically check for updates with respect to the interval settings set in the parameter bellow. Check for update every This parameter will set the interval for the auto update mechanism. Check for updates now Click on this button to have the software check if there are any updates available.
Device Control Device Users can see the status of the USB recorder device in this window. This tab also allow the user to fully control the recorder by using the mouse to click on the different buttons that mimics the actual buttons on the recorder itself. Recording Gain This parameter ranges from 1- 255 and is used to determine the recording level of the LOCAL party. The higher the value the louder the LOCAL party will be heard on the recording.
Log Users can view events within the software in real time. This feature is used mainly for troubleshooting by USB Recorder tech support team.
Rec Data Tab The Rec Data tab will allow a user to properly mange a single recording. Plays the previous recording Plays the next recording Click to activate automatic play of recordings (used in conjunction of play previous and play next recordings.
Backup the recording Backup and remove (delete) the recording Compress the recording Save Changes Add Bookmarks Clear All Bookmarks Remove Selected Bookmarks ~ 20 ~
LIST Tab This screen is lists recordings and allows management of multiple recorded files. Type File Name Format Date Length Subject The recording type - Room or Phone Name of the recorded file Wav is Uncompressed, GSM or MP3 are Compressed.
Right Click Options Load Locate on Disk Loads the selected file and opens the Rec Data tab. Opens a windows explorer window to show the location of the recorded file. Email Email the recorded file or files Remove Remove (delete) the selected file or files Backup Backup the selected file or files. Backup and Remove Backup the selected file or files then remove(delete) them from the main data directory FTP Copy the selected file or files to the FTP server defined in the Admin General tab.
Query Tab The query tab allows user to search for recordings A query can be created with any combination of the parameters explained below.
Player Large Player Click to Record from the Phone Click to Record from the Room Click to Play the loaded file Click to activate handset for playback of recorded files. When selected (Green), the user can play an audio file to the remote during a phone conversation with that party. The recorded audio will be heard by both parties. When Handset is active click on the icon again to deactivate it. Compressed files can NOT be played Use this feature ONLY in conjunction with a 2.
Small Player All these icons are acting in the same manner as in the Large Player view Recording Options Large Player recording from Phone Small Player Recording from Phone Pause the recording Stops the Recording ~ 25 ~
Play Options Large Player Playing a Recording Small Player Playing a Recording Click to pause the playback of a recording Click to stop the playback of a recording Click to go to the beginning of the recording. Click to rewind the playback as determined by the Rewind Interval Click to Fast Forward as determined by the fast forward interval. Click to go to the end of the recorded file. ( Not available on the small player.
Player Paused Click to continue playing Click to stop playback Trimming a Recording Click to Trim the recording (only available in large player) After clicking the Trim Icon Select Trim Start or Trim End. By selecting Trim Start the application will erase any recording from the pause point to the beginning of the recording. By selecting Trim End, the application will erase the recording from the pause point till the end of recording. For example, start playing the desired file.
Bookmarks Bookmarks are created by users and allow a reference point within a recording. Double Click on a bookmark to go directly to that section of the recording. Creating a Bookmark While reviewing a recording or during the recording itself Click on the add bookmark Icon.
A bookmark is added to the recording showing the time stamp. The user can then add the Title and Comments to the bookmark. When completed the changes must be saved by clicking the Save changes icon. After saving the Bookmark and selecting the LIST tab A “+” has been added to the type of recording to indicate that bookmarks exist on that recording.
Deleting a selected Bookmark Choose a recording that has bookmarks created. Choose one of those bookmarks by clicking on it. Click on the Delete selected bookmark(s) icon.
Options Joining multiple files together Click on the List Icon to open the player to the list tab Select multiple files by selecting one file. Press and hold down the CTL key and using the mouse select more files. Right Click on one of the selected files and select Join Selected Files option from the menu.
The Join files window will appear The order of files can be arranged by clicking on a file or down . and moving it up Files can also be removed from the list by selecting the file and clicking . Enter the name of the new file that will be created in the Output file box and clicking to join the selected files. The new name will appear on the recordings list window.
USB Recorder Device Keys Press to initiate or end a recording of the room Press to initiate or end a recording of the phone Press to Initiate or stop the playback of a recording Press to Fast Forward or Rewind during playback of a recording. In idle mode, these button will "scroll" between the files in the list and will upload the selected file.
Connectors Connect the phone handset to this end Connect the phone base to this end USB Cable connector 2.
Multiple Recorders on a Single Computer Multiple devices can be attached to the same computer. Multiple instances of the USB recorder application control each device separately. When the application is initializing the user will be asked which device to control.
When using multiple recorders it is highly recommended that each instance ids logged in by a different user. If all applications are logged in to by one user any of the applications (If admin privileges) can change settings for all applications. So it is recommended to have Login Required enabled in the General Tab under Admin and to have multiple users log in.
Auto Detect & Select Devices The software can eliminate the previous step by automatically assigning each instance of software to a device by selecting the "Auto Select Device" in the Admin General section Automatically Start Multiple Instances By selecting the automatically start multiple instances the software will start as many instances of the software as there are devices connected to the system.