
User Guide


X16 Installation Guide
- 22 - Issue 2
Telephone Wall
Mount
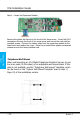
Step 2 – Insert the Expansion Module
Remove the plastic tab found on the front of the Voice server. Insert the RJ14
connections through the front of the voice server and secure the card with the
provided screws. Connect the ribbon cable from the expansion module to the
main board and replace the cover. Place the provided black plastic encasement
window around the newly installed card.
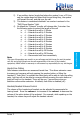
Telephone Wall Mount
When wall mounting an X16 Digital Telephone Endpoint be sure to use
the inner posts (3.26 inches) on an adjustable wall mount plate. If this
plate is not available, use the “Telephone Wall mount” template, which
can be found on the “System Wall Mount Template” used in step 1 (
Page 13) of the installation section.