
User's Manual


8
Xdrop™ Installation and Set-Up Quick Guide
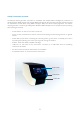
1. Place the transport box on a flat surface.
2. Flip out the four lock twisters and turn them counterclockwise to unlock the lid of the
transportation box.
3. Remove the lid to gain access to the instrument.
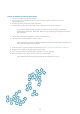
4. Slide a hand into the box on each side of the instrument and lift it out of the box.
Tip: If required, gently lift the back of the instrument 10-15 cm and place it against the
foam/padding at the back. This should allow you to get a good grip placing both hands under
the instrument.
5. Lift out the instrument and place it on a flat horizontal surface.
6. Leave the instrument unused for at least 2 hours.
Note: Leaving the instrument at ambient temperatures allows the instrument to equilibrate and
will reduce the risk of instrument failure.
7. Attach the power cord to the back of the instrument. Note: Use the included power cable only!
8. Plug the power cable into an appropriate power outlet.
9. Turn the main switch at the back of the instrument to the ”|” position.
10. Press the Power button at the front to power up the instrument.
Note: Power button needs to be fully pressed for the instrument to start up.