05-0580-000 August, 2003 4800/2400 Series Installation and user guide
©Copyright 2003 by Visioneer. All Rights Reserved. Copyright protection claimed includes all forms and matters of copyrighted material and information now allowed by statutory or judicial law or hereinafter granted, including without limitation, material generated from the software programs that are displayed on the screen such as styles, templates, icons, screen displays, looks, etc. “Xerox® and the digital X® are trademarks of XEROX, used under license from Xerox Corporation.
Table of Contents 1 Getting started with your new scanner Step 1: Installing the scanner software . . . . . . . . . . . . . . . . . . . . . . . . . . . . . . . . . . . . .1-1 Step 2: Connecting the scanner . . . . . . . . . . . . . . . . . . . . . . . . . . . . . . . . . . . . . . . . . .1-2 Getting the PaperPort software user’s guide . . . . . . . . . . . . . . . . . . . . . . . . . .1-4 Step 3: Checking out your scanner . . . . . . . . . . . . . . . . . . . . . . . . . . . . . . . . . . . . . . . .
iv 4800/2400 Series Installation and User Guide
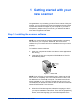
1 Getting started with your new scanner Congratulations on purchasing your One Touch scanner. With your scanner, you can quickly scan paper documents and color photos to place their electronic images on your computer. If you have a transparency adaptor with your scanner, you will also be able to scan 35mm negatives and slides. Step 1: Installing the scanner software NOTE: You must install the scanner software before connecting the scanner to your computer.
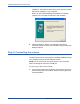
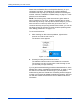
Getting started with your new scanner installed in, and follow the instructions on the screen to install the scanner software on your computer. When you are finished installing the software, a message instructs you to connect the scanner to the computer. Figure 1-2 Connect scanner 4. Follow the steps in “Step 2: Connecting the scanner” to connect the scanner. When you’re finished, click [Finish] in the dialog box above.
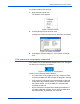
Getting started with your new scanner Unlocked position Figure 1-3 Unlock scanner NOTE: The locking tab protects the scanner’s scan head by holding it securely in position. Lock the scanner when transporting it from one location to another, but always remember to unlock it before scanning. The scanner will not scan when locked. 2. If your scanner does not have a Transparency Adaptor, go to Step 3.
Getting started with your new scanner 4. Plug the power supply cable into the jack on the back of the scanner, then plug the power supply into a wall outlet. USB Cable Power supply Figure 1-6 Plug in power supply A progress message appears saying that the scanner has been found. The scanner is now correctly installed. NOTE: If you computer is running Windows XP, you may see messages about using a fast USB 2.0 connection for the scanner. If your computer is not equipped with USB 2.
Getting started with your new scanner To check the status of the scanner: 1. Right-click the scanner icon. The shortcut menu appears. Figure 1-8 Shortcut menu 2. Choose [About] from the shortcut menu. A dialog box confirms that the scanner is properly connected. Figure 1-9 Scanner information 3. Click [OK] to close the dialog box. Your scanner is ready to scan.
Getting started with your new scanner Please see the Readme file in the PaperPort directory on your computer’s hard drive. The Readme file contains additional information that may help you diagnose problems connecting the scanner. Also see “Installation troubleshooting” on page 3-1 of this guide for more information. NOTE: The scanning lamp under the scanner’s glass needs to warm up before you can scan. A status message lets you know when the lamp is ready.
2 Three ways to scan You can scan paper items by pressing a One Touch button, by clicking a button on the screen, or from the PaperPort software (or other TWAIN software). Scan with the scanner buttons Press a button on the scanner’s front panel. Figure 2-1 Press a scanner button Scan from the screen Click the scanner icon on the Windows taskbar. A panel representing the scanner buttons appears. Click a button on the panel.
Three ways to scan 1. Place an item to scan on the glass, face down, and align the edge of the item with the arrow marker at the lower left corner of the glass. 2. Close the lid and press one of the scanner buttons. The scanner starts scanning the item. Messages just above the Windows taskbar shows the status of the scanning.
Three ways to scan Button Function Preconfigured Settings Copy/ Print Prints the scanned item in black and white on your printer/copier at the printer/copier’s default resolution. Custom Scans the item as a color photo and displays it in an image processing application. NOTE: If a button is not preconfigured, the Configuration dialog box appears when you press that button so you can configure it manually.
Three ways to scan A question mark icon on a button means your computer does not have an application that corresponds to that button’s functions. For example, if your computer does not have an email application, the Email button will have a question mark icon on it. About the Configuration dialog box The Configuration dialog box shows the current settings for each scanner button. The tabs across the top of the dialog box correspond to the buttons.
Three ways to scan Figure 2-8 Shortcut menu 2. Choose [Configure] from the shortcut menu. The Configuration dialog box appears. The options on the Configuration dialog box are: Select Destination – the list of applications that can open to display the scanned image. Select the application that you want to automatically open to display or process the scanned image. Select Configuration – the list of the button’s scan configurations.
Three ways to scan Options – displays a dialog box for selecting options about the destination application for the scanned image. Each destination application has its own options dialog box. Folder Copy – displays a dialog box for selecting the folder to use for storing copies of the scanned images.
Three ways to scan 3. Click a selection in the Select Configuration list to choose a new scan configuration for the selected scanner button. The configurations are preset for the application you select in the application list. If you select another application, the configurations are for that application. If you want to select a configuration prior to scanning, click the option, [Configure before Scan].
Three ways to scan 2. Click the tab of the button whose options you want to change. 3. In the Select Configuration list, click the configuration that you want to adjust. For example, the following figure shows a configuration named Special Scan for Dark Print (which you would have created earlier). Figure 2-12 Edit a configuration 4. Click the [Edit] button. The dialog box appears for adjusting the scanning settings of the selected configuration. Figure 2-13 Edit scan settings 5.
Three ways to scan scanning produces an image in varying shades of gray. Select Color to scan color photographs and other color items. Resolution – Drag the slider to the right or left to adjust the dots per inch (dpi) of the resolution. The higher the dpi setting, the sharper and clearer the scanned image. However, higher dpi settings take longer to scan and produce larger files for the scanned images.
Three ways to scan Gamma – Drag the slider to improve how the colors in a scanned image look on your monitor. Gamma correction allows you to achieve precise color matching. Because the computer cannot always transmit the exact color information to the hardware, you may have to make some color adjustments using the Gamma feature. The default Gamma setting works fine in most cases and normally does not need to be adjusted. 7. Click [OK]. The Configuration dialog box reappears.
Three ways to scan The name of the button to receive new preferences Figure 2-16 Button preferences 3. If the Button tab on the Preferences dialog box is not selected, click it. Show All Destinations – Clicking this option automatically selects all the destination applications categories. When you click the button’s tab on the Configuration dialog box, its list of destination applications include all of the applications on your computer that fall into these categories.
Three ways to scan Figure 2-17 General preferences Show Status Window – Select this option to see the small window at the bottom right corner of the screen that shows the status of the scanning and other information as shown in this sample: Figure 2-18 Status window Show Scanner Icon in Windows Taskbar – Select this option to see the small icon representing the One Touch scanner in the Windows taskbar.
Three ways to scan Scanning from the PaperPort software Instead of using a scanner button, you can scan directly from the PaperPort software. NOTE: You can also scan directly with other software that meets the TWAIN standards for scanning, which includes many graphics and imaging applications available for your computer. The following steps explain how to set up and scan from the PaperPort software but you can use the same basic processes with other TWAIN software.
Three ways to scan scanning at a higher resolution creates a larger file size and takes longer to scan. To minimize the file size and the time required to get a better quality scan, select just the area of the item that you want to scan. To scan an item: 1. Open the scanner cover, place the item face down onto the lower left edge of the scanner glass, and close the cover. 2. If PaperPort isn’t running, double-click the PaperPort icon on the Windows Desktop to start it. The PaperPort Desktop appears. 3.
Three ways to scan You can now scan manually by previewing the image and adjusting the scan settings to your liking, or you can click [AutoScan]. The AutoScan feature uses your preset scan settings and the scanner’s automatic image analysis capabilities to find the optimum combination of settings for the item you’re scanning. NOTE: The appearance of the Scan Manager Pro window depends on your computer monitor’s screen resolution.
Three ways to scan Thumbnail image Bitmap icon Figure 2-22 Thumbnail images in PaperPort To scan automatically: 1. Click [AutoScan]. The scanner uses your preselected resolution setting for the configuration you selected. See “Setting preferences” on page 2-10 to set the AutoScan settings. In addition, your One Touch scanner has built-in image analysis capabilities that find the optimum combination of settings for the item you’re scanning.
Three ways to scan Getting help with the PaperPort software The PaperPort software includes a complete set of help topics that answer questions about each feature of the software. To see help information, press the [F1] key, or from the [Help] menu, choose [PaperPort Help Topics] to display the Help Topics window. HINT: Also see the technical support card included with your scanner.
Three ways to scan Click to close the settings panel Figure 2-25 Resolution settings NOTE: The information in the scan settings list and the options that you select on the various settings panels are interactive. That is, as you change the settings on the panel, the numbers in the list on the left also change. Saving a new profile If you adjust the scan settings you can save them as a profile for later use. To save a new profile: 1. Select a configuration on the Scan Manager Pro, such as Color/Custom.
Three ways to scan 4. Type a name for the new profile. 5. Select the options you want: • Store the custom output image size in this Profile – You can create a custom image size as part of the settings; if you adjusted the output image size for the selected configuration, that output image size is saved with this profile. See “Saving a custom size” on page 2-24 for more about a custom image size.
Three ways to scan 3. To adjust the sharpness, drag the Fidelity slider to the left to decrease the sharpness or to the right to increase the sharpness. You can also type a number directly into the sharpness setting box, or click the up and down arrows next to the box to increase or decrease the setting. 4. To return the settings to their original amounts, click [Reset]. The resolution and sharpen panel also includes an advanced setting for Moire patterns.
Three ways to scan You can also adjust the brightness and contrast by sampling portions of the image in the preview window. The three Sampler buttons correspond to the Black, Mid tones, and White portions of an image. To use the Sampler buttons: 1. Click one of the buttons. The pointer automatically moves onto the image and becomes a sampler pointer. 2. Place the pointer on the portion of the image for that sample and click.
Three ways to scan new curve. The x and y numbers at the bottom of the response curve indicate the exact position of the pointer on the curve. The Gamma slider remains fixed when you use the Freestyle option. 3. Drag the Gamma, Saturation, and Color Hue sliders to the left to decrease the settings or to the right to increase the settings. You can also type a number directly into the setting boxes, or click the up and down arrows next to the boxes. 4.
Three ways to scan 3. If the dotted line is not exactly where you want it, put the pointer on the line and drag the mouse. For example, if you want the scan to include a border around the image, you can drag the dotted line to be slightly larger than the autotrimmed area. To use the pointer to drag the line, make sure the pointer button is selected at the top of the window. 4. When the trimmed area is what you want, click [Scan]. To manually set the output size for an item: 1.
Three ways to scan A new Scan Info box for the area selected on the image. The area you selected to scan. Figure 2-27 Adjusting output size 4. If the dotted line is not exactly where you want it, put the pointer on the line and drag the mouse. To use the pointer to drag the line, make sure the pointer button is selected at the top of the window. 5. To rotate the selected area 90 degrees, click [Rotate 90 Degrees]. 6.
Three ways to scan Figure 2-28 Save a custom size 2. Type a name and dimensions for the size. 3. Click [OK]. The new custom size is now listed in the box at the top of the panel. Select it in the list to automatically reuse the custom size. The Scan Info box The following figure shows the information on the Scan Info box: Physical size of the image to scan. Location of the top left corner of the image in the Preview window.
Three ways to scan Setting preferences You can set preferences for the Scan Manager Pro and scanner that are independent of the preferences for the PaperPort software. To set the Scan Manager Pro preferences: 1. Click the [Preferences] button. The User Preferences dialog box appears. Figure 2-30 Set user preferences 2. Select the preferences you want: • Enable selection of color bitdepths...
Three ways to scan • AutoScan Resolution – You can scan an item by clicking the AutoScan button on the Scan Manager Pro. The scanner uses these resolution settings for the respective configurations: Color, Grey Scale and Black and White. • Folder for Temporary Images – When you scan an item, its scanned image is initially stored in a folder before being sent to the PaperPort Desktop or some other application.
Three ways to scan P/N:180700002060 Mask for 35mm slides Mask for 35mm negatives Figure 2-31 Transparency masks 2. To scan a 35mm slide, first position the 35mm mask on the glass. The mask has one square corner. Align that corner with the arrow on the scanner body. Make sure that the text on the 35mm mask faces up so the slide fits properly in the mask. Follow the directions on the mask and place the 35mm slide horizontally into the slide holder.
Three ways to scan Figure 2-33 Negative placement The 35mm negative mask also has a calibration slot. Do not place items to be scanned in the calibration slot. You’re now ready to scan the slide or negative. To scan a 35mm slide or negative: 1. Start the PaperPort software, click the [Scan] icon on the PaperPort command bar, and then click the [Scan] button in the Scan pane. The Scan Manager Pro appears.
Three ways to scan Click the dropdown arrow and choose the transparency scanning option from this menu, The option “Scan Reflective Using” is for scanning paper items, not slides or negatives. Figure 2-34 Transparency scanning options 3. Click [Preview] to preview the image and, if necessary, adjust the various settings, then click [Scan] when the image is what you want. See “Using TWAIN and Scan Manager Pro” on page 2-13 for details about scanning.
3 Troubleshooting and maintenance Installation troubleshooting My computer isn’t recognising my scanner. I’ve checked the power and connections, what else should I check? Sometimes the driver does not install correctly and needs to be reinstalled (this occurs if the scanner is connected before the PaperPort software is installed). To check this go to the Control Panel and double click on the System icon.
Troubleshooting and maintenance How to uninstall your scanner To uninstall your One Touch scanner, you remove the One Touch software first, and then remove the PaperPort software, or other software you installed for the scanner. Step 1: Uninstalling the One Touch software For Windows 98, 98 SE, and ME: 1. Click [Start] on the Windows Taskbar. 2. Choose [Settings] then [Control Panel] from the menu. 3. Double-click the [Add/Remove Programs] icon. The Add/Remove Programs Properties window appears.
Troubleshooting and maintenance The One Touch software is uninstalled from your computer. The status light on the scanner turns amber indicating that the scanner and computer are no longer communicating. 9. If the Remove Shared Components window appears, select [No to All]. 10. Unplug the power to the scanner and remove its USB cable from your computer. 11. Close the Add/Remove Program Properties window and the Control Panel window. 12. Restart your computer. For Windows 2000 and XP: 1.
Troubleshooting and maintenance 7. Make sure the [Automatic] option is selected. NOTE: The Automatic option is selected by default. Using the Automatic option is recommended. The other options are for advanced users only. 8. Click [Next]. The Perform Uninstall window appears. 9. Click [Finish]. The One Touch software is uninstalled from your computer. The status light on the scanner turns amber indicating that the scanner and computer are no longer communicating. 10.
Troubleshooting and maintenance NOTE: Files created by PaperPort are in a proprietary format (with a .max extension) and cannot be opened by other applications. If you decide to keep your scanned image files and want to be able to view them, you can use the PaperPort Viewer instead of the PaperPort application. To download the viewer, visit www.xeroxscanners.com. You may see a note about missing software. Click [OK]. 9. For Windows XP, click [Finish]. 10.
Troubleshooting and maintenance 3-6 4800/2400 Series Installation and User Guide