PRINTFOLD (Synergix) Fold System 40 & Model 2750 ENGINEERING DOCUMENT FOLDER OPERATOR’S MANUAL Printfold Company, Inc. • 825 North Easton Road • Doylestown, PA 18901 • USA Tel: 215-345-0800 or 800-DOC-FOLD Fax: 215-348-3031 E-mail: CUSTSVC@PRINTFOLD.COM 2750 op#0_1 R3.doc 10-02 Copyright 2002, Printfold Company, Inc.
PRINTFOLD MODEL 2750 & SYNERGIX FOLD SYSTEM 40 ENGINEERING DOCUMENT FOLDER OPERATOR’S MANUAL Table of Contents Chapter 1 Introduction Chapter 2 Operating Instructions Chapter 3 Outline of Folding Mechanism Chapter 4 System Menu and Key Operator Functions WARNING The interlock system is designed to prevent access to components capable of causing injury. Do not try to defeat any interlock by taping or otherwise artificially holding it closed.
Chapter 1 INTRODUCTION General information There are four variants of the Printfold Model 2750 Folder, each accommodating a specific range of print speeds: XES Model 2753 XES Model 2755 XES Model 2757 Synergix Fold System 40 Print speeds up to 5 ips (120 mm/s) Print speeds up to 6 ips (160 mm/s) Print speeds up to 8 ips (200 mm/s) Print speeds up to 10 ips (250 mm/s) The Printfold 2750 Folder is self-programming, and fully automatic.
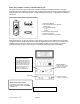
Power entry module / counter / communications port The power entry module, with on/off switch and main fuse block, is located at the base of the right accordion side panel. Adjacent to the power entry module are the print counter and communications port, diagram below. The communications port is a DB9 female type receptacle, configurable for an RS232 or RS422 link.
Main control panel The main control panel is located on top of the tower section of the accordion unit. It comprises five push buttons for fold selection and service-related functions, a four-line x 20-character display, and additional push buttons controlling optional features that may or may not be installed. All control functions other than fold selection are password protected to prevent accidental reprogramming by non-trained persons.
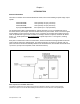
Bridge The bridge is the link between printer and folder. Its main functions are determining the media width on which the incoming document was printed, and providing the means for measuring length of the document. It also signals the in-feed system to accelerate once the document has left the printer, the purpose of this being to increase the separation between one document and the next. This allows the folder to accommodate high-speed printers with small inter-copy gaps.
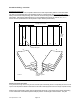
Print Upper surface of accordion folder Stack diverter in "fold" attitude To accordion folder drum A From bridge Tower in normal (folding) and bypass modes In (A) the underside of the stack diverter is horizontal, allowing prints to pass beneath to the accordion folder. In (B) the diverter is flipped down by solenoid action. Both the down-going (manual feed) and up-going paths may be accessed for jam clearance when the tower cover is tilted up as shown.
Accordion folding – overview Standard accordion fold In the standard accordion fold, all panels other than the final compensating fold are of the same width. The final or compensating fold of the standard sequence is positioned to give two equal-width panels, always narrower than the preceding ones unless the document length is an exact multiple of the selected panel width.
always narrower than the panel width unless the length of the document - as measured automatically by the bridge and in-feed system - happens to be an exact multiple of width S. Bookfolds (accordion folding with binding edge) For bookfolding, the accordion fold sequence is designed so that the left hand edge of the bottom panel extends to the left of the pack. The “binding margin” thus formed, typically 1” wide in the US, may be punched for filing in a binder.
Crossfolding – overview The accordion folded document is transferred to the crossfold section, which performs either one or two crossfolds depending on the media width (this being the longer dimension of the accordion fold). Crossfolded packets are delivered to a receiving tray at the side of the folder.
Key facts about fold programs • • • Orientation of the document as it enters the folder is important! The standard document feed orientation, SEL, is defined as “image up, title block leading, Short Edge Leading”. The “other” orientation, LEL, defined as “image up, title block trailing, Long Edge Leading”, is increasingly used in electronic printing installations having the ability to rotate images in software (unlike analog machines, in which the copy orientation is established by the original).
• The accordion folder has a capacity of 20 panels of 20lb (75 gsm) bond, less with heavier media. With a panel width of 12”, this allows a maximum foldable feed length of 240”. Accordion folding ceases at panel number 20, and any trailing portion of the document is passed unfolded. • The maximum number of panels of 20lb (75 gsm) bond that can be accordion folded and crossfolded is usually 12, corresponding to a document length of 144” with 12” panels.
Main features of the 2750 folding system • A length measurement system in the bridge between printer and folder automatically allows the accordion folder to deliver equal-width compensating panels, usually aligned with the trailing edge of the document. The same system ensures that the overall width of a bookfold is always 8½”, no matter what the document length. (Overall width of a metric bookfold is 210 mm.
Chapter 2 OPERATING INSTRUCTIONS After installation ... Your Printfold installer will have demonstrated how the folder operates with your printer or copier, showing how the bridge can be pivoted vertically for access to the rear of the printing system, and also how, in the event of a folder jam, documents are diverted to avoid a build-up of paper at the printer exit. Model 2750 Folder (operator’s side) Features to note ...
Handfeed Pressing the Handfeed pushbutton switches the 2750 into hand-folding mode, displaying a modified list of programs. The print to be folded is fed into the rollers at the rear of the folder (image face-down, title block leading - centering is not important, but alignment is). Receiver Advance Advances conveyor belts on High Capacity Print Receiver, if installed Folder ON Models 2753, 2755 and 2757 have similar control panels, with plain language in place of icons, e.g.
If you inadvertently leave the fold display mode, as in the above example, you will be in one of several password-protected modes not normally accessible to the operator. To return to the fold display mode, press MORE as many times as it takes to present “Quit” as one of the display options, then press the appropriate button. Start-up 1. Turn on the Power switch on the power entry panel (press I).
The communications protocol in effect is determined by the firmware installed in the folder, and by the Host parameter in the Parameters menu. USE KEYPAD FOLDS mode – integrated system In this mode the control panel on the folder is used to select the fold program, overriding fold selections made elsewhere. All other communications features remain in effect, including shutdown and job recovery functions, and sheet size transmission.
Manual document feeding In its normal “on-line” mode of operation the 2750 automatically processes documents passed from the printer. The 2750 also allows off-line operation, accepting hand-fed documents for folding. Because the width measuring system in the bridge is inactive when the folder is off-line, hand folding has limitations which do not apply to on-line operation: • • Bookfolding is not possible.
HAND FEED HANDFEED light off - hand feed program not initiated HAND FEED HANDFEED light on steady - folder is ready to accept a print HAND FEED HANDFEED light flashes - folder is currently folding a print To begin hand feeding ... 1. If applicable to your system, check the printer controller/host computer to make sure no prints are queued to the folder. 2. Press the HANDFEED button.
There are two parameters available to the service technician to customize the hand feeding process to suit individual operator preferences: • Handfeed delay: Determines the amount of time that the infeed sensor is covered before the tower rollers pull the document in. The delay is selectable from 0 through 10 seconds (2 seconds is the default condition). Some users prefer a longer delay to allow more time to square up the document. • Handfeed ramping time: This is the “oops” provision.
Jam conditions If a paper jam occurs in the folder, the folder attempts to process sheets within the folding system before stopping. The diverter at the front of the bridge then flips up, closing the bridge entrance, and diverting documents to the floor under the bridge. A jam condition is signaled by an audible alert (beep), and by the ERROR LED on the operator’s control panel.
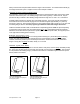
BRIDGE and BRIDGE EXIT Raising the bridge lid Release the lid by rotating the center catch counter clockwise. Raise the bridge lid. 1. If the document is visible ... 2. ... and has not entered the accordion folder, open the bridge lid by disengaging the catch in the center of the forward rail, then pull the document clear in the normal direction of print flow. Close and lock the bridge lid. ...
Raising the bridge The bridge is a precisely manufactured assembly. DO NOT use it as a seat or step, and DO NOT slam the bridge into its down or up positions! When returning the bridge to the down position, allow the bridge to engage gently the fixed stops inside the tower, then turn the knurled knob to lock the bridge in place. 4. Remove the document from the accordion folder in-feed rollers. If that isn’t possible, see “Accordion Folder” below. Lower and lock the bridge.
ACCORDION FOLDER 1. Raise the accordion folder lid. Accordion folder lid in raised position 2. Raise the upper drum guide shell (clam shell), exposing the folding drum. Use the “jog” feature … You can clear paper through the infeed rollers under power. Press the MORE button on the control panel to display System Menu, then press 1. Select Infeed Jog, forward or reverse as necessary. Opening the upper “clam shell” The clam shell is released by rotating the butterfly knob at center one quarter turn. 3.
Raising the drum faceplate shutter The drum faceplate is mounted on the drum shaft at the end nearest to the operator’s control panel. The crank handle could cause serious injury if engaged in the drum faceplate while the folder is operating. Springs on the crank hand pins and shutters over the drum ends are designed to prevent this. Do not try to defeat these safety features. Ejector springs on crank handle Use the “jog” feature … You can clear paper through the infeed rollers under power.
5. Rotate the drum in either direction to free one end of the document. Grasp and remove the document. Close and lock the clam shell, then close the accordion folder lid. 6. If the document cannot be removed as described above, it may be caught beneath the folding drum. This will require trained assistance. If you are qualified to perform this service, proceed as follows: Switch off the folder at the power entry panel, then remove the power cord. Raise the upper section of the crossfolder.
When replacing the rear panel, take care not to damage the interlock switch. Crossfolder rear panel Remove the rear panel for access to the lower section of the crossfolder, including the hub for the crank handle used to clear jams. Unplug the power cord before unhitching the crossfolder. Unhitching the accordion and cross folder Once the hitch pin has been removed, the crossfolder may be detached from the accordion folder. The lower clam shell is then accessible through the rear of the accordion folder.
When replacing the rear panel, take care not to damage the interlock switch. Crank handle engaged in crossfold roll 4. After clearing the jam, remove and stow the crank handle, close and lock the upper section, then replace the rear panel. 5. If the document is not caught in either pair of nip rolls, it should be possible to ease the document down through the open slot at the bottom of the crossfold pocket, or, using the crank handle, out into the catch bin.
SYSTEM ERROR The operator’s display indicates which type of system error has occurred. If calling for service, note for the technician the four-digit error code. If the error code is no longer shown on the keypad, use the recent error list under the system menu.
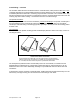
Chapter 3 OUTLINE OF FOLDING MECHANISM Section 1: The Accordion Folder In-feed rollers Fold rolls Folding drum Incoming document Edge detecting sensors In-feed and accordion folding components Paper gates (“flippers”), and other items have been removed for clarity. The accordion folder comprises a pair of in-feed rolls, and a folding drum that works together with two fold rolls.
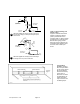
B 2 A [2] Panel measuring phase A measured length of the document is taken up by the folding drum. At the start of the process the drum turns counter-clockwise [1], taking the document through the lower fold roll, then stopping at the point [2], where the distance between the leading edge of the document (A) and the upper fold roll (B) equals the accordion panel width chosen by the operator. At this point the drum reverses [3].
The drum continues to rotate clockwise, stopping at the point [4], where the distance between the folded edge (C) and the lower fold roll again equals the selected accordion panel width. At this point the drum reverses [5], this time developing a down-going loop (D) which in turn becomes trapped by the lower fold roll to make the second fold. C B 5 D A [5] Starting the second fold Again, the opposing drives of drum and in-feed rolls cause a loop, this time in the other direction.
Document inversion For most documents the accordion folding procedure is exactly as described above. (Bookfolds require a modified form of accordion folding.) In the first phase of the standard procedure [1], the leading edge of the document is deflected downward to make contact with the folding drum. Certain document types require the document to be deflected upward in the first phase, this being necessary to present the packet with title block in the correct orientation relative to the crossfold blades.
Fold #1pushes the packet down To receiving tray Lower crossfold fold rolls Lower crossfold blade acts as diverter [2] Single crossfold mode The lower crossfold blade remains stationary, deflecting the cross-folded packet out to the receiving tray. If a second crossfold is required [3], the packet descends a calculated distance past the fold rolls, and is then pushed into the rolls by forward motion of the crossfold blade. The double folded packet then exits to the crossfold receiving tray.
Chapter 4 System Menu and Key Operator Functions Operator’s control panel The operator’s control panel displays which fold tables the folder is currently configured to perform and also will display an error code in the event of an error. There are also many diagnostic tools available from the control panel. The last item always displayed along with the operator selectable folds is called the System Menu.
Passwords Certain menu items displayed on the control panel are password protected for the KEY OPERATORS and TECHNICIAN ONLY. Untrained persons adjusting parameters can cause a great deal of damage to the folder. For each of these, the user will be prompted to enter the password. Use the number 1 button (up) until the appropriate number is reached, then press the number 3 button (set/enter).
Device test Accessible only to the Key Operator and technician Device Test allows the Key Operator or technician to exercise independently several of the folder’s key functions. Page 1 1: BRIDGE DIVERT 2: STACK DIVERT 3: UPPER FLIPPER 4: LOWER FLIPPER Page 2 1: PULLBACKS 2: SHIFT WHEELS 3: BACKSTOP 4: VERT. BLADE Page 3 1: HORIZ. BLADE - H 2: HORIZ.
To edit the operator’s program list, select Assign Folds from the SYSTEM MENU. The control panel displays: Fold Menu: #2 Fold Table: Number Description 1: Change 4: Quit NOTE: “Table” = Program number in the folder firmware, see Section 9. The #2 menu selection is the first one available for editing because the first selection is always STACK, which cannot be changed. To change or delete the selection press 1.
721p (Synergix) Fold System 40 & XES 2750 Series fold tables Table Display No. Hand Description Feed? 0 STACK No fold, flat sheet stack on top of accordion folder cabinet 1 8.5 X 11 LAND C Yes 8½" x 11" landscape packet with C style crossfold 2 8.5 X 11 PORT C Yes 8½" x 11" portrait packet with C style crossfold 3 8.5 X 11 PORT Z Yes 8½" x 11" portrait packet with Z style crossfold 4 Reserved 5 8.5 X 11 MIXED C Yes 8 ½” x 11” Mixed, SEL - Portrait, LEL - Landscape 6 8.
34 8.5 x 11 BkB 1.0 No Bookfold Style B, 7 ½” panels, 1" binding margin, Z crossfold 35 8.5 x 11 BkB Z 1.25 No Bookfold Style B, 7¼" panels, 1¼" binding margin, Z crossfold 36 8.5 x 11 BkB Z 1.50 No Bookfold Style B, 7" panels, 1½" binding margin, Z crossfold 37 8.5 x 11 BkB Z 1.75 No Bookfold Style B, 6¾" panels, 1¾" binding margin, Z crossfold 38 8.5 x 11 BkB Z 2.
72 DIN 824 TYPE B #2 No Bookfold Style F, 190mm panels, 0mm binding margin, tab, Z crossfold 297 mm, title block trailing 73 DIN 824 TYPE C #2 Yes Endless fold style 210mm panels, Z crossfold 297mm, title block trailing 74 Reserved 75 Reserved 76 Reserved 77 8.5 BkB FAN 1.00 No Bookfold Style B, 7½" panels, 1" binding margin, accordion fold only 78 Reserved 79 Reserved 80 8.5 BkF FAN 1.
FOLD BANK 1 (common European sizes) Position 1 Fold Table 0 2 Display Description STACK No fold, flat sheet stack on top of folder cabinet 47 DIN 824 TYPE A Bookfold Style 1 (F = Favors Front), 190mm panels, 20mm binding margin, Z crossfold 3 43 DIN 824 TYPE B Bookfold Style 1 (F = Favors Front), 190mm panels, 0mm binding margin, tab, Z crossfold 297mm 4 44 DIN 824 TYPE C Endless fold style 210mm panels, Z crossfold 297mm 5 46 210 x 297 BkF Z 0mm Bookfold Style 1 (F = Favors Front), 210
Folder Error Messages Message 0010 Definition Interlock open. (On model 2750, location unidentified) Location or type of error A door or panel is open. If no specific item is listed on the display, then the electronics cannot detect the interlock, possibly due to a faulty interlock or an open circuit in the interlock cable.