WorkCentre 3119 User Guide 705N00022
© 2006 Xerox Corporation. All rights reserved. This manual is provided for information purposes only. All information included herein is subject to change without notice. Xerox Corporation is not responsible for any direct or indirect damages, arising from or related to use of this manual. • Workcentre 3119 is model names of Xerox Corporation. • Xerox and Xerox logo are trademarks of Xerox Corporation. • IBM and IBM PC are trademarks of International Business Machines Corporation.
CONTENTS 1. Introduction Special features ..................................................................................................................... 1.1 Understanding component locations .......................................................................................... 1.2 2. Getting started Setting up your machine Finding more information ........................................................................................................ Selecting a location ........................
8. Maintenance Printing reports ...................................................................................................................... Clearing memory ................................................................................................................... Cleaning your machine ........................................................................................................... Maintaining the toner cartridge ...................................................................
Important Precautions and Safety Information 16 The Power cord supplied with your machine should be used for safe operation. If you are using a cord which is longer than 2 m with 110 V machine, then it should be 16 AWGa or bigger. When using this machine, these basic safety precautions should always be followed to reduce risk of fire, electric shock and injury to people: 1 17 SAVE THESE INSTRUCTIONS. Read and understand all instructions. 2 Use common sense whenever operating electrical appliances.
Power Saver •Increase the separation between the equipment and receiver. •Connect the equipment into an outlet on a circuit different from that to which the receiver is connected. •Consult the dealer or experienced radio TV technician for help. This printer contains advanced energy conservation technology that reduces power consumption when it is not in active use. When the printer does not receive data for an extended period of time, power consumption is automatically lowered.
WARNING If you cut off the moulded plug, get rid of it straight away. You cannot rewire the plug and you may receive an electric shock if you plug it into a socket. IMPORTANT WARNING: You must earth this machine.
1 Save time and money Introduction • You can print multiple pages on one single sheet of paper to save paper. • You can use preprinted forms and letterhead on plain paper. See the Software Section Thank you for purchasing this Xerox multifunctional product. Your machine provides printing, copying, and scanning functions! • This machine automatically conserves electricity by substantially reducing power consumption when not printing.
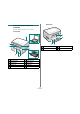
Rear view Understanding component locations These are the main components of your machine: Front view 1 document cover 6 manual feeder guides 2 document glass 7 paper input tray 3 control panel 8 manual feeder 4 front cover 9 output tray 5 toner cartridge 10 1 rear cover 3 power receptacle 2 USB port 4 power switch scan unit 1.
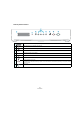
Control panel functions 1 Displays the current status and prompts during an operation. 2 Shows the status of your machine. See page 9.3. 3 Enters Menu mode and scrolls through the available menus. 4 Scroll through the options available in the selected menu. 5 Confirms the selection on the display. 6 Sends you back to the upper menu level. 7 Allows you to enter the number of copies. 8 Stops an operation at any time.
2 Setting up your machine Getting started This chapter gives you step-by-step instructions for setting up your machine. Finding more information This chapter includes: You can find information for setting up and using your machine from the following resources, either printed or onscreen.
Selecting a location Installing the toner cartridge Select a level, stable place with adequate space for air circulation. Allow extra space for opening covers and trays. 1 Open the front cover. 2 Remove the toner cartridge from its bag. Do not use a knife or other sharp object as it might scratch the drum of the toner cartridge. 3 Roll the toner cartridge 5 or 6 times to distribute the toner evenly inside the toner cartridge.
Loading paper CAUTION: • To prevent damage, do not expose the toner cartridge to light for more than a few minutes. Cover it with a piece of paper, if left exposed for more than a few minutes. • Do not touch the green underside of the toner cartridge. Use the handle on the toner cartridge to avoid touching this area. 5 Hold the toner cartridge by the handle. Slowly insert the toner cartridge into the opening in the machine.
4 5 Changing the size of the paper in the paper input tray Pay attention to the paper limit mark on both inside walls of the paper input tray. Paper overloading may cause paper jams. To load longer sizes of paper, such as Legal-sized paper, you need to adjust the paper guides to extend the paper input tray. 1 After pressing and unlatching the guide lock, slide the paper length guide out completely to extend the paper input tray to its full length.
3 Squeeze the paper width guide, as shown and slide it to the stack of paper until it lightly touches the side of the stack. NOTE: When using the USB connection, your machine provides two USB modes; Fast and Slow. Fast is the default mode. Some PC users may experience poor USB function in the default mode. If this occurs, select Slow mode to achieve successful results. For details about changing the USB mode, see page 9.7.
Setting up the machine system Changing the display language To change the language that appears on the control panel, follow these steps: Overview of control panel menus The control panel provides access to various menus to set up the machine or use the machine’s functions. They can be accessed by pressing button. Refer to the following diagram. Reduce/Enlarge 1 Press button until Machine Setup appears on the top line of the display. 2 Press 3 Press the scroll button ( or want and press button.
Printer software overview Printer driver features Your printer drivers support the following standard features: • Paper source selection Supplied printer software • Paper size, orientation and media type You must install the printer software using the supplied printer driver CD after you have set up your machine and connected it to your computer. For details, see the Software Section. • Number of copies The following table lists a general overview of features supported by your printer drivers.
System requirements Before you begin, ensure that your system meets the minimum requirements. Item Requirements Recommended Operating system Windows 98/Me/2000/XP CPU Windows 98/Me/2000 Pentium II 400 MHz or higher Pentium III 933 MHz Windows XP Pentium III 933 MHz or higher Pentium IV 1 GHz Windows 98/Me/2000 64 MB or more 128 MB Windows XP 128 MB or more 256 MB Windows 98/Me/2000 300 MB or more 1 GB Windows XP 1 GB or more 5 GB RAM Free disk space Internet Explorer 5.
3 Loading original documents and paper 2 Place the document face down on the document glass and align it with the registration guide at the top left corner of the glass. 3 Close the document cover. Be careful not to move the document. This chapter introduces you to how to load documents and print materials into your machine.
Supported paper types and sizes Selecting print materials Dimensions Weighta Capacityb Letter 215.9 x 279 mm (8.5 x 11 inches) Legal 215.9 x 355.6 mm (8.5 x 14 inches) Folio 216 x 330.2 mm (8.5 x 13 inches) A4 210 x 297 mm (8.27 x 11.69 inches) • 60 to 90 g/m2 (16 to 24 lb bond) for the paper input tray • 60 to 165 g/m2 (16 to 43 lb bond) for the manual feeder • 250 sheets of 75 g/m2 (20 lb bond) paper for the paper input tray • 1 sheet of paper for the manual feeder Oficio 216 x 343 mm (8.
Type Size Envelope (continued) Envelope C6 Transparency Letter, A4 Labels Card stock Dimensions 114 x 162 mm (4.48 x 6.
Guidelines for special materials Paper Type Envelopes Paper Type Guidelines • Successful printing on envelopes depends upon the quality of the envelopes. When selecting envelopes, consider the following factors: - Weight: The weight of the envelope paper should not exceed 90 g/m2 (24 lb) or jamming may occur. - Construction: Prior to printing, envelopes should lie flat with less than 6 mm (0.25 inches) curl, and should not contain air.
Paper Type Preprinted paper In the manual feeder Guidelines Use the manual feeder to print transparencies, labels, envelopes or postcards in addition to making quick runs of paper types or sizes that are not currently loaded in the paper input tray. • Letterhead must be printed with heat-resistant ink that will not melt, vaporize, or release hazardous emissions when subjected to the machine’s fusing temperature of 208° C (406.4° F) for 0.1 second.
2 Adjust the manual feeder guides to the width of the print material without bending it. 4 Press the scroll button ( or ) to find the paper size you are using and press button. 5 Press 6 Press the scroll button ( press button. 7 Press the scroll button ( or ) to find the paper type you are using and press button. 8 Press button to return to the upper level. or ) to select Paper Type and button to return to Standby mode.
2 Take the paper out manually. To use the rear cover, open the rear cover by pulling it up. 3 Close the scan unit. In order to close the cover, push the tab to the left and hold it down. Then lower the cover carefully until the cover is holding down the tab. Then you can move your hand and finish lowering the cover. Be careful not to pinch your fingers! CAUTION: The fuser area inside the rear cover of your machine becomes very hot when in use. Take care when you access this area.
4 Reduced/Enlarged copy Copying You can reduce or enlarge the size of a copied image from 50% to 200% when you copy original documents from the document glass. This chapter gives you step-by-step instructions for copying documents. To select from the predefined copy sizes: This chapter includes: • Copying • Changing the settings for each copy • Using special copy features • Setting the time out option Copying 1 Place a document on the document glass.
3 Press Auto Fit copying button to save the selection. A Changing the default settings This feature automatically reduces or enlarges the original image to fit on the paper currently loaded in the machine. NOTE: When the size of the document you want to copy is not same as the size of the paper loaded, this function automatically adjusts the size of the document to fit the paper. You can not adjust the copy size manually.
NOTE: If you press button or no buttons are pressed for approximately 30 seconds, the machine cancels the copy job and returns to Standby mode. 7 Press NOTE: You cannot adjust the copy size using the Reduce/ Enlarge menu while making a poster. Your original document is divided into 9 portions. Each portion is scanned and printed one by one in the following order: button to begin copying. 2-UP copying 1 2 This feature prints 2 original images reduced to fit onto one sheet of paper.
5 Basic printing This chapter explains common printing tasks. Printing a document This printer allows you to print from various Windows applications, a Macintosh computer, or a Linux system. The exact steps for printing a document may vary depending on the application you use. For details about printing, see the Software Section.
6 Scanning Scanning with your machine lets you turn pictures and text into digital files on your computer. Then you can upload them on your web site or use them to create projects that you can print using Xerox the WIA driver. Scanning basics Your machine offers the following ways to scan an image: • From TWAIN-compliant software: You can use other software including Adobe Photoshop Deluxe and Adobe Photoshop.
7 Ordering toner cartridge This chapter provides information on purchasing toner cartridges available for your machine. Toner cartridges When the toner runs out, you can order the following type of toner cartridges for your machine: Yielda Type Standard 3,000 pages Part number 013R00625 a. ISO 19752 5% coverage How to purchase To order Xerox-authorized toner cartridges, contact your local Xerox dealer or the retailer where you purchased your machine, or visit www.xerox.
8 Maintenance Cleaning your machine This chapter provides information for maintaining your machine and the toner cartridge. To maintain print and scan quality, follow the cleaning procedures below each time the toner cartridge is replaced or if print and scan quality problems occur. This chapter includes: CAUTION: Cleaning the cabinet of the machine with cleaning materials containing large amounts of alcohol, solvent, or other strong substances can discolor or crack the cabinet.
3 With a dry lint-free cloth, wipe away any dust and spilled toner from the toner cartridge area and the toner cartridge cavity. The machine prints out a cleaning page. Toner particles on the drum surface are affixed to the paper. 4 If the problem remains, repeat steps 1 through 3. Cleaning the scan unit Keeping the scan unit clean helps ensure the best possible copies. We suggest that you clean the scan unit at the start of each day and during the day, as needed.
2 Pull the toner cartridge out. 3 Thoroughly roll the toner cartridge 5 or 6 times to distribute the toner evenly inside the toner cartridge. Maintaining the toner cartridge Toner cartridge storage To get the most from the toner cartridge, keep the following guidelines in mind: • Do not remove the toner cartridge from its package until ready for use. • Do not refill the toner cartridge. The machine warranty does not cover damage caused by using a refilled toner cartridge.
Replacing the toner cartridge 4 Remove the paper protecting the toner cartridge. When the toner cartridge is completely empty: • The warning message, Toner Empty or [Toner Empty] Replace Toner displays on the control panel. • The Smart Panel program window appears on the computer telling you that the toner cartridge is empty. • The Status LED lights red. At this stage, the toner cartridge needs to be replaced. For order information for toner cartridges, see page 7.1.
trained service professional, except for the toner cartridge (see page 8.4). 8.
9 3 Troubleshooting Remove the jammed paper by gently pulling it straight out. This chapter gives helpful information for what to do if you encounter an error. This chapter includes: • Clearing paper jams • Understanding the Status LED • Understanding display messages • Solving other problems Clearing paper jams If there is any resistance and the paper does not move when you pull, or if you cannot see the paper in this area, check the fuser area around the toner cartridge. See page 9.2.
In the fuser area or around the toner cartridge In the paper exit area 1 NOTE: The fuser area is hot. Take care when removing paper If the paper does not exit, continue to step 2. from the machine. 2 1 Open and close the front cover. The jammed paper automatically exits the machine. Gently pull the paper out of the output tray. Skip to step 9. Open the front cover and pull the toner cartridge out. If you cannot see the jammed paper in the output tray, continue to the next step.
Tips for avoiding paper jams Understanding the Status LED By selecting the correct paper types, most paper jams can be avoided. When a paper jam occurs, follow the steps outlined in page 9.1. The Status LED on the control panel shows the status of your machine. See the table below to know your machine’s status. • Follow the procedures in page 2.3. Ensure that the adjustable guides are positioned correctly. Status • Do not overload the paper input tray.
Display Understanding display messages Messages appear on the Smart Panel program window or the control panel display to indicate the machine’s status or errors. Refer to the tables below to understand the messages’ meaning and correct the problem if necessary. Messages and their meanings are listed in alphabetical order. NOTE: When you call for service, it is very convenient to tell Meaning Paper has jammed in the feeding area of the paper input tray. Clear the jam. See page 9.1.
Condition Paper sticks together. Printing problems Suggested solutions • Ensure that there is not too much paper in the paper input tray. The paper input tray can hold up to 250 sheets of paper, depending on the thickness of your paper. • Make sure that you are using the correct type of paper. See page 3.2. • Remove paper from the paper input tray and flex or fan the paper. • Humid conditions may cause some paper to stick together. Multiple sheets of paper do not feed.
Condition Possible cause Suggested solutions The machine selects print materials from the wrong paper source. The paper source selection in the printer properties may be incorrect. For many software applications, the paper source selection is found under the Paper tab within the printer properties. Select the correct paper source. See the Software Section. A print job is extremely slow. The job may be very complex. Reduce the complexity of the page or try adjusting the print quality settings.
Printing quality problems Condition If the inside of the machine is dirty or paper has been loaded improperly, you may notice a reduction in print quality. See the table below to clear the problem. Condition Light or faded print Vertical lines Suggested solutions Dropouts If black vertical streaks appear on the page: • The drum inside the toner cartridge has probably been scratched. Remove the toner cartridge and install a new one. See page 8.4.
Condition Background scatter Suggested solutions Condition Background scatter results from bits of toner randomly distributed on the printed page. • The paper may be too damp. Try printing with a different batch of paper. Do not open packages of paper until necessary so that the paper does not absorb too much moisture. • If background scatter occurs on an envelope, change the printing layout to avoid printing over areas that have overlapping seams on the reverse side.
Condition Horizontal stripes Suggested solutions If horizontally aligned black streaks or smears appear: • The toner cartridge may be installed improperly. Remove the toner cartridge and reinsert it. • The toner cartridge may be defective. Remove the toner cartridge and install a new one. See page 8.4. • If the problem persists, the machine may require repair. Contact a service representative.
Common Linux Problems Condition Suggested solutions Message appears on your computer screen: • “Device can't be set to the H/W mode you want.” • “Port is being used by another program.” • “Port is disabled.” • “Scanner is busy receiving or printing data. When the current job is completed, try again.” • “Invalid handle.” • “Scanning has failed.” • There may be a copying or printing job in progress. When that job is complete, try your job again. • The Selected port is currently being used.
Condition The machine does not appear on the scanners list (continued). The machine doesn’t scan. Suggested solutions Condition • Check if the MFP port is not busy. Since functional components of MFP (printer and scanner) share the same I/O interface (MFP port), the situation of simultaneous access of different “consumer” application to the same MFP port is possible. To avoid possible conflicts, only one of them at a time is allowed to gain control over the device.
Common macintosh problems Problems in printer setup utility Condition Suggested solutions There is described "driver not installed" at Product List Window after you click Add and Select USB. • Software is not installed correctly. Reinstall the software. See Software Section. • Make sure that you are using a high-quality cable. Your product not listed at Product List Window after you click Add and Select USB. • Make sure that the cables are connected correctly and the machine is turned on.
10 a Sound Pressure Level, ISO7779 b The number of pages may be affected by operating environment, printing interval, media type, and media size. Specifications This chapter includes: • General specifications Scanner and copier specifications • Scanner and copier specifications • Printer specifications Item General specifications Item Paper input capacity Description Compatibility TWAIN standard/ WIA standard Scanning method Color CIS Resolution Optical: Max.
Printer specifications Item Description Printing method Laser Beam Printing Printing speeda Up to 18 ppm in A4 (19 ppm in Letter) First print out time 11 seconds (From Ready) Print resolution Up to 600 x 600 dpi Printer language SPL (Xerox Printer Language) OS Compatibilityb Windows 98/Me/2000/XP, Various Linux OS, Macintosh 10.3/10.4 Inteface USB 2.
INDEX Numerics D O 2-up, special copy 4.3 display language, change 2.6 document glass cleaning 8.2 loading document 3.1 document, loading 3.1 drum, clean 8.2 order information, toner cartridges 7.1 output location, select 3.6 output tray 3.6 A auto fit, sepcial copy 4.2 C cleaning drum 8.2 inside 8.1 LSU 8.2 outside 8.1 scan unit 8.2 clone, special copy 4.2 component location 1.2 connection power cord 2.5 USB 2.5 consumables 8.4 contrast, copy 4.1 control panel 1.3 copying 2-up 4.3 auto fit 4.
S scanning 6.1 software overview 2.7 special materials, guidelines 3.4 specifications general 10.1 paper 3.2 printer 10.2 scanner and copier 10.1 Status LED 9.3 system requirements Windows 2.8 T toner cartridge installing 2.2 maintaining 8.3 order information 7.1 redistributing 8.3 replacing 8.4 toner save mode, use 2.6 U USB, connecting 3.
WorkCentre 3119 Software section
SOFTWARE SECTION CONTENTS Chapter 1: INSTALLING PRINTER SOFTWARE IN WINDOWS Installing Printer Software ........................................................................................................ 4 Removing Printer Software ....................................................................................................... 5 Printer driver ................................................................................................................. 5 Scanner driver ..................
Using Overlays ...................................................................................................................... 15 What is an Overlay? ...................................................................................................... 15 Creating a New Page Overlay ......................................................................................... 15 Using a Page Overlay ....................................................................................................
Chapter 7: USING YOUR PRINTER WITH A MACINTOSH Installing Software for Macintosh ............................................................................................. 27 Setting Up the Printer ............................................................................................................ 28 For a Network-connected Macintosh ................................................................................ 28 For a USB-connected Macintosh ...............................................
1 This is recommended for most users. All components necessary for printer operations will be installed. Installing Printer Software in Windows This chapter includes: 1 Make sure that the printer is connected to your computer and powered on. 2 Insert the supplied CD-ROM into your CD-ROM drive. The CD-ROM should automatically run, and an installation window appears. • Installing Printer Software • Removing Printer Software If the installation window does not appear, click Start and then Run.
5 Click Next. Removing Printer Software Printer driver 1 2 3 4 6 Click Finish. The driver installation is now complete. Start Windows. From the Start menu select Programs or All Programs → Xerox WorkCentre 3119 Series → Xerox WorkCentre 3119 Series Uninstall. When your computer asks you to confirm your selection, click Yes. The selected driver and all of its components are removed from your computer. After the software is removed, click Finish. Scanner driver 1 2 3 4 Start Windows.
2 1 2 Basic Printing This chapter explains the printing options and common printing tasks in Windows. Open the document you want to print. Select Print from the File menu. The Print window is displayed. It may look slightly different depending on your application. The basic print settings are selected within the Print window. These settings include the number of copies and print range.
Layout Tab Printer Settings The Layout tab provides options to adjust how the document appears on the printed page. The Layout Options includes Multiple Pages per Side and Poster Printing. See “Printing a Document” on page 6 for more information on accessing printer properties. You can use the printer properties window, which allows you to access all of the printer options you need when using your printer.
Paper Tab 5 Scaling Printing Scaling Printing allows you to automatically or manually scale your print job on a page. You can choose from None, Reduce/ Enlarge, and Fit to Page. • For details, see “Printing a Reduced or Enlarged Document” on page 13. • For details, see “Fitting Your Document to a Selected Paper Size” on page 13. Use the following options to set the basic paper handling specifications when you access the printer properties.
Graphics Tab Advanced Options Use the following Graphic options to adjust the print quality for your specific printing needs. See “Printing a Document” on page 6 for more information on accessing printer properties. You can set advanced settings by clicking the Advanced Options button. • TrueType Options: This option determines what the driver tells the printer about how to image the text in your document. Select the appropriate setting according to the status of your document.
Extras Tab About Tab You can select output options for your document. See “Printing a Document” on page 6 for more information about accessing the printer properties. Use the About tab to display the copyright notice and the version number of the driver. See “Printing a Document” on page 6 for more information about accessing printer properties. Click the Extras tab to access the following feature: Printer Tab If you access printer properties through the Printers folder, you can view the Printer tab.
Using a Favorite Setting The Favorites option, which is visible on each properties tab, allows you to save the current properties settings for future use. To save a Favorites item: 1 2 Change the settings as needed on each tab. 3 Click Save. Enter a name for the item in the Favorites input box. When you save Favorites, all current driver settings are saved. To use a saved setting, select the item from the Favorites drop down list.
3 Advanced Printing Printing Multiple Pages on One Sheet of Paper (N-Up Printing) This chapter explains printing options and advanced printing tasks. 1 2 3 4 NOTE: • Your printer driver Properties window that appears in this User’s Guide may differ depending on the printer in use. However the composition of the printer properties window is similar. • If you need to know the exact name of your printer, you can check the supplied CD-ROM.
Printing Posters Printing a Reduced or Enlarged Document This feature allows you to print a single-page document onto 4, 9, or 16 sheets of paper, for the purpose of pasting the sheets together to form one poster-size document. 1 2 3 You can change the size of a page’s content to appear larger or smaller on the printed page. To change the print settings from your software application, access printer properties. See “Printing a Document” on page 6.
Editing a Watermark Using Watermarks 1 The Watermark option allows you to print text over an existing document. For example, you may want to have large gray letters reading “DRAFT” or “CONFIDENTIAL” printed diagonally across the first page or all pages of a document. 2 There are several predefined watermarks that come with the printer, and they can be modified, or you can add new ones to the list.
Using a Page Overlay Using Overlays After an overlay has been created, it is ready to be printed with your document. To print an overlay with a document: 1 2 What is an Overlay? Dear ABC Regards WORLD BEST An overlay is text and/or images stored in the computer hard disk drive (HDD) as a special file format that can be printed on any document. Overlays are often used to take the place of preprinted forms and letterhead paper.
4 Sharing the Printer Locally Setting Up a Host Computer 1 2 3 4 5 6 You can connect the printer directly to a selected computer, which is called “host computer,” on the network. The following procedure is for Windows XP. For other Windows OS, refer to the corresponding Windows User's Guide or online help. NOTES: • Check the Operating System(s) that are compatible with your printer. Please refer to the OS Compatibility section of Printer Specifications in your Printer User’s Guide.
5 Scanning Scanning Process with TWAINenabled Software Scanning with your machine lets you turn pictures and text into digital files on your computer. Then you can fax or e-mail the files, display them on your web site or use them to create projects that you can print using the WIA driver. • Scanning Process with TWAIN-enabled Software If you want to scan documents using other software, you will need to use TWAIN-compliant software, such as Adobe PhotoDeluxe or Adobe Photoshop.
Scanning Using the WIA Driver Your machine also supports the Windows Image Acquisition (WIA) driver for scanning images. WIA is one of the standard components provided by Microsoft Windows XP and works with digital cameras and scanners. Unlike the TWAIN driver, the WIA driver allows you to scan and easily manipulate images without using additional software. NOTE: The WIA driver works only on Windows XP with USB port. 1 Load the document(s) face up into the ADF.
6 Using Your Printer in Linux Installing the MFP Driver System Requirements You can use your machine in a Linux environment. Supported OS This chapter includes: • Redhat 7.1 and above • Getting Started • Linux Mandrake 8.0 and above • Installing the MFP Driver • SuSE 7.1 and above • Caldera OpenLinux 3.1 and above • Using the MFP Configurator • Turbo Linux 7.0 and above • Configuring Printer Properties • Slackware 8.
Installing the MFP Driver 1 2 6 When the installation is complete, click Finish. Make sure that you connect your machine to your computer. Turn both the computer and the machine on. When the Administrator Login window appears, type in root in the Login field and enter the system password. NOTE: You must log in as a super user (root) to install the printer software. If you are not a super user, ask your system administrator. 3 Insert the printer software CD-ROM. The CD-ROM will automatically run.
Uninstalling the MFP Driver 1 Using the MFP Configurator When the Administrator Login window appears, type in root in the Login field and enter the system password. MFP Configurator is a tool primarily intended for configuring MFP devices. Since an MFP device combines the printer and scanner, the MFP Configurator provides options logically grouped for printer and scanner functions.
Printers Configuration Classes Tab Printers configuration has the two tabs; Printers and Classes. The Classes tab shows a list of available printer classes. Printers Tab You can see the current system’s printer configuration by clicking on the printer icon button on the left side of the MFP Configurator window. Shows all of the printer classes. Switches to Printer configuration. Shows all of the installed printer. Shows the status of the class and the number of printers in the class.
MFP Ports Configuration Configuring Printer Properties In this window, you can view the list of available MFP ports, check the status of each port and release a port that is stalled in busy state when its owner is terminated for any reason. Switches to MPF ports configuration. Using the properties window provided by the Printers configuration, you can change the various properties for your machine as a printer. 1 Open the MFP Configurator. 2 3 Shows all of the available ports.
Printing a Document Printing from Applications There are a lot of Linux applications that you are allowed to print from using Common UNIX Printing System (CUPS). You can print on your machine from any such application. 1 From the application you are using, select Print from the File menu. 2 Select Print directly using lpr. 3 5 In the Xerox LPR window, select the model name of your machine from the Printer list and click Properties. 6 7 Click. The following four tabs display at the top of the window.
The document is scanned and the image preview appears in the Preview Pane. Scanning a Document You can scan a document using the MFP Configurator window. 1 Double-click the MFP Configurator on your desktop. 2 3 Click the button to switch to Scanners Configuration. Select the scanner on the list. Drag the pointer to set the image area to be scanned. Click your scanner. 7 Change the scan options in the Image Quality and Scan Area sections.
11 Select the file directory where you want to save the image Tools and enter the file name. 12 Click Save. Function Cancels your last action. Adding Job Type Settings You can save your scan option settings to retrieve for a later scanning. Restores the action you canceled. To save a new Job Type setting: 1 Change the options from the Scanner Properties window. 2 3 4 Allows you to scroll through the image. Click Save As. Enter the name for your setting. Crops the selected image area. Click OK.
7 Install the Printer driver Using Your Printer with a Macintosh 1 2 3 Your printer supports Macintosh systems with a built-in USB interface or 10/100 Base-TX network interface card. When you print a file from a Macintosh computer, you can use the CUPS driver by installing the PPD file. 4 5 6 7 8 NOTE: Some printers do not support a network interface. Make sure that your printer supports a network interface by referring to Printer Specifications in your Printer User’s Guide.
Install the Scan driver 1 2 3 Setting Up the Printer Make sure that you connect your printer to the computer. Turn on your computer and printer. Insert the CD-ROM which came with your printer into the CD-ROM drive. Double-click CD-ROM icon that appears on your Macintosh desktop. Double-click the MAC_Installer folder. Set up for your printer will be different depending on which cable you use to connect the printer to your computer—the network cable or the USB cable.
Changing Printer Settings Printing You can use advanced printing features when using your printer. From your Macintosh application, select Print from the File menu. The printer name which appears in the printer properties window may differ depending on the printer in use. Except for the name, the composition of the printer properties window is similar. NOTES: • The Macintosh printer’s properties window that appears in this User’s Guide may differ depending on the printer in use.
Printing Multiple Pages on One Sheet of Paper Printer Features Setting The Printer Features tab provides options for selecting the paper type and adjusting print quality. You can print more than one page on a single sheet of paper. This feature provides a cost-effective way to print draft pages. Select Printer Features from the Presets drop-down list to access the following features: 1 2 From your Macintosh application, select Print from the File menu. Select Layout. ▲ Mac OS 10.
Scanning If you want to scan documents using other software, you will need to use TWAIN-compliant software, such as Adobe PhotoDeluxe or Adobe Photoshop. The first time you scan with your machine, select it as your TWAIN source in the application you use. The basic scanning process involves a number of steps: • Place your photograph or page on the document glass or ADF. • Open an application, such as PhotoDeluxe or Photoshop. • Open the TWAIN window and set the scan options.
SOFTWARE SECTION INDEX A L advanced printing, use 12 Layout properties, set Macintosh 29 Windows 7 Linux driver, install 20 printer properties 23 printing 24 scanning 25 C canceling scan 18 D document, print Macintosh 29 Windows 6 E Extras properties, set 10 F favorites settings, use 11 G Graphics properties, set 9 H help, use 11 I install printer driver Macintosh 27 Windows 4 installing Linux software 19 M Macintosh driver install 27 uninstall 27 printing 29 scanning 31 setting up the printer 2
S scanning Linux 25 TWAIN 17 WIA driver 18 scanning from Macintosh 31 setting darkness 9 favorites 11 image mode 9 resolution Macintosh 30 Windows 9 toner save 9 true-type option 9 software install Macintosh 27 Windows 4 system requirements Macintosh 27 uninstall Macintosh 27 Windows 5 system requirements Linux 19 Macintosh 27 T toner save, set 9 TWAIN, scan 17 U uninstall, software Macintosh 27 Windows 5 uninstalling MFP driver Linux 21 W watermark create 14 delete 14 edit 14 print 14 WIA, scan 18 33