Xerox® WorkCentre 3550 April 2010
Xerox WorkCentre 3550 Quick Use Guide
English Xerox WorkCentre 3550 Quick Use Guide Thank you for choosing the Xerox WorkCentre 3550. If you work through the procedures in this book in the order they are presented, you will successfully: • Connect the machine • Setup the machine • Operate the machine Contents Safety and Legal Information . . . . . . . . . . . . . . . . . . . . . . . . . 4 Install the WorkCentre 3550 . . . . . . . . . . . . . . . . . . . . . . . . . . 6 Configure the Machine . . . . . . . . . . . . . . . . . . . . . . . . . . .
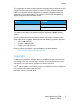
English Safety and Legal Information To ensure you operate the equipment safely please carefully read the safety and regulatory notes in the User Guide supplied on the User Documentation CD before using this product. Your Xerox machine and supplies have been designed and tested to meet strict safety requirements. These include safety agency evaluation and certification, and compliance with electromagnetic regulations and established environmental standards.
English This equipment has been tested and found to comply with the limits for a Class A digital machine, pursuant to part 15 of the FCC Rules. Shielded interface cables must be used with this equipment to maintain compliance with FCC regulations in the United States. This machine is certified by the following Agency using the Safety standards listed. Agency Standard Underwriters Laboratories Inc.
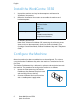
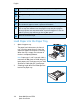
English Install the WorkCentre 3550 1. 2. Unpack the machine and any hardware options and locate the Installation Instructions.
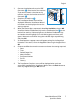
English 3. 4. 5. 6. 7. 8. 9. Connect the telephone line to the LINE Connector 2 at the back of the machine. If you wish to attach a handset to the 4 1 machine, connect the handset to the EXT Connector 3 . Switch on the machine 4 . 2 The Installation Wizard screen will be 3 displayed. Follow the Installation Wizard instructions on the display and enter the settings required. When the Product Key is requested, select Key Available and press OK.
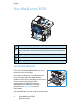
English Your WorkCentre 3550 2 1 3 4 5 1 2 Control Panel: Display and alphanumeric keypad Document Feeder: Used for scanning multiple documents. The Document Glass underneath is used for scanning single documents, bound documents etc. 3 Output Tray: Collects output 4 Bypass Tray: Used for non-standard printing media 5 Paper Trays: Tray 1 is standard and Tray 2 is optional Inside the Machine There is one Customer Replaceable Unit in the machine, the Print Cartridge.
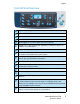
English Control Panel Overview 1 7 21 14 9 2 3 5 4 6 19 11 10 12 13 16 17 1 Copy: Activates Copy mode. 2 E-mail: Activates E-mail mode. 3 Fax: Activates Fax mode. 4 Scan: Activates Scan mode. 5 Paper Supply: Use to select a paper tray for the copy job. 6 7 8 9 10 11 Machine Status: Use to access machine information, status information, the machine serial number and to print reports.
English 17 ‘C’ Cancel Entry: Cancels the previous entry made on the keypad. 18 Keypad: Use to enter alphanumeric characters. 19 20 21 22 23 Interrupt Printing: Use to interrupt the current job to run a more urgent job. Clear All: Press to clear the last selections made. Power Saver: Sends the machine into power saver mode or power down. Press the button again to restart a powered off machine. Stop: Pressing the Stop button once displays a confirmation message but does not stop the machine.
English 3. Squeeze the rear guide and move from the current position and into the correct position for the paper size. Make sure the guide clicks into place. 4. Load paper into the tray. Do not fill above the 28lb (105g) line at the rear of the tray. Position the side guide by squeezing the lever and sliding it towards the stack of paper, until it gently touches the side of the stack. Insert the paper tray into the machine.
English Loading Documents Documents can be loaded into the Document Feeder or onto the Document Glass. Document Feeder 1. 2. Load documents to be scanned face up in the input tray of the Document Feeder with the top of the document to the left or rear of the tray. Move the Document Guide to just touch both sides of the document. Note: Up to 60 sheets of 20 lb (80 g/m²) bond paper can be loaded. Weight ranges from 12.5 lb to 28 lb (50 - 120 g/m²). Document Glass 3. 4.
English Connecting to the Network Follow these instructions to connect the machine to an Ethernet TCP/IP network. If you are connecting your machine to a different type of network, or you wish to use other protocols, refer to the System Administrator Guide. Test the Machine Before connecting the machine to your network, make sure that it is operating correctly as a copier. 1. Place a document in the Document Feeder and make 3 copies. 2.
English Network Setup IP Address Assignment After the machine starts, it negotiates with the DHCP server for an IP Address. Wait two minutes for the network setup to complete and then print the configuration page to check if an IP Address has been assigned. To print a configuration page: 1. Press Machine Status on the control panel. 2. Press the up/down arrows to highlight Information Pages and press OK. 3. Press the up/down arrows to highlight Configuration Page and press OK. 4.
English Network Setup Using a Static IP Address Before you begin, obtain the following information from your network administrator: • IP Address • Gateway Address • Subnet Mask • DNS Server Address Use the following instructions to enter a static IP Address: 1. Press Machine Status on the control panel. 2. Press the up/down arrows to highlight Network Settings and press OK. 3. Enter the Administrator’s Password using the keypad. The default is 1111.
English Install Printer Software You can install the printer software for local printing and network printing. To install the printer software on the computer, perform the appropriate installation procedure depending on the printer in use. The printer software also provides the Fax from PC function if selected during the installation process. A printer driver is software that lets your computer communicate with your printer.
English 4. Click Typical installation for a local printer and follow the wizard instructions to install the local printer. Note: For Custom install instructions, refer to the System Administrator Guide. 5. If your printer is not already connected to the computer, the Connect Device screen will appear. After connecting the printer, click Next. If you don’t want to connect the printer at this time, click Next, and No on the following screen.
English Networked Printer When you connect your printer to a network, you must first configure the TCP/IP settings for the printer. After you have assigned and verified the TCP/IP settings, you are ready to install the software on each computer on the network. 1. Make sure that the printer is connected to your network and powered on. For details about connecting to the network, refer to Connecting to the Network on page 13. 2. Insert the supplied CD-ROM into your CDROM drive.
English E-mail Setup If you wish to setup the E-mail service follow this procedure. Before starting the setup procedure, please ensure the following items are available or the following actions have been performed: • Ensure the machine is fully functioning on the network. • Ensure that the TCP/IP and HTTP protocols are configured on the machine and fully functional. Refer to Network Setup on page 14. • Obtain the IP Address of a functional SMTP mail server that accepts inbound mail traffic.
English 3. If an SMTP Server has been discovered, the Host Name field will be filled with the SMTP Server Host Name. Test the Discovered SMTP Server by sending an e-mail from the machine to a valid e-mail address. A confirmation sheet will print informing you whether the e-mail send was successful. • If the confirmation sheet reports a successful send, the SMTP Server is setup correctly. You can modify some of the e-mail setting defaults, refer to Modifying E-mail Setting Defaults on page 21.
English Modifying E-mail Setting Defaults To modify the e-mail settings defaults: 1. Open your web browser and enter the TCP/IP Address of the machine in the address bar. Press Enter. 2. Click Properties > E-mail > E-mail Setup. • Enter the current administrator User Name and Password. The default is admin which is case sensitive, and 1111. • Enter the domain name in the Domain Name box (for example: abc.xyz.company.com). It is only necessary to configure the DNS settings if Host Names are to be used. 3.
English Making Copies 1. 2. 3. 4. 5. Load the documents to be copied face up in the Document Feeder or face down to the rear left corner of the Document Glass. Press the Copy button on the control panel. Select the control panel features required: • Press the Paper Supply button and use the up/down arrows to select the paper tray required for the job or to select Auto. Select OK. • Press the 2 Sided button and use the up/down arrows to select the 2 Sided option required for the job. Select OK.
English Printing a Document 1. 2. 3. 4. Ensure that the correct Xerox WorkCentre 3550 print driver has been installed on your workstation. To install the print drivers refer to Install Printer Software on page 16. You can also access the print drivers by referring to the Software CD supplied with your machine, or you can download the latest versions from the Xerox website at www.xerox.com/support. Open the document to be printed.
English Banner Sheet The machine can print a banner sheet with every print job. Use the following instructions to enable or disable the Banner Sheet at the machine. 1. Press Machine Status on the control panel. 2. Press the up/down arrows to highlight System Setup and press OK. 3. Enter the Administrator’s Password using the keypad. The default is 1111. Note: You may have to press the 1 key several times to enter the ‘1’. 4. 5. 6. 7.
English Sending a Fax 1. 2. 3. 4. 5. Load the documents to be faxed face up in the Document Feeder or face down to the rear left corner of the Document Glass. Press the Fax button on the control panel. Select the Fax features required for the job. Press Menu and use the up/down arrows to highlight the feature required and press OK. Select the setting required and press OK.
English Address Book: Select the Address Book button to access the fax address book and add recipients. Select Search & Dial and then Speed Dial or Group Dial. Enter an ID using the keypad and select OK. A list of matching entries is displayed. Select an entry to add to the recipient list. Press Start to transmit your fax. • 6. Press the Job Status button on the Control Panel to display status information about the job or to delete the job from the list.
English The following features are available: 5. 6. 7. 8. File Format Sets the file format in which the image is to be saved. Output Color Sets the color mode. Lighten/Darken This provides manual control to adjust the lightness or darkness of the scanned images. Background Suppression Use to automatically reduce or eliminate the dark background resulting from scanning colored paper or newspaper originals.
English Sending an E-mail 1. 2. 3. 4. Load the documents to be e-mailed face up in the Document Feeder or face down to the rear left corner of the Document Glass. Press the E-mail button on the control panel. If Authentication is enabled, enter your Login ID and Password (if required). When Enter From Address: appears, enter the sender’s e-mail address and press OK. If Send to Myself? appears, press the left/right arrows to highlight Yes or No and press OK.
English 9. 10. Resolution A higher resolution produces better quality for photos. A lower resolution reduces communication time. Original Size Use to specify the size of the image to be scanned. Press Back to return to the E-mail screen. If the originals are 2 Sided, press the 2 Sided button on the control panel. Select the 2 Sided option required using the up/down arrows and press OK. Press Start to scan your originals.
English Fax from PC You can send a fax from your PC without going to the Xerox WorkCentre 3550. To send a fax from your PC, you need to install the Printer software. The Fax from PC function is installed at the same time as the printer driver. Refer to Install Printer Software on page 16 for instructions. 1. Open the document you want to send. Click File > Print and select the Xerox MFP PC Fax from the list of printers displayed. 2. Select OK. 3.
English Using the USB Port USB memory devices are available with a variety of memory capacities to give you more room for storing documents, music and videos, high resolution photographs, and other files. You can scan a document and store it on your USB memory device, or you can print files directly from the USB memory device. You can print TIFF, JPEG, PDF, PCL, PS, TXT and PRN files. Refer to the System Administrator Guide for information about USB Port setup.
English The following features are available: 7. File Format Sets the file format in which the image is to be saved. Output Color Sets the color mode. Lighten/Darken This provides manual control to adjust the lightness or darkness of the scanned images. Background Suppression Use to automatically reduce or eliminate the dark background resulting from scanning colored paper or newspaper originals. Original Type Use to improve the image quality by selecting the document type for the originals.
English Enhance Productivity The WorkCentre 3550 is a powerful multi-function machine with many digital functions integrated into one system. It is designed to support small or large workgroups in different production environments. You can do more with less and streamline your workflow with these productivity enhancing features. Excellent Quality and Speed • • • You can print with a resolution of up to 1200 dpi effective output.
English Send E-mails • • • Scanned documents can be sent as E-mail attachments to a specified Email recipient or recipients. Access to the E-mail features is gained using the E-mail button on the Control Panel. This is an excellent feature for scanning documents for your own use. Simply select the E-mail button, enter your own E-mail address and scan the document. Moments later it will be in your E-mail Inbox.
English Troubleshooting A variety of situations can affect the quality of your output. For optimal performance, ensure the guidelines in the User Guide are followed. The documentation and the fault messages on the machine help to locate and resolve a problem easily. Some problems can be resolved by switching the machine off and on. Wait approximately 20 seconds before switching the machine on.
English Problem Paper jams Solution • • • • • Cannot fax a document • • Load the paper in the paper trays with the seam side of the paper up. Load the paper in the Bypass Tray with the seam side down. If the paper curls excessively, flip the paper over in the applicable paper tray. Fan paper before inserting it into a paper tray. Use paper from a fresh package. Ensure your machine is connected to a working telephone line and check for a dial tone. Check that Fax is enabled.
English Paper Path CAUTION: The fuser area is hot. Take care when removing paper from the machine. • Open the front door and pull the print cartridge out by lightly pushing it down. • Remove the jammed paper by gently pulling it straight out. Replace the print cartridge and close the front door. Printing automatically resumes. • Output Area • Gently pull the paper out of the output tray.
English Duplex Area The duplex unit is located on the back of the machine. If it is not inserted correctly, a paper jam may occur. Make sure that the duplex unit is inserted correctly. • Pull the duplex unit out of the machine and remove the jammed paper. • If the paper does not come out with the duplex unit, remove the paper from the bottom of the machine. • Insert the duplex unit into the machine. • If you still do not see the paper, open the rear door and unfold the duplex guide fully.
English • • Lift the Document Feeder. Remove any paper from the feed area by carefully pulling it to the right using both hands. Close the Document Feeder. For further information about jam clearance and troubleshooting, refer to the User Guide. Further Assistance For any additional help visit our customer web site at www.xerox.com or contact the Xerox Support Center quoting the machine serial number.
English Printing a Machine Report You can print the machine's information and job report. 1. Press Machine Status on the control panel. 2. Press the up/down arrows to highlight Information Pages and press OK. 3. To print all reports and lists, select All Pages and press OK. Press the left/right arrow to highlight Yes at the Print? prompt and press OK. You can use CentreWare Internet Services to print the machine's configuration report or browse the status.