Xerox EX Print Server, Powered by Fiery®, for the Xerox 700 Digital Color Press Printing from Mac OS
© 2008 Electronics for Imaging, Inc. The information in this publication is covered under Legal Notices for this product.
CONTENTS 3 CONTENTS INTRODUCTION 5 Terminology and conventions 5 About this document 6 User software 6 Downloading printer drivers using WebTools 7 System requirements 7 SETTING UP PRINTING ON MAC OS X 8 Installing Mac OS X printer drivers and printer description files 8 Setting up the EX Print Server on Mac OS X 9 Configuring installable options PRINTING UTILITIES 15 16 Printing from a USB device 16 FTP printing 18 PRINTING FROM MAC OS X Printing from applications with Mac OS X
INTRODUCTION 5 INTRODUCTION This document describes how to install printer drivers and printer description files for the Xerox EX Print Server, Powered by Fiery, for the Xerox 700 Digital Color Press and how to set up printing from Apple Mac OS X computers. It also describes how to print to the EX Print Server. For information about setting up network servers and clients to use the Xerox EX Print Server, Powered by Fiery, for the Xerox 700 Digital Color Press, see Configuration and Setup.
INTRODUCTION 6 About this document This document covers the following topics: • Installing printer files on Mac OS computers • Setting up printing connections on Mac OS computers • Installing EX Print Server printing utilities • Printing from Mac OS computers User software The following table lists the user software that is described in this document. This is the user software you need for setting up basic printing on the EX Print Server.
INTRODUCTION 7 Downloading printer drivers using WebTools You can install printer drivers and printer description files from the User Software DVD or directly from the EX Print Server with WebTools. For more information about setting up and starting WebTools, see Utilities. TO DOWNLOAD PRINTER DRIVERS WITH WEBTOOLS 1 Start your Internet or intranet browser and type the DNS name or IP address of the EX Print Server. 2 Click the Downloads tab.
SETTING UP PRINTING ON MAC OS X 8 SETTING UP PRINTING ON MAC OS X To set up the EX Print Server as a PostScript printer on a Mac OS X computer, install the printer driver files that correspond to your digital press. The printer driver files are provided on the User Software DVD or can be downloaded using WebTools. Printer drivers provide a way to communicate information about print jobs between your applications, the EX Print Server, and the digital press.
SETTING UP PRINTING ON MAC OS X Setting up the EX Print Server on Mac OS X After you install the printer driver files on Mac OS X, you must set up the EX Print Server in the Printer Setup Utility. This section describes how to set up the EX Print Server and configure the EX Print Server for the options installed on the digital press. TO SET UP THE EX PRINT SERVER IN THE PRINTER SETUP UTILITY (FOR MAC OS X V10.3.9) 1 Choose Utilities from the Go menu and start the Printer Setup Utility.
SETTING UP PRINTING ON MAC OS X 10 For IP Printing, type the IP address or DNS name of the printer in the Printer Address field and the print connection (Print, Hold, or Direct) in the Queue Name field. 5 For Printer Model, choose Xerox and the appropriate model, and then select the file for the EX Print Server PPD. 6 Click Add. The EX Print Server is added to the list of printers.
SETTING UP PRINTING ON MAC OS X 11 TO SET UP THE EX PRINT SERVER WITH BONJOUR CONNECTION TYPE IN THE PRINTER SETUP UTILITY N OTE : Bonjour printers are available to Mac OS X v10.4.x computers only if Bonjour is enabled on the EX Print Server. 1 Choose Utilities from the Go menu and start Printer Setup Utility. The Printer List dialog box appears. 2 Click Add. 3 Click Default Browser. 4 Select the printer with the Bonjour connection type from the Printer Name list. 5 Click Add.
SETTING UP PRINTING ON MAC OS X 12 TO SET UP THE EX PRINT SERVER IN THE PRINTER SETUP UTILITY (FOR MAC OS X V10.4) 1 Choose Utilities from the Go menu, and start Printer Setup Utility. The Printer List dialog box appears. 2 Click Add. 3 Choose the Default Browser tab or the IP Printer tab. 4 In the Default Browser, choose the name of the EX Print Server with the AppleTalk connection type from the Printer Name list. If the printer is not listed in the Printer Name list, click More Printers.
SETTING UP PRINTING ON MAC OS X 13 If the zone is not listed as the Default Zone, or one of the Recent Zones, select AppleTalk Network, select the zone, and then click Choose. Proceed to step 6. For LPD/LPR printing, choose Line Printer Daemon - LPD, type the IP address or DNS name of the printer in the Address field, and the print connection (Print, Hold, or Direct) in the Queue field. Proceed to step 5.
SETTING UP PRINTING ON MAC OS X 14 For IP Printing, choose Internet Printing Protocol - IPP, type the IP address or DNS name of the printer in the Address field, and the print connection (Print, Hold, or Direct) in the Queue field. Proceed to step 5. 5 For Printer Model or Print Using, choose Xerox and the appropriate model, and then select the file for the EX Print Server PPD. 6 Click Add. 7 Choose the installable options and click Continue. The EX Print Server is added to the list of printers.
SETTING UP PRINTING ON MAC OS X 15 Configuring installable options For Mac OS X v10.3.9, you must configure the EX Print Server for the options installed on the digital press to allow the EX Print Server to take advantage of the digital press options after you complete the printer driver installation. Configure the options manually. You can change the configuration for the installable options later if necessary. N OTE : For more information about the print settings, see Print Options.
PRINTING UTILITIES 16 PRINTING UTILITIES The following methods allow you to print to the EX Print Server: • USB device • FTP printing Printing from a USB device You can print files on a USB device to the EX Print Server. To do so, save files to the USB device and download them directly to the EX Print Server. You can print files that originated on Mac OS computers.
PRINTING UTILITIES 17 TO PRINT FILES FROM THE USB DEVICE 1 Configure the USB printing options in Setup. For more information, see Configure Help. 2 Create folders at the top (root) level of the USB device named Print, Hold, and Direct. 3 Copy the files (PS, EPS, PCL, TIFF, and PDF) from the user’s computer to the USB device.
PRINTING UTILITIES 18 7 Specify print options for the file. The print options you can choose are: • Queue (Print, Direct or Hold) • Number of copies • Duplex (Off, Top-Top, Top-Bottom) • Page Size 8 Press Print to send the file to the EX Print Server for printing. 9 Remove the USB device from the EX Print Server. FTP printing If FTP Services are enabled on the EX Print Server, the EX Print Server is set up as an FTP server. You can send jobs to the EX Print Server using FTP printing.
PRINTING FROM MAC OS X 19 PRINTING FROM MAC OS X Print to the EX Print Server as you would print to any other printer from a Mac OS X application. Select a printer and print the file from within the application. In addition to this method, you can download files to the EX Print Server using Hot Folders (see Utilities) or the Docs tab in WebTools (see Utilities), and print documents using Command WorkStation (see Utilities).
PRINTING FROM MAC OS X 20 N OTE : The following procedure shows Mac OS X v10.4 illustrations. TO SET PRINT OPTIONS AND PRINT FROM MAC OS X 1 Open a file and choose Page Setup from the application’s File menu. 2 For Settings, choose Page Attributes. For Format for, choose the EX Print Server. The Paper Size option in the Page Setup dialog box is the same as the Document Size print option in the Fiery Features Media tab.
PRINTING FROM MAC OS X 21 7 Choose Fiery Features from the drop-down list. N OTE : For information about Two-Way Communication, see page 36. 8 Click Customize to specify the options shown in the Basic window. You can select a shortcut from the Available Shortcuts list and add it to the Current Shortcuts list, as well as removing a shortcut from the Current Shortcuts list.
PRINTING FROM MAC OS X 22 9 Click Full Properties in the Basic window. The Job Info tab is displayed. 10 Type your user name or domain\user name in the User Name field if User Authentication is enabled on the EX Print Server. 11 Type your local password or domain password in the Password field if User Authentication is enabled on the EX Print Server. 12 Type information in the Notes 1 and Notes 2 fields under Job Notes on Job Info tab.
PRINTING FROM MAC OS X 23 15 Type values for the other fields as needed. For information about these fields, see Print Options. 16 Click the Color tab. 17 Specify color print options for the job. 18 To use advanced color management features, such as Rendering Style, click Expert Settings. The Expert Color Settings dialog box appears.
PRINTING FROM MAC OS X 24 N OTE : To display the ColorWise settings from the EX Print Server in this dialog box, make sure that Two-Way Communication is enabled. To enable Two-Way Communication, see page 36. 19 Specify the color settings for the print job and click OK.
PRINTING FROM MAC OS X 25 20 To shift the position of the print image on the page, click the Finishing tab and choose Image Shift to specify the shift distances. You might need to shift the print image to allow for binding, for example.
PRINTING FROM MAC OS X 21 To define Mixed Media, click the Media tab and choose Mixed Media. 22 Choose other printer-specific options.
PRINTING FROM MAC OS X 27 These print options are specific to the EX Print Server and the digital press. You must choose each Feature Set to see all the options. These options override settings in EX Print Server Printer Setup but can be changed from Command WorkStation. If you choose Printer’s default, the job prints according to the settings specified in Setup. For more information about these options and overrides, see Print Options.
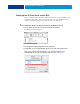
PRINTING FROM MAC OS X 28 TO RETRIEVE A SECURE PRINT JOB 1 At the digital press control panel, press the All Services button. 2 Select Web Applications. 1 1 2 All Services button Secure Print 2 3 Select Secure Print from the Main page. The Secure Print password window appears. 4 Type the same password you entered in the Secure Print field of the printer driver. The jobs that match the password are displayed in the Login window. 5 Select your print job and choose either Print or Delete.
PRINTING FROM MAC OS X 29 Using presets Saving print option settings to your hard disk enables you to load specifically configured settings for a particular job as a preset. TO CREATE A PRESET 1 Open a file and choose Print from the application’s File menu. 2 Choose Fiery Features from the drop-down list. 3 Click Full Properties in the Basic window to adjust the print settings as desired. 4 Choose Save As from the Presets drop-down list.
PRINTING FROM MAC OS X 30 TO DELETE PRESETS 1 Open a file and choose Print from the application’s File menu. 2 Choose a preset from the Presets drop-down list. 3 Choose Delete from the Presets drop-down list. TO RENAME PRESETS 1 Open a file and choose Print from the application’s File menu. 2 Choose a preset from the Presets drop-down list. 3 Choose Rename from the Presets drop-down list. 4 Enter a descriptive name for the preset (a maximum of 32 characters) and click OK.
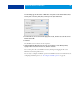
PRINTING FROM MAC OS X 31 Defining and editing custom page sizes in Page Setup With custom page sizes, you define page dimensions and margins. Use Page Setup to define a custom page size. When you define or edit a custom page size, use the following procedures. TO DEFINE A CUSTOM PAGE SIZE MAC OS X V10.3.9 1 Choose Page Setup from the application’s File menu. 2 Choose Custom Paper Size from the Settings menu. 1 Custom page names 1 3 Click New and type a name for the custom page size.
PRINTING FROM MAC OS X 32 TO DEFINE A CUSTOM PAGE SIZE ON MAC OS X V10.4 1 Choose Page Setup from the application’s File menu. 2 Choose Manage Custom Sizes from the Page Size menu. 1 Custom page names 1 3 Click the plus sign ( ) to add a new custom page size. 4 Double-click Untitled to type a name for the custom page size. 5 Enter the page dimensions and margins. 6 Click OK to exit. The custom page size you defined is added to the list of Page Size selections in the Page Setup dialog box.
PRINTING FROM MAC OS X 33 TO DELETE A CUSTOM PAGE SIZE 1 Choose Page Setup from the application’s File menu. 2 Choose Custom Paper Size from the Settings menu. For Mac OS X v10.4, choose Manage Custom Sizes from the Page Size menu. 3 Select the Custom Paper Size name. 4 Click Delete. For Mac OS X v10.4, click the minus sign ( ) to delete a custom page size. 5 Click OK to exit. TO MAKE A COPY OF THE CUSTOM PAGE SIZE 1 Choose Page Setup from the application’s File menu.
PRINTING FROM MAC OS X 34 4 Click the Media icon. N OTE : Document Size is the page size defined in your original application’s Print setup (or Page Setup) dialog box. Paper size is the size of the actual sheet of paper on which your job will print. In cases when printing one document page per sheet of paper, Document size is usually the same as the Paper size. However, it may differ when printing booklets or imposing multiple document pages on a single sheet. 5 Click Custom.
PRINTING FROM MAC OS X 35 TO EDIT A CUSTOM PAGE SIZE WITH THE MAC OS X PRINTER DRIVER 1 Choose Print from the application’s File menu. 2 Choose Fiery Features from the drop-down list. 3 Click Full Properties in the Basic window. 4 Click the Media icon. 5 Select the custom page size from the Paper Size list. 6 Click Custom. The Custom Paper Size dialog box appears. 7 Edit the settings, as described on page 34, and click OK.
PRINTING FROM MAC OS X 36 Enabling Two-Way Communication If you enabled a TCP/IP network, you can retrieve digital press status and ColorWise settings from the EX Print Server and display them in the printer driver using the Two-Way Communication feature. The digital press status includes the current paper and toner levels. You can set the ColorWise settings on the EX Print Server using ColorWise Pro Tools. For more information about ColorWise print options, see Color Printing.
PRINTING FROM MAC OS X 37 N OTE : If the dialog box does not appear automatically, click Configure. 4 Type the EX Print Server IP address or DNS name in the Printer Address field or select a Bonjour printer from the list in the dialog box. 5 Click OK. 6 Click the Printer tab to monitor the status of the digital press. 7 To update the digital press status in the Printer window, click Update. • Paper: Displays the tray name and the amount of paper remaining in the specified tray as a percentage.
INDEX 39 INDEX A O AppleTalk connection, in Printer Setup Utility 9 OSX Installer 8 B P Bonjour connection type 11 Page Setup dialog box 19 PostScript fonts 6 PostScript Printer Description file, see PPD PPD overview 6 presets choosing for a print job 29 creating 29 Print dialog box 19 print options Mac OS X 19 printer driver downloading 7 installation, Mac OS X 8 setup, Mac OS X 9 Printer Setup Utility 8, 9 Bonjour connection type 11 Printer’s default 27 printing a custom page size 35 C ColorWise