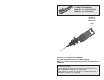
OPERATOR'S MANUAL MANUEL de L'UTILISATEUR MANUAL del OPERADOR Catalog No. No de Cat. Catálogo No. 5335 FPO HEAVY DUTY DEMOLITION HAMMER EXTRA ROBUSTE MARTEAU DE DÉMOLISSEUR MARTILLO PERFORADOR DE DEMOLICION PARA TRABAJOS PESADOS TO REDUCE THE RISK OF INJURY, USER MUST READ AND UNDERSTAND OPERATOR'S MANUAL. AFIN DE RÉDUIRE LE RISQUE DE BLESSURES, L'UTILISATEUR DOIT LIRE ET BIEN COMPRENDRE LE MANUEL DE L'UTILISATEUR. PARA REDUCIR EL RIESGO DE LESIONES, EL USUARIO DEBE LEER Y ENTENDER EL MANUAL DEL OPERADOR.
GENERAL SAFETY RULES-FOR ALL POWER TOOLS WARNING! READ ALL INSTRUCTIONS Failure to follow all instructions listed below may result in electric shock, fire and/or serious injury. The term "power tool" in all of the warnings listed below refers to your mains-operated (corded) power tool or batteryopearted (cordless) power tool. SAVE THESE INSTRUCTIONS 8. WORK AREA SAFETY 1. Keep work area clean and well lit. Cluttered or dark areas invite accidents. 2.
GROUNDING SPECIFIC SAFETY RULES 1. Hold power tools by insulated gripping surfaces when performing an operation where the cutting tool may contact hidden wiring or its own cord. Contact with a live wire will make exposed metal parts of the tool live and shock the operator. 2. Maintain labels and nameplates. These carry important information. If unreadable or missing, contact a MILWAUKEE service facility for a free replacement. 3.
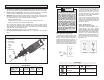
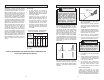
EXTENSION CORDS Grounded tools require a three wire extension cord. Double insulated tools can use either a two or three wire extension cord. As the distance from the supply outlet increases, you must use a heavier gauge extension cord. Using extension cords with inadequately sized wire causes a serious drop in voltage, resulting in loss of power and possible tool damage. Refer to the table shown to determine the required minimum wire size.
Starting and Stopping the Tool Hammering 1. Pull the trigger to start the tool. 1. 2. Release the trigger to stop the tool. Install the hammer iron following the instructions in Installing Hammer Irons. 2. Place iron on intended work site. 3. While holding the tool firmly, pull trigger. Locking Trigger The lock button holds the trigger in the ON position for continuous full-speed use. When chiseling or chipping, hold the tool at an angle to the work area.
FIVE YEAR TOOL LIMITED WARRANTY Every MILWAUKEE tool is tested before leaving the factory and is warranted to be free from defects in material and workmanship. MILWAUKEE will repair or replace (at MILWAUKEEs discretion), without charge, any tool (including battery chargers) which examination proves to be defective in material or workmanship from five (5) years after the date of purchase.
RÈGLES GÉNÉRALES DE SÉCURITÉ POUR LES OUTILS ÉLECTRIQUE AVERTISSEMENT! LIRE SOIGNEUSEMENT TOUTES LES INSTRUCTIONS Le non respect des instructions ci-après peut entraîner des chocs électriques, des incendies et/ou des blessures graves. Le terme «outil électrique» figurant dans les avertissements ci-dessous renvoie à loutil électrique à alimentation par le réseau (à cordon) ou par batterie (sans fil). CONSERVER CES INSTRUCTIONS 6. SÉCURITÉ DU LIEU DE TRAVAIL 1. 2. 3.
MISE A LA TERRE RÈGLES DE SÉCURITÉ PARTICULIÈRE 1. Tenir loutil par les surfaces de prise isolées si, au cours des travaux, loutil de coupe risque dentrer en contact avec des fils cachés ou avec son propre cordon. Le contact avec un fil sous tension met les parties métalliques exposées de loutil sous tension, ce qui infligera un choc électrique à lopérateur. 2. Entretenez les étiquettes et marqies di fabricant. Les indications qu'elles contiennent sont précieuses.
CORDONS DE RALLONGE MANIEMENT Si lemploi dun cordon de rallonge est nécessaire, un cordon à trois fils doit être employé pour les outils mis à la terre. Pour les outils à double isolation, on peut employer indifféremment un cordon de rallonge à deux ou trois fils. Plus la longueur du cordron entre loutil et la prise de courant est grande, plus le calibre du cordon doit être élevé.
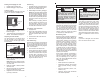
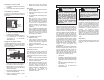
Démarrage et arrêt de loutil 1. Pour mettre loutil en marche, enfoncez la détente. 2. Pour arrêter loutil, relâchez la détente. 4. Le bouton de verrouillage maintient la détente à la position de marche continue à plein régime. 1. Installez la pièce-outil selon les instructions de la page 14. 2. Posez la pointe de la pièce sur lendroit à travailler. 3. Tenez solidement loutil et appuyez sur la détente. Fig. 3 N.B.
GARANTIE LIMITÉE DE LOUTIL DE CINQ ANS Tous les outils MILWAUKEE sont testés avant de quitter lusine et sont garantis exempts de vice de matériau ou de fabrication. MILWAUKEE réparera ou remplacera (à la discrétion de MILWAUKEE), sans frais, tout outil (y compris les chargeurs de batterie) dont lexamen démontre le caractère défectueux du matériau ou de la fabrication dans les cinq (5) ans suivant la date dachat.
REGLAS DE SEGURIDAD GENERALES PARA HERRAMIENTAS ELÉCTRICAS ¡ADVERTENCIA! LEA TODAS LAS INSTRUCCIONES Si no se siguen todas las siguientes instrucciones se puede provocar una descarga eléctrica, un incendio y/o lesiones graves. El término herramienta eléctrica en todas las advertencias incluidas más abajo se refiere a su herramienta operada por conexión (cable) a la red eléctrica o por medio de una batería (inalámbrica). GUA0RDE ESTAS INSTRUCCIONES 6. SEGURIDAD EN EL ÁREA DE TRABAJO 1. 2. 3.
TIERRA REGLAS ESPECIFICAS DE SEGURIDAD 1. 2. 3. 4. 5. Agarre la herramienta por los asideros aislados cuando realice una operación en la que la herramienta de corte pueda entrar en contacto con cables ocultos o con su propio cable. El contacto con un cable con corriente hará que las partes de metal expuesto de la herramienta pasen la corriente y produzcan una descarga al operador. Guarde las etiquetas y placas de especificaciones. Estas tienen información importante.
EXTENSIONES ELECTRICAS Las herramientas que deben conectarse a tierra cuentan con clavijas de tres patas y requieren que las extensiones que se utilicen con ellas sean también de tres cables. Las herramientas con doble aislamiento y clavijas de dos patas pueden utilizarse indistintamente con extensiones de dos a tres cables. El calibre de la extensión depende de la distancia que exista entre la toma de la corriente y el sitio donde se utilice la herramienta.
3. Cómo encender y apagar la herramienta 1. Apretar el gatillo para encender la herramienta. 2. Soltar el gatillo para apagar la herramienta. 4. Martilleo 1. Instale la broca de martilleo según las instrucciones Cómo instalar las brocas de martilleo. 2. Ponga la broca sobre el área a ser fragmentada. 3. Mientras coja la herramienta seguramente, apriete el gatillo.
ACCESORIOS GARANTÍA LIMITADA DE CINCO AÑOS Todas las herramientas MILWAUKEE se prueban antes de abandonar la fábrica y se garantiza que no presentan defectos ni en el material ni de mano de obra. En el plazo de cinco (5) años a partir de la fecha de compra MILWAUKEE reparará o reemplazará (a discreción de MILWAUKEE), sin cargo alguno, cualquier herramienta (cargadores de baterías inclusive) cuyo examen determine que presenta defectos de material o de mano de obra.
UNITED STATES - MILWAUKEE Service MILWAUKEE prides itself in producing a premium quality product that is NOTHING BUT HEAVY DUTY®. Your satisfaction with our products is very important to us! If you encounter any problems with the operation of this tool, or you would like to locate the factory Service/Sales Support Branch or authorized service station nearest you, please call... 1-800-SAWDUST (1.800.729.