Xerox 700 Digital Color Press Quick Start Guide
Quick Start Guide Prepared by: Xerox Corporation Global Knowledge and Language Services 800 Phillips Road Building 218 Webster, New York 14580 Translated by: Xerox GKLS European OperationsBessemer Road Welwyn Garden City Hertfordshire AL7 1BU UK © Copyright 2008 by Xerox Corporation. All Rights Reserved.
Table of Contents Control Panel 1 Where to Find Help 3 Simple Copying 5 Booklet Creation 7 Simple Network Scanning 9 Using Separator Pages 11 Reports 13 Billing Meters 15 System Administrator Menu Overview 17 Loading Paper and Media 21 Replacing the Toner Cartridges 25 Xerox 700 Digital Color Press iii
Quick Start Guide iv Xerox 700 Digital Color Press
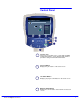
Control Panel Xerox 700 Digital Color Press Home Copy This product will allow you to make copies and perform a number of other operations which may include sending E-mails, faxes, and storing documents in electronic forms, depending on what Services it is equipped with. Press any button to select a service. Network Scanning Web Applications Xerox 700 Digital Color Press 1 Touch Screen The touch screen allows you to select all the available programming features.
Quick Start Guide 5 Log In/Out Provides password protected access to the System Administration menu used to adjust the defaults of the machine. 6 Language Changes text to an alternative language (when available). 7 Power Saver Your machine has energy saver features which significantly reduce the power consumption during periods of inactivity. When your machine is in a power saver mode the Power Saver indicator light is lit.
Where to Find Help 1-800 Telephone numbers For system support, user help, and service support, call the appropriate number: US: 1-800-821-2797 (Includes TTY Support) Canada: 1-800-939-3769 Xerox also provides web-based customer support. Go to: www.xerox.com/eSupportCentre Machine Status Machine Information Faults Supplies Billing Information Tools It may be helpful to know your machine serial number when calling for support. The machine serial number is shown on the Machine Information tab.
Quick Start Guide Locating the Machine Serial Number Press the Machine Status button on the control panel. Touch the Machine Information tab. The machine serial number is displayed. Machine Status Machine Information Faults Supplies Billing Information Tools Website: Paper Tray Status Machine Serial Number: xxxxxxxxxx Print Reports Current System Software 0.210.
Simple Copying 1. Load the documents. 2. Press the Services button. 3. Select the Features. Ready To Copy Quantity Copy Ho m T h is a lo w m a w il t o c o p ie s b e r m o f a y e b in c lu d e s e n d in g A p p lic a t io n s E- m a ils , f a x e s , a n d s t o r in g Layout Adjustment Paper Supply Output Format Output Color Auto Paper Select 1 Plain Auto Detect Color Black and White 64% 2 Plain 78% 3 Plain Dual Color (Red/Black) Plain Single Color (Red) More...
Quick Start Guide 4. Enter the Quantity. 5. Press Start. 6. Identify your job in the Queue. Active Jobs Completed Jobs Print Waiting Jobs Secure Print Jobs and More View All Jobs 6 # Owner Name Status 001 Smith, J. XYZ.
Booklet Creation Booklet creation enables the production of booklets or multi-page copies from 1 or 2-sided originals. The machine will scan your originals and automatically reduce and arrange the images in the correct sequence on your selected copy paper so that a booklet is created when the copy set is folded in half. 1. Select the Output Format tab.
Quick Start Guide Ready To Copy Quantity Booklet Creation Booklet Options Cancel Original Input Save Fold and Staple Off 1 Sided Originals No Fold or Staple On 2 Sided Originals Fold and Staple Rotate Side 2 Fold Only 3. Depending on your finisher, you may also have the option to choose from the following Fold and Staple selections: > No Fold or Staple > Fold and Staple > Fold Only.
Simple Network Scanning 1. Load the documents. 2. Press the Services button. Touch the All Services icon, then touch the Network Scanning icon. 3. Select the template.
Quick Start Guide 4. Select the features. Ready to scan your job All Services Network Scanning Network Scanning Advanced Settings Layout Adjustment Filing Options Go to Template Description Update Templates Color Scanning 2 Sided Scanning Original Type Scan Presets Auto Detect 1 Sided Photo and Text for Sharing and Printing Color 2 Sided Text for Archival Record Black 2 Sided Rotate Side 2 Photo for OCR Grayscale More... 5. Press Start. 6. Identify your job in the Queue.
Using Separator Pages When making a set of transparencies you can insert a divider between each transparency in order to make it easier to manage your presentation slides. This option is reached from the Output Format tab on the touch screen. Transparency Separators are not available if the Auto Paper Supply option is selected. Follow the steps below to access and use this feature.
Quick Start Guide 4. Touch the Transparency Options button.
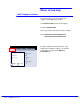
Reports 1. Press the Machine Status button on the control panel. 2. Touch the Machine Information tab. 3. Touch the Print Reports button. Xerox 700 Digital Color Press Home Copy This product will allow you to make copies and perform a number of other operations which may include sending E-mails, faxes, and storing documents in electronic forms, depending on what Services it is equipped with. Press any button to select a service.
Quick Start Guide Close Print Reports Job Status Scan Reports 14 Copy Reports An example of a typical Print Reports screen is shown here. To print any of the reports shown, simply touch the corresponding report button on the touch screen, then press the Start button on the control panel. NOTE: The reports available will differ depending on your machine configuration.
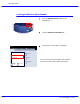
Billing Meters The Billing Meters feature provides access to machine usage and billing information. The meters vary depending on your machine configuration and setup. 1. Press the Machine Status button on the control panel. 2. Touch the Billing Information tab.
Quick Start Guide Machine Status Machine Information Faults Machine Serial Number UGW22222 Counter Count Color Impressions 5608 Black Impressions 1601 Total Impressions 16 Supplies Billing Information Tools The Billing Meters information is shown here. Customers can view the various billing meters, and machine serial number for tracking purposes. This completes the Billing Meters topic.
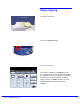
System Administrator Menu Overview Machine Status Machine Information Faults System Settings Supplies Group Billing Information Tools Features Setup and Calibration Common Service Settings Machine Clock/Timers Accounting Copy Service Settings Audio Tones Scan Service Settings Screen/Button Settings Network Controller Settings Paper Tray Settings Authentication/Security Settings The system administrator tools enable the system administrator to set-up, customize and maintain the machine.
Quick Start Guide 1. Press the Log In/Out button on the control panel. 2. Enter the System Administrator's Login ID in the field provided. 3. Touch Enter on the touch screen. 4. Press the Machine Status button on the control panel. 5. Touch the Tools tab.
Quick Start Guide Machine Status Machine Information Faults Supplies System Settings Group Billing Information Tools Features Setup and Calibration Common Service Settings Machine Clock/Timers Accounting Copy Service Settings Audio Tones Scan Service Settings Screen/Button Settings Network Controller Settings Paper Tray Settings Authentication/Security Settings The System Settings menu allows administrators to access submenus for Common Settings, Copy Mode Settings, Scan Mode Settings,
Quick Start Guide The Accounting menu allows you to set restrictions on users using specific machine features, or set restrictions on individual users.
Loading Paper and Media Trays 1, 2, and 3 can take 550 sheets of 20lb. from 8.5"x5.5" to 11"x17" paper in a variety of different media stock. The following procedure shows you how to load Tray 1 with 8.5"x11" paper. Caution: A paper jam may occur if a tray is opened while it is being used to feed stock. Xerox 700 Digital Color Press 1. Open the paper tray. 2. Fan the sheets before loading them into the tray. Register the stack of paper or media against the right side of the tray.
Quick Start Guide 22 3. The paper guides in the trays must be adjusted so that they touch the stock. 4. To position the right side guide, squeeze the clamp mechanism and slide the guide to touch the edge of the stock. 5. To position the front and rear guides, squeeze the clamp mechanism and slide the guide to touch the edge of the stock.
Quick Start Guide Whenever you change paper in a paper tray, you will need to change the paper type and paper size values on the Paper Tray Settings screen. If enabled by your System Administrator, the Paper Tray settings screen may be displayed on the touch screen. Tray 1 Cancel 8.5"x11" Plain Heavyweight Confirm 6.. Select the Change Settings button. Change Settings White The Paper Type options allow you to select the paper type (Heavyweight, Transparency, Tabs, Hole Punched, etc.
Quick Start Guide Tray 1 Close Items Current Settings Paper Size Auto Size Detect Paper Type and Weight Plain Paper Color White Adjust Paper Curl Default Alignment Adjustment Default Background Suppression: Off Image Enhancement Off Tray 1 Items 24 Current Settings Auto Size Detect 2. Paper Type and Weight Plain 3. Paper Color White 4. Adjust Paper Curl Default 5.
Replacing the Toner Cartridges 1. Replace the toner cartridge while the machine is on. Open the toner cover, located just above the machine front door. CAUTION: Before you begin the procedure, ensure that the machine has been allowed to cool down. Failure to do so may result in burns if certain parts of the machine are touched. 2. Lay paper on the floor before removing the cartridge. This will allow any excess toner to fall on the paper.
Quick Start Guide 5. Remove the new toner cartridge from its packaging. 6. Gently tilt the new cartridge up and down, and then left and right to redistribute the toner. 7. Install the toner cartridge by aligning the arrows on the cartridge evenly with the printer until you hear a click. 8. Close the Front Door. If the door will not close completely, make sure the cartridge is in the lock position and the toner cartridge is installed into the appropriate toner location.