00-ugm940.
00-ugm940.book Page 2 Monday, July 31, 2000 3:20 PM Prepared by: Xerox Industrial Design Human Interface Graphic Design Jefferson Road Henrietta New York ©2000 by Xerox Limited. All rights reserved.
00-ugm940.book Page iii Monday, July 31, 2000 3:20 PM Table of Contents U SER GU ID E 1. BASIC INFORMATION M940 - M950 WorkCentre Components Connections Control Panel M940 - M950 WorkCentre Components Software Components Xerox ControlCentre 2.0 - WorkCentre Status Bar 1-1 1-2 1-3 1-6 1-7 1-9 2.
00-ugm940.book Page iv Monday, July 31, 2000 3:20 PM Clear/Stop Start 2-8 2-8 3. PRINTING Printing Printing Documents Printing Cards Printing Envelopes Printing Single Envelope Printing Several Envelopes Printing Iron-On Transfers Printing Labels Printing Photographs Printing Transparencies Printing Banners 3-1 3-2 3-3 3-4 3-4 3-5 3-6 3-7 3-8 3-9 3-10 4.
00-ugm940.book Page v Monday, July 31, 2000 3:20 PM Faxing Using Preset 2 Faxing From ControlCentre - Pagis Inbox 6-2 6-3 7. MAINTENANCE Maintaining Your WorkCentre Changing an Ink Cartridge Cleaning the Print Head Aligning the Print Head Changing the Print Head 7-1 7-2 7-5 7-6 7-7 8.
00-ugm940.
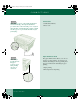
00-ugm940.book Page 1 Monday, July 31, 2000 3:20 PM M940 - M950 WORKCENTRE COMPONENTS Chapter One 1z M940 - M950 WorkCentre Components BASIC INFORMATION 1 2 1. CD, Getting Started guide, User Guide, and Warranty Card (in most countries) Y104 - Magenta Yellow Cyan + Ink Cartridges DOCU PRINT M WORK CENTRE Series M Series 1 Catouche d’Encre Tintenpatrone Cartuccia inhiostro Inkt Cartridge Cartucho de tinta Russian ink Cartridge Chinese ink Cartridge 4 2. WorkCentre Control Panel 3.
00-ugm940.book Page 2 Monday, July 31, 2000 3:20 PM CONNECTIONS Connections Note: When power is connected the WorkCenter will automatically go through an adjustment procedure. Do not disconnect the power cord from the wall outlet, as the WorkCentre requires a small amount of power to prevent the ink in the nozzles from drying. 1. USB cable (included) 2. Power cord 1 2 Paper Thickness Knob The paper thickness knob allows you to choose envelope or paper printing.
00-ugm940.book Page 3 Monday, July 31, 2000 3:20 PM CONTROL PANEL Control Panel 3 1 4 5 2 + - 7 6 11 9 8 10 13 14 15 12 1.Paper Setup: Select paper type and size 2. Lighten/Darken: Adjust lightness/darkness and color intensity 3. Display: Shows messages 1 4. Menu/Exit: Enter or exit the menu 5. Clear/Stop: Clear or stop 6. Color: Select between Color and B & W 7. Quality: Select from the following quality options: • Best • Normal • eXpress • Draft User Guide 1.
00-ugm940.book Page 4 Monday, July 31, 2000 3:20 PM CONTROL PANEL 8. Reduce/Enlarge: Adjust the size copy desired 9. Scan Mode: Enter Scan Mode 10. Navigator Control: Move between selections 11. Error light: Lights when error occurs 12. Select button: Select options 13. Copy Quantity: Select copy quantity 14. Start: Starts scanning or copying 15.
00-ugm940.book Page 5 Monday, July 31, 2000 3:20 PM CONTROL PANEL Paper Tray The paper tray is inserted into the lower portion of the WorkCentre. Output Tray The output tray rests on top of the paper tray and slides into the WorkCentre. 1 Output Tray Extension The output tray extension pulls out and flips up. User Guide 1.
00-ugm940.book Page 6 Monday, July 31, 2000 3:20 PM M940 - M950 WORKCENTRE COMPONENTS M940 - M950 WorkCentre Components Bypass Tray The bypass tray is located on the back of the WorkCentre. To use the bypass tray, flip it down. The bypass tray is used for loading a variety of media, including envelopes, banner paper, and transparencies. Rear Access Door The rear access door is located on the back of the WorkCentre, underneath the bypass tray to provide access to the paper path. 1.
00-ugm940.book Page 7 Monday, July 31, 2000 3:20 PM SOFTWARE COMPONENTS Software Components ControlCentre 2.0: • • Pagis PRO 3.0 : The latest version of Pagis customized for the M940/950 which integrates all of the functions into one easy to use interface. The primary functions include: • TextBridge PRO 9.0: Beneficial for any document where you combine set format, text, and graphics.
00-ugm940.book Page 8 Monday, July 31, 2000 3:20 PM SOFTWARE COMPONENTS Note: To use your WorkCentre as a scanner, the WorkCentre TWAIN Scanner driver must be installed on your PC during print driver installation and you must have a TWAINcompliant software application (for example, ScanSoft Pagis Pro, MS Word, or MGI PhotoSuite). 1.8 User Guide • MGI PhotoSuite: Photo editor modifies your scanned images to fit your specific application.
00-ugm940.book Page 9 Monday, July 31, 2000 3:20 PM XEROX CONTROLCENTRE 2.0 - WORKCENTRE Xerox ControlCentre 2.0 - WorkCentre Status Bar Open the WorkCentre Status Bar by selecting Start>Programs>Xerox ControlCentre2.0>Status Bar or by clicking the Xerox ControlCentre 2.0 - Pagis Inbox. 1. Select the ink level to display the Status/Maintenance window. 2. The display window shows error messages and allows you to change copier settings. 3.
00-ugm940.book Page 10 Monday, July 31, 2000 3:20 PM XEROX CONTROLCENTRE 2.0 - WORKCENTRE 1.
00-ugm940.book Page 1 Monday, July 31, 2000 3:20 PM COPYING Chapter Two 233 COPYING Copying This chapter contains the following information: • Copying • Using the Set Document Feeder (M950 only) • Optimizing copy appearance 2 User Guide 2.
00-ugm940.book Page 2 Monday, July 31, 2000 3:20 PM COPYING Copying 2.2 User Guide 1 Open the top. 2 Place your original face-down on the document glass. 3 Close the top. Press the desired copy options (such as copy quantity or paper type) from the Control Panel. When you have finished making your selections, press Start to copy. To stop copying, select the Clear/Stop button. Copy options are covered in more detail in the following pages.
00-ugm940.book Page 3 Monday, July 31, 2000 3:20 PM USING THE SET DOCUMENT FEEDER (M950 ONLY) Using the Set Document Feeder (M950 only) Load your original face-down in the Set Document feeder. Adjust the side guide. Press the Start button. 1 2 3 Note: You are limited to making one copy in the Set Document Feeder. Copy Color 2 B&W Select either B & W or Color on the left side of the control panel.
00-ugm940.book Page 4 Monday, July 31, 2000 3:20 PM PAPER SETUP Paper Setup Paper Setup allows you to select the paper type and size. 1 Press the Paper Setup button. + - Note: When copying on card stock, remember to change the knob on the right side of the WorkCentre from the plain paper setting to the envelope setting, which handles thicker paper stock.
00-ugm940.book Page 5 Monday, July 31, 2000 3:20 PM LIGHTEN/DARKEN Lighten/Darken The Lighten/Darken button allows you to adjust lightness/darkness for black and white and color copies as well as adjust the color intensity when you make color copies. To adjust the lightness or darkness, press the Lighten/Darken button. - 1 + Use the Up/Down Navigator buttons to move between Lighten/Darken and Color Intensity.
00-ugm940.book Page 6 Monday, July 31, 2000 3:20 PM REDUCE/ENLARGE Reduce/Enlarge Note: The Left/Right Navigator buttons will reduce or enlarge by 1% when using the Reduce/ Enlarge feature (Variable, Poster, Repeat Image, Mirror, or Custom). The Reduce/Enlarge button allows you to change the copy image size. 1 To change the size, press the Reduce/Enlarge button. 2 Use the Up/Down Navigator buttons to scroll through the options. When the option you want displays, press Select.
00-ugm940.book Page 7 Monday, July 31, 2000 3:20 PM REDUCE/ENLARGE Reduce/Enlarge If Default Paper Type is Letter If Default Paper Type is A4 Description of Preset Function Variable (100%, default) Variable (100%, default) Changes the size in 1% increments when you press the Left/Right Navigator buttons. Full Image (91%) Full Image (91%) If your image extends to the edge of the page, this adds a margin and reduces it to fit on the page.
00-ugm940.book Page 8 Monday, July 31, 2000 3:20 PM SELECT BUTTON Select Button The Select button allows you to choose options when they appear in the display window. Menu/Exit The Menu/Exit button allows you to browse through menu items. You must use the Select button to add menu items. Copy Quantity Buttons The Copy Quantity button allows you to select the number of copies. You can make up to 50 copies.
00-ugm940.book Page 1 Monday, July 31, 2000 3:20 PM PRINTING Chapter Three 333 PRINTING Printing This chapter contains the following information: • Printing documents from your PC • Printing cards • Printing envelopes • Printing iron-on transfer • Printing labels • Printing photographs • Printing transparencies • Printing banners 3 User Guide 3.
00-ugm940.book Page 2 Monday, July 31, 2000 3:20 PM PRINTING DOCUMENTS Printing Documents 1 Open the document you want to print and select File > Print 2 Select Properties, then select from the options listed on the Paper/Output tab: • Copies: Type how many copies you want. • Orientation: Choose Portrait or Landscape. • Print Order: Check Collate or Reverse print order.
00-ugm940.book Page 3 Monday, July 31, 2000 3:20 PM PRINTING CARDS Printing Cards You can use the WorkCentre to print index cards, postcards, and birthday cards. Choose any card size in the Paper Size Selection menu or use the Custom selection to print on other card sizes not found in the selection menu. Note: The minimum card size you can print is 3 inches x 5 inches or 76.2mm x 127mm. Remove any other media in the Paper Tray and place up to 30 cards in the right side of the tray.
00-ugm940.book Page 4 Monday, July 31, 2000 3:20 PM PRINTING ENVELOPES Printing Envelopes There are two methods you can use for printing envelopes: • For printing a single envelope use the Bypass Tray on the back of the machine. • For printing several envelopes use the Paper Tray (instructions on next page). Printing Single Envelope Note: If the printing on your envelope is not correct, reverse the orientation of the envelope and print again.
00-ugm940.book Page 5 Monday, July 31, 2000 3:20 PM PRINTING SEVERAL ENVELOPES Printing Several Envelopes Remove any other media from the Paper Tray. 1 Insert the envelopes addressable side down with the flap of the envelope pointing toward the left side. 2 Adjust the guides snugly against the envelopes. 3 On the right side of the machine position the Paper Thickness Knob to envelope.
00-ugm940.book Page 6 Monday, July 31, 2000 3:20 PM PRINTING IRON-ON TRANSFERS Printing Iron-On Transfers You can use the iron-on transfer feature to put an image onto shirts or other cloth material. All you need is iron-on transfer paper, which you can buy at most computer or office supply stores. Note: A mirror image will be printed on the iron-on transfer paper. 3.6 User Guide 1 Load the iron-on transfer paper, printable side down, in the Paper Tray.
00-ugm940.book Page 7 Monday, July 31, 2000 3:20 PM PRINTING LABELS Printing Labels You can use your WorkCentre to print sheets of labels. Use only US letter or A4-sized labels. For best results use labels that are specifically designed for ink jet machines. Fan the edges of the label sheets to separate them. Remove any other paper in the Paper Tray and load up to 30 sheets of labels face down. 1 2 Adjust the paper guides snugly against the stack.
00-ugm940.book Page 8 Monday, July 31, 2000 3:20 PM PRINTING PHOTOGRAPHS Printing Photographs Note: If printing multiple pages, carefully remove each sheet promptly and allow it to dry before handling. 3.8 User Guide For best results use Photo Gloss paper. 1 Remove any other media and place the paper in the Paper Tray with the glossy side down.
00-ugm940.book Page 9 Monday, July 31, 2000 3:20 PM PRINTING TRANSPARENCIES Printing Transparencies For best results use a Xerox ink jet transparency or a transparency specifically designed for ink jet machines. Note: Use transparencies designed for ink jet machines. Using transparencies designed for laser machines will cause the ink to smear. Remove any other media and place up to 30 transparencies in the Paper Tray with the rough side down.
00-ugm940.book Page 10 Monday, July 31, 2000 3:20 PM PRINTING BANNERS Printing Banners For printing banners, we recommend you use 20 lb. or 75 gsm paper. You can feed up to five sheets of banner paper through the bypass tray. 3.10 User Guide 1 After you open your document and select File: Print, click on the Properties button, then the Paper/Output tab, then select Banner in the Paper size list box. In the paper source list box select Bypass Tray.
00-ugm940.book Page 1 Monday, July 31, 2000 3:20 PM CUSTOMIZING YOUR WORKCENTRE Chapter Four 433 Customizing your WorkCentre CUSTOMIZING YOUR WORKCENTRE This chapter contains the following information: • Customizing copier features • Selecting WorkCentre display window language • Selecting paper default • Selecting program timeout • Selecting sleep mode • Customizing print features on your PC • Customizing scan features • 4 Setting a preset for email User Guide 4.
00-ugm940.book Page 2 Monday, July 31, 2000 3:20 PM CUSTOMIZING COPIER FEATURES - + Customizing Copier Features You can customize and save the following copier features: Tip: You can also customize some copier features from the ControlCentre on your PC, by selecting Start>Programs>Xerox ControlCentre>Status Bar and clicking the Settings>System Defaults button. Selecting WorkCentre Display Window Language 1 Press the Menu/Exit button. + - 2 Press the down Navigator until option "9.
00-ugm940.book Page 3 Monday, July 31, 2000 3:20 PM SELECTING PAPER DEFAULT Selecting Paper Default Press the Menu/Exit button. 1 + - Press the down Navigator button until option "7. Paper Default" displays. 2 + - Press the right Navigator button until the required paper size displays. 3 Press the Select 4 button. Selecting Program Timeout You can select the amount of time the WorkCentre delays before returing to defaults. Press the Menu/Exit button.
00-ugm940.book Page 4 Monday, July 31, 2000 3:20 PM SELECTING SLEEP MODE SETTING Selecting Sleep Mode Setting You can select the amount of time the WorkCentre delays before going into sleep mode. 1 Press the Menu/Exit button. + - 2 Press the down Navigator button until option "6. Sleep Mode" displays. - 3 Press the right Navigator the desired time displays. 4 Press the Select + button until button. Learning How to Customize Print Features on Your PC 4.
00-ugm940.book Page 5 Monday, July 31, 2000 3:20 PM CUSTOMIZING SCAN FEATURES Customizing Scan Features Your WorkCentre is set up with five presets. A preset is a previously saved setting that allows you to save frequently used settings. (For example, if you make frequent scans of color pictures, you might set up one of the presets to scan to your favorite photo application). Note: How to scan using a preset is covered in chapter 5 of this guide, "Scanning.
00-ugm940.book Page 6 Monday, July 31, 2000 3:20 PM SETTING A PRESET FOR EMAIL Setting a Preset for Email Note: You can set presets for other applications using the same steps as email by changing the application you will scan to. 1 On your PC, select Start>Programs>Xerox ControlCentre>Status Bar. The Xerox ControlCentre - WorkCentre Status Bar window displays. 2 Select the Settings button. Select Scan Presets. Under "Step 1," select Preset 3 from the list box.
00-ugm940.book Page 1 Monday, July 31, 2000 3:20 PM SCANNING Chapter Five 533 SCANNING Scanning This chapter contains the following information: • Scanning using presets • Sending a scan through email • Scanning using ControlCentre - Pagis Inbox • Scanning using MGI PhotoSuite • Scanning using MS Word • Scanning using PhotoShop .
00-ugm940.book Page 2 Monday, July 31, 2000 3:20 PM SCAN USING PRESET 1 Scan Using Preset 1 Your WorkCentre is set up with five presets. A preset is a programmed setup that allows you to scan using preferred settings. (For example, if you make frequent scans of color pictures, you might set up one of the presets to scan to your favorite photo application). Note: How to set presets is covered in chapter 4 of this guide, "Customizing your WorkCentre.
00-ugm940.book Page 3 Monday, July 31, 2000 3:20 PM SENDING A SCAN THROUGH EMAIL Sending a Scan through Email In the ControlCentre - Pagis Inbox, click and hold the left mouse button down on the image you want to send. 1 Drag the image to the email application and release the left mouse button. The Choose Profile window displays. Click OK. The email Pagis XIF File window displays. 2 Select the format to send the file in.
00-ugm940.book Page 4 Monday, July 31, 2000 3:20 PM SCANNING USING CONTROLCENTRE - PAGIS INBOX Scanning Using ControlCentre - Pagis Inbox Note: Remember that Prescan only scans a preview of a document. To actually scan a document, select the Scan button. 5.4 User Guide 1 Place your original face-down on the document glass. 2 Select Xerox ControlCentre - Pagis Inbox icon from your PC window. 3 In the Xerox ControlCentre - Pagis Inbox, select the Scan icon.
00-ugm940.book Page 5 Monday, July 31, 2000 3:20 PM SCANNING USING MGI PHOTOSUITE Scanning Using MGI PhotoSuite This feature allows you to incorporate a scanned image directly into a document. These instructions apply to MGI PhotoSuite. If you are using a different application,consult the documentation provided with the application. Note: The scanning application must be TWAIN-compliant. Select Start>Programs>MGI PhotoSuite. 1 When the application opens, select Work on Your Own.
00-ugm940.book Page 6 Monday, July 31, 2000 3:20 PM SCANNING USING MS WORD Scanning Using MS Word This feature allows you to incorporate a scanned image directly into a Word document. Note: The scanning application must be TWAIN-compliant. Note: The higher the resolution, the larger the file size. Note: The Saved settings list box is optional and allows you to save settings you use frequently. 5.6 User Guide 1 Select Start>Programs>Microsoft Word.
00-ugm940.book Page 7 Monday, July 31, 2000 3:20 PM SCANNING USING ADOBE PHOTOSHOP Scanning Using Adobe PhotoShop This feature allows you to incorporate a scanned image directly into a PhotoShop document. Note: The scanning application must be TWAIN-compliant. Select Start>Programs>Adobe PhotoShop. 1 Open a document or select File>New to create a new document. 2 Select File>Import>TWAIN_32. 3 Select the Xerox WorkCentre M940-M950 scanner.
00-ugm940.book Page 8 Monday, July 31, 2000 3:20 PM SCANNING USING ADOBE PHOTOSHOP 5.
00-ugm940.book Page 1 Monday, July 31, 2000 3:20 PM FAXING FROM YOUR PC Chapter Six 633 FAXING Faxing from your PC This chapter contains the following information: • Faxing using preset 2 • Faxing using ControlCentre - Pagis Inbox 6 . User Guide 6.
00-ugm940.book Page 2 Monday, July 31, 2000 3:20 PM FAXING USING PRESET 2 Faxing Using Preset 2 Your WorkCentre is set up with fax as a factory default setting for sending Faxes from your PC modem using the WorkCentre - QuickLink III PC Fax. This fax software uses the modem on your PC to send faxes. Note: How to set presets is covered in chapter 4 of this guide, "Customizing your WorkCentre." You can scan a document for faxing using preset 2.
00-ugm940.book Page 3 Monday, July 31, 2000 3:20 PM FAXING FROM CONTROLCENTRE - PAGIS INBOX Select View Fax to view your fax (optional). 6 Select Send Fax to fill out information regarding your fax. 7 Select Send Fax or select the Help>Contents button to find more information about using WorkCentre - QuickFax III. 8 Note: For more information about using WorkCentre - QuickLink III PC Fax select Help>Contents in the application.
00-ugm940.book Page 4 Monday, July 31, 2000 3:20 PM FAXING FROM CONTROLCENTRE - PAGIS INBOX 6.4 User Guide 7 Select Send Fax to fill out information regarding your fax. 8 Select Fax to send your fax or use the Help>Contents button to find more information about using WorkCentre - QuickFax III.
00-ugm940.book Page 1 Monday, July 31, 2000 3:20 PM MAINTAINING YOUR WORKCENTRE Chapter Seven 7 MAINTENANCE Maintaining Your WorkCentre This chapter contains the following information: • Changing an ink cartridge • Cleaning the print head • Aligning the print head • Changing the print head 7 User Guide 7.
00-ugm940.book Page 2 Monday, July 31, 2000 3:20 PM CHANGING AN INK CARTRIDGE Changing an Ink Cartridge Follow this procedure to replace an ink cartridge when the WorkCentre displays the message, "Out of ink." Note: Only replace ink cartridges when they are "Out of ink," not when the ink is low. 1 2 7.2 User Guide Pull the two side latches forward and raise the WorkCentre cover. The ink tanks will move to the center.
00-ugm940.book Page 3 Monday, July 31, 2000 3:20 PM CHANGING AN INK CARTRIDGE Remove the new ink cartridge from its package. Slowly peel off the foil seal from the cartridge in the direction of the arrow. 3 Caution: Do not touch the uncovered opening in the ink cartridge, as ink will get on your hands. 7 User Guide 7.
00-ugm940.book Page 4 Monday, July 31, 2000 3:20 PM CHANGING AN INK CARTRIDGE 6 Insert the green base of the ink cartridge, heel first, into the correct location on the color print head. The ink cartridges and corresponding locations are color-coded and numbered. 7 Push the ink cartridge down until it clicks into place. 8 To close the WorkCentre cover, lift up to release the support arms and push down until completely closed. Your WorkCentre will automatically begin cleaning the print heads.
00-ugm940.book Page 5 Monday, July 31, 2000 3:20 PM CLEANING THE PRINT HEAD Cleaning the Print Head The clean function is used to restore the print head when the nozzles become dirty or clogged with dried ink. Press the Menu/Exit button. Press the down Navigator button until "Maintenance" displays. Press the Select button. Press the right Navigator button until the type of cleaning you want to do displays. There are four types of print head cleaning available.
00-ugm940.book Page 6 Monday, July 31, 2000 3:20 PM ALIGNING THE PRINT HEAD Aligning the Print Head 1 2 Press the down Navigator button until Maintenance displays. Press the Select button. 3 Press the right Navigator button until "Align PrintHead" displays. 4 7.6 User Guide Press the Menu/Exit button. Press the Select button to print an alignment page. 5 Look over this page and find the areas that are best aligned.
00-ugm940.book Page 7 Monday, July 31, 2000 3:20 PM CHANGING THE PRINT HEAD Changing the Print Head Remove the new print head from the plastic case. 1 Caution: Setting the print head on a hard surface may cause damage to the inkjets. 1 Lift the Print head latch up to unlock the print carriage. 7 2 2 User 3 4 Guide 7.
00-ugm940.book Page 8 Monday, July 31, 2000 3:20 PM CHANGING THE PRINT HEAD 1 2 3 Insert the print head into the print carriage. 4 Lower the print head latch until it clicks, to lock print heads into place. 3 4 2 7.
00-ugm940.book Page 1 Monday, July 31, 2000 3:20 PM TROUBLESHOOTING Chapter Eight 8 TROUBLESHOOTING Troubleshooting This chapter contains the following information: • Printing a test page • Paper feeding problems • Quality problems • Copier/Printer problems • Scanner problems • Error Problems 8 User Guide 8.
00-ugm940.book Page 2 Monday, July 31, 2000 3:20 PM PRINTING A TEST PAGE Printing a Test Page 1 2 8.2 User Guide Press the Menu/Exit button in the window display. Press the down Navigator button until Maintenance displays. Press the Select button. 3 Press the right Navigator button until "Print Test Page" displays. 4 Press the Select button to print a test page.
00-ugm940.book Page 3 Monday, July 31, 2000 3:20 PM PAPER FEEDING PROBLEMS Paper Feeding Problems Symptom DiagnosDiaDiagnosis and/or Solutiongnosis and ors and/ Paper sticks together • Ensure there is not too much paper in the tray. Depending on the thickness of your paper, the paper tray can hold up to 150 sheets. • Ensure you are using the correct type of paper. Remove paper from the feeder and flex or fan the paper. • Humid conditions may cause some paper to stick together.
00-ugm940.book Page 4 Monday, July 31, 2000 3:20 PM QUALITY PROBLEMS Quality Problems Symptom DiagnosDiaDiagnosis and/or Solutiongnosis and ors and/ Printed document is blank • Verify that you have an original on the document glass. • Print a test print from the Control Panel: Note: Do not disconnect the power cord from the wall outlet, as the WorkCentre requires a small amount of power to prevent the ink in the nozzles from drying. • • • Press Menu/Exit in the display window.
00-ugm940.book Page 5 Monday, July 31, 2000 3:20 PM QUALITY PROBLEMS Quality Problems Symptom DiagnosDiaDiagnosis and/or Solutiongnosis and ors and/ Light or blurred characters • You may be using Draft quality. Try selecting a better print mode using the Quality button (Normal, eXpress, Best). • Make sure you are using good quality ink jet paper. Try another type of paper. Glossy paper provides better quality.
00-ugm940.book Page 6 Monday, July 31, 2000 3:20 PM QUALITY PROBLEMS Quality Problems Symptom DiagnosDiaDiagnosis and/or Solutiongnosis and ors and/ Printed image is too small or off the edge of the media • Select Full Image from Reduce/Enlarge button. • Change the document margins in the application that you are using. • Ensure you have selected the correct Paper Size from the Paper Setup button. • Try another type of paper. Ensure the paper is flat and unwrinkled.
00-ugm940.book Page 7 Monday, July 31, 2000 3:20 PM QUALITY PROBLEMS Quality Problems Symptom DiagnosDiaDiagnosis and/or Solutiongnosis and ors and/ Color print quality is poor • Try using a different kind of paper. Glossy paper provides better quality. • Make sure that the Paper Type setting is correct for the type of paper loaded. • Change the Print Quality setting. • The print heads may be mis-aligned. Color images are fuzzy, white streaks • • • • Press Menu/Exit on the Control Panel.
00-ugm940.book Page 8 Monday, July 31, 2000 3:20 PM COPIER/PRINTER PROBLEMS Copier/Printer Problems Symptom DiagnosDiaDiagnosis and/or Solutiongnosis and ors and/ WorkCentre does not print • A paper jam has occurred. If this is the case, a message appears in the display window. • Print a test print by selecting Exit/ Menu>Maintenance>Print Test Page. If the test print is good, check the printer cable or the PC. If the test print does not print, see the Copier troubleshooting section.
00-ugm940.book Page 9 Monday, July 31, 2000 3:20 PM COPIER/PRINTER PROBLEMS Copier/Printer Problems Symptom DiagnosDiaDiagnosis and/or Solutiongnosis and ors and/ Paper feed problems • Out of paper. Add paper. • Paper has not been loaded properly. Remove and re-insert the paper correctly. • There is too much paper in the paper tray. Remove some paper. • Check paper path for obstructions.
00-ugm940.book Page 10 Monday, July 31, 2000 3:20 PM COPIER/PRINTER PROBLEMS Copier/Printer Problems 8.10 Symptom DiagnosDiaDiagnosis and/or Solutiongnosis and ors and/ Printer prints very slowly • If you do not need Best mode, change the Print Quality setting to Normal or eXpress. • Close all applications not needed to print the job. • On your PC, select: Start > Settings > Printers.
00-ugm940.book Page 11 Monday, July 31, 2000 3:20 PM SCANNER PROBLEMS Scanner Problems Symptom DiagnosDiaDiagnosis and/or Solutiongnosis and ors and/ Scanning is too slow • Lower the scanning resolution. Typically 150dpi will give you an adequate image. • Typically color images and graphics take longer to scan than black and white because of larger amounts of data. • If using a parallel cable, try using a USB cable (for Windows 98 or 2000).
00-ugm940.book Page 12 Monday, July 31, 2000 3:20 PM SCANNER PROBLEMS Scanner Problems 8.12 Symptom DiagnosDiaDiagnosis and/or Solutiongnosis and ors and/ The scanner does not scan • Ensure you placed the original to be scanned face-down on the document glass. • There may not be enough available memory to hold the document you want to scan. Lower the resolution rate. • The USB or parallel cable is not connected properly. • The USB or parallel cable is defective.
00-ugm940.book Page 13 Monday, July 31, 2000 3:20 PM ERROR CODES Error Codes These error codes may appear in the display: Symptom Where Error Occurs Diagnosis and/or Solution *1 Scanner unit Initial motor hardware error. "Shipping Lock is on, unlock to operate" appears in display. • Turn power off. Pull the two release buttons on the sides of the machine toward you and lift the Access Cover. • To prevent damage the WorkCentre scanner chassis is shipped in the locked position.
00-ugm940.book Page 14 Monday, July 31, 2000 3:20 PM ERROR CODES Error Codes 8.14 Symptom Where Error Occurs Diagnosis and/or Solution F951 Printer unit Printer hardware failure. Unplug and plug in. If this fails, call service. F960 RDY-bus communication NVM error. Unplug and plug in. If this fails, call service.
00-ugm940.book Page 1 Monday, July 31, 2000 3:20 PM GENERAL INFORMATION Chapter Nine 9 General Information General Information This chapter contains the following information: • Service and Support • Ordering Supplies • Specifications • Safety 9 User Guide 9.
00-ugm940.book Page 2 Monday, July 31, 2000 3:20 PM SERVICE AND SUPPORT Service and Support If you are unable to solve a problem using this guide, do one of the following: • Access: http:/WWW.XEROX.COM • In the U.S. and Canada Call the Xerox Customer Support Center at: 1-800-TEAM XRX (1-800-832-6979) If possible, call from a telephone near your PC and the WorkCentre. Before calling, have the following information ready: 9.2 User Guide • Make sure that both your PC and your printer are turned on.
00-ugm940.book Page 3 Monday, July 31, 2000 3:20 PM ORDERING SUPPLIES Ordering Supplies Order Xerox WorkCentre M940-M950 supplies from your local Xerox dealer or retailer.
00-ugm940.
00-ugm940.book Page 5 Monday, July 31, 2000 3:20 PM INK CARTRIDGE/PRINT HEAD RE-ORDER NUMBERS Maximum Size 8.5” x 14” / 216 x 356 mm Banner Paper Feed US letter x 5 or A4 x 5 Paper Weight 16 - 110 lbs. / 60 - 200 g/m2 Input Tray Capacity 150 sheets (20 lbs. / 75 g/m2) Output Tray Capacity 50 sheets (20 lbs. / 75 g/m2) Bypass 1 sheet SOFTWARE INCLUDED Document Management Software Xerox ControlCentre 2.0 Optical Character Recognition TextBridge PRO 9.
00-ugm940.book Page 6 Monday, July 31, 2000 3:20 PM INK CARTRIDGE/PRINT HEAD RE-ORDER NUMBERS Weight 26.4 lbx. / 12 kgs (M940) 30.8 lbs. / 14 kgs (M950) Environment: Temperature 59° - 86° F / 15° - 30° C Environment: Humidity 20% - 80% Warranty 1 year SYSTEM REQUIREMENTS FOR PC CONNECTION 9.6 User Guide Minimum Requirements Pentium 133 MHz processor, 32 MB RAM, 40 MB HD space Recommended Requirements Pentium 200 MHz, 64 MB RAM, 200 MB HD space Operating System Win 95/98/00, Win NT 4.
00-ugm940.book Page 7 Monday, July 31, 2000 3:20 PM SAFETY Safety Regulatory Notices (European Union) Declaration of Conformance The CE marking applied to this product symbolizes Xerox Ltd Declaration of Conformity with the following applicable Directives of the European Union. Council Directive 73/23/ EC amended by Council Directive 93/68/EC, on the harmonization of the laws of the Member States related to equipment designated for use within certain voltage limits.
00-ugm940.book Page 8 Monday, July 31, 2000 3:20 PM SAFETY Regulatory Notices (USA) FCC Statement Note: This equipment has been tested and found to comply with the limits for a Class B digital device pursuant to Part 15 of the FCC Rules. These limits are designed to provide reasonable protection against harmful interference in a residential installation.
00-ugm940.book Page 9 Monday, July 31, 2000 3:20 PM SAFETY Declaration of Conformity These devices comply with Part 15 of the FCC Rules. Operation is subject to the following two conditions: (1) These devices may not cause harmful interference, and (2)these devices must accept any interference that may cause undesired operation. Model Numbers: YPA-3 and YPA-4 Contact Person: Xerox Corporation Phone: 1-800-828-6571 Address: 800 Phillips Road Webster, NY 14580 9 User Guide 9.
00-ugm940.book Page 10 Monday, July 31, 2000 3:20 PM SAFETY 9.
00-ugm940.book Page 11 Monday, July 31, 2000 3:20 PM INDEX Index USER GUIDE A Alignment, Print Head ..................... 7-6 B Banners, Printing .......................... 3-10 Bypass Tray ................................... 1-6 C Cards, Printing ............................... 3-3 Changing Ink Cartridge ............................ 7-2 Print Head ............................... 7-7 Cleaning, Print head ........................ 7-5 D Door, Rear Access ..........................
00-ugm940.book Page 12 Monday, July 31, 2000 3:20 PM INDEX E Ink Cartridge Changing ................................. 7-2 Re-Order Numbers .................... 9-3 Iron-On, Printing ............................ 3-6 Printing Cards ......................................3-3 Iron-On ...................................3-6 Labels .....................................3-7 Photographs .............................3-8 Several Envelopes .....................3-5 Single Envelope ........................