Version 6.
Prepared by: Xerox Corporation Global Knowledge and Language Services 800 Philips Road Bldg. 845-17S Webster, New York 14580 USA ©2007 by Xerox Corporation. All rights reserved. Copyright protection claimed includes all forms and matters of copyrightable material and information now allowed by statutory judicial law or hereinafter granted, including without limitation, material generated from the software programs displayed on the screen such as icons, screen displays, or looks.
Table of contents . . . . . . . . . . . . . . . . . . . . . . . . . . . . . . . . . . . . . . . . . . . . . . 1-1 MICR features. . . . . . . . . . . . . . . . . . . . . . . . . . . . . . . . . . . . . . 1-1 Datastreams . . . . . . . . . . . . . . . . . . . . . . . . . . . . . . . . . . . . 1-1 MICR Printers . . . . . . . . . . . . . . . . . . . . . . . . . . . . . . . . . . . . . . 1-2 MICR system differences . . . . . . . . . . . . . . . . . . . . . . . . . . 1-2 MICR fonts . . . . . . . . . . . . . . . .
Tab l e o f c on te n ts ii MI CR U s er G ui d e
MICR The purpose of this document is to familiarize you with the MICR features and functions available with FreeFlow Print Server systems. It provides information on installing MICR fonts on the FreeFlow Print Server and documents the process for printing MICR forms.
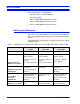
MICR Printers The following printers support MICR: • DocuPrint 100/115/135/155/180 MX • DocuPrint 75 MX • Nuvera 100MX Digital Production System • Nuvera 120MX Digital Production System • Nuvera 144MX Digital Production System MICR system differences The systems have some differences in the adjustments they make when entering MICR mode, and in the fonts and datastreams they support. The following table shows how these printers differ in their support of MICR features. Table 1-1.
MICR fonts The Xerox-supplied MICR fonts are required to optimize the quality of the MICR line and ensure excellent performance. It is critical that the font character raster patterns and metrics are not modified in any way and that no new characters are added. NOTE: Xerox MICR fonts must be used. They may not be modified in any way. MICR fonts provided Xerox provides sets of E13B and CMC7 MICR fonts for PostScript, PCL, LCDS, and IPDS. The following sections describe the fonts that you receive.
• CMC74J.FNT • CMC74L.FNT • CMC74P.FNT • E14BI.FNT • E14BJ.FNT • E14BL.FNT • E14BP.FNT NOTE: For the LCDS datastream, the font resolution must be 300 dpi only. IPDS fonts The T1001032 code page includes these fonts: • X0AE13 (E13B font) • X0AT13 (E13B test font) • X0LE13 (Landscape E13B) • X0LT13 (Landscape test font) The T1001033 code page includes the CMC7 font X0ACMC. However, CMC7 fonts are not currently supported on the DP 75 MX.
NOTE: When loading your fonts from CD, load the fonts from either the 600 dpi MICR Fonts CD or the 300 dpi CD. If both versions of the 9.12 point E13B PostScript font are present on the system at the same time, unpredictable results can occur. For this reason, two CDs are provided, each containing a different version of the 9.12 point E13B PostScript font.
your CD are listed: • 600 dpi CD: E13B, E13B9, and CMC72510 are listed. • 300 dpi CD: E13B and CMC72510 NOTE: The DocuPrint 75 EPS does not support the CMC7 fonts. For these systems, select only E13B and E13B9 (if available). e. Highlight the required fonts, and click Install. A Question window tells you that loading the fonts from CD could take over 30 minutes. Click OK. Watch the lower-left corner of the window. The “Installing Fonts…Done” message is displayed briefly. f.
Installing LCDS fonts To install the LCDS fonts: 1. From the Administration pull-down menu, select LCDS Resources. 2. From the Source pull-down menu, select CD-RW 0. 3. Click the Display button. The following eight LCDS fonts are listed in the resources section. • CMC74I.FNT • CMC74J.FNT • CMC74L.FNT • CMC74P.FNT • E13B4I.FNT • E13B4J.FNT • E13B4L.FNT • E13B4P.FNT 4. Select and highlight the fonts that you want to load, then rightclick on them. 5.
Selecting MICR fonts Checking the font version Selecting the wrong font can result in improper signal strength and high reject rates at the bank. To make sure that you have the font that you want, print a question mark, ?, in the MICR line. While the resulting document does not have a valid MICR line, the printed font is obvious. You can also print a test pattern. Refer to “Printing MICR test forms,” for the procedure.
Table 1-2.
Figure 1-1.
Selecting PostScript fonts To select a Xerox Postscript font, set the attributes for one of the following: • Internal name: E13B Point size: 9.12 • Internal name: E13B9 Point size: 9 • Internal name: CMC72510 Point size: 9.06 The Postscript E13B MICR font has the same character mappings as the PCL fixed pitch E13B font. Refer to the Generic MICR Fundamentals Guide for a complete listing of the character mappings.
NOTE: 600 dpi PCL fonts must not be used with a 300 dpi queue or with any 300 dpi resources. The resolution mismatch causes characters to be one dot further apart than is nominal. While this spacing meets industry standards, a high reject rate can result if the adjacent field spacing does not compensate for this error. You can use the PCL Unit of Measure command to set the PCL Unit to 600 (for example, &u600D). Alternatively, you can override the resolution to 600 dpi in the queue.
Setting the font resolution Before printing MICR jobs, you must set the resolution attribute appropriately for the queue to which you will be sending the jobs. The following table lists the different MICR font formats and the resolution at which each font should be printed. Table 1-3.
Setting the font resolution for the queue Before sending a document to a print queue, you must make sure that the resolution of the font used in the document is the same as that specified for the queue. If the font and queue resolutions do not match (for example, a document with a 600 dpi font is sent to a 300 dpi queue), the font may print with subtle distortions and could be rejected at the bank. Follow this procedure to set the font resolution as a queue property: 1.
Image quality for PCL The MICR fonts provided with the MX printers have been optimized for MICR printing on these systems. Therefore, it is important that darkening of the bitmap font is disabled when printing PCL MICR documents. To ensure that bitmap font darkening is disabled, follow these steps: 1. Log on as Administrator. 2. Select the Printer pull-down menu and select Image Quality. 3.
4. Add the new library to the MX font library concatenation. 5. Because the names of the Xerox AFP MICR fonts are the same as the IBM AFP MICR fonts, be careful not to overwrite the original IBM fonts. You may need to reference them later. New MICR implementation 1. Install the Xerox MICR fonts on the host AFP system. 2. Use the X0AE13 and X0AT13 fonts in your applications. 3. Refer to the code page and character set descriptions in the IBM manuals and Xerox supplements. 4.
Security features PSF has a security feature that allows you to download MICR fonts to a MICR printer only. The Xerox MICR printers also support this feature. MICR Secure Mode disables the following features: • Reposition Output • Sample Page • Job Forwarding • Proof • Save PDL • Move Blocks for Tape • Periodic Sample Set MICR forms This section provides MICR information for forms and test patterns on Xerox FreeFlow Print Server systems.
inverse landscape. Test forms are provided in US Letter, US Legal, and A4 paper sizes. E13B 300 and 600 dpi • MICR11_300.PCL (portrait and landscape, US Letter) • MICR11_300_I.PCL (inverse orientations, US Letter) • MICR11_600.PCL (portrait and landscape, US Letter) • MICR11_600_I.PCL (inverse orientations, US Letter) • MICR14_300.PCL (portrait and landscape, US Legal) • MICR14_300_I.PCL (inverse orientations, US Legal) • MICR14_600.PCL (portrait and landscape, US Legal) • MICR14_600_I.
CMC7 300 dpi • MXCM11 (US Letter) • MXCM14 (US Legal) • MXCMA4 (A4) Printing MICR test forms Setting up a test forms queue A queue must be created in order to print any of the MICR test forms. Follow this procedure to create a new queue. 1. select the Queue pull-down menu and select New Queue. 2. On the New Queue window, enter a name in Queue Name text box (for example, TestMICR). 3.
cd /opt/XRXnps/XRXdatv/data NOTE: Ensure that the cursor is inside the Terminal window. 3. Enter ls to display the MICR forms in the directory. 4. Enter /usr/ucb/lpr -P queuename -#nn filename where #nn indicates the required number of copies of the form. Example: /usr/ucb/lpr - P MICRTest -#20 MICRSA.ps From Print from File 1. From the FreeFlow Print Server window, select the Services pull-down menu and select Print From File. 2. Select Browse. 3. Under Look In, select the File System option. 4.
6. Make any further desired changes to the other fields on this window. For example, you can print multiple copies by increasing the number in the Quantity box. 7. Click OK to print the test form.
Additional information This section contains information that may be helpful for the user of MICR on a FreeFlow Print Server system. MICR output verification tools The MICR Positioning and Dimension Gauge (part number: 600T80025) is included in the MICR font and documentation kit that is shipped with your MX printing system. You may also order additional MICR verification tools, such as the Optical Comparator.
who have access to the printing system, as well as limiting what they can bring to, or remove from, the printer environment. Controlling access to critical files A combination of fonts, logos, signatures, and forms are used in developing a Xerox MICR application. One approach to securing these files is to place them on media that can be physically secured. The Xerox MICR fonts are supplied on CD ROMs in the ship kit for the printers.
Software security There are a number of software features that provide different levels of protection, ranging from a class-level logon control to the ability to automatically delete certain files at the end of a print job. As with physical security, software security focuses on restricting access to key files for authorized individuals only. The following software features are provided for security on the FreeFlow Print Server printers.
documents are waiting for an action in order to be printed. If a MICR document is waiting to be printed, take the appropriate actions, depending on the status of the job, to determine the cause of the problem and correct it. Ineligible jobs If a MICR job has Ineligible status, you should follow this procedure: 1. On the Job Manager window, right-click the ineligible job, and select Properties… from the pop-up menu. 2. Select the Ineligible tab on the job properties window. 3.
26 MICR User Guide