September 2008 701P48512 8254E/8264E Color Wide Format Printer Quick Start Guide
About this Manual 1. Purpose and Target Readers The purpose of the 8254E/8264E Quick Start Guide is to provide the casual or infrequent user with a set of instructions for some of the more common operator and maintenance tasks that may be performed on the printer. See the 8254E/8264E User Guide for a complete set of operating and maintenance instructions. 2. Manual Notation The following symbols are used in this manual for easier understanding of the information.
Table of Contents 1 Safety Instructions ..................................................................................................................1 1.1 Introduction .................................................................................................................1 2 Preparing To Print ..................................................................................................................3 2.1 Turning the printer power ON/OFF ..................................................
ii 8254E / 8264E Quick Start Guide
1 Safety Instructions 1.1 Introduction Various sections and procedure steps throughout this guide may contain cautions, notes, or tips. Be sure to read all cautions, notes, and tips before perfoming procedure steps. See the 8254E / 8264E User Guide for complete product safety information for these printers.
1 Safety Instructions This page has been intentionally left blank.
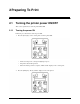
2 Preparing To Print 2.1 Turning the printer power ON/OFF This section explains how to turn the printer ONor OFF. 2.1.1 Turning the power ON Follow the procedure below to turn the power ON. 1. Press the [Power] key on the control panel to turn the printer ON. • The Power lamp on the control panel lights up in green. • The printer starts initial operation. • When the initial operation is complete, "Media width" displays in the control panel. 2. Press the [Menu] key.
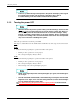
2 Preparing To Print • 2.1.2 If there is a problem during initial operation, the printer will display a message in the control panel and may stop operating. If operation stops, refer to 5 Troubleshooting in the User Guide and deal with the problem. Turning the power OFF • Never disconnect the printer’s power cable(s) from the building’s electrical outlet without first pressing the [Power] key to turn the printer’s power OFF.
2 Preparing To Print 2. Press the [Power] key to turn the printer OFF. • The Power lamp on the control panel turns OFF. • The printer starts the procedure to turn the power OFF. • "Power Off" displays in the control panel. • All of the lamps on the control panel and the LCD monitor are turned OFF. • The printer automatically turns the power OFF. • If the control panel is in the following status, the power is ON. • The [Power] key is pressed in. • The green Power lamp is lit.
2 Preparing To Print 3. If the printer won’t be used for a long time, raise the media loading lever. 8264E 8254E 4. If the printer is going to be put into long term storage, you should perform a head cleaning following the HeadWash procedure in 4.6.1.18 Head Wash menu. You should also press the [Power] key to turn the printer’s power OFF, then disconnect the power cable(s) and the communication cable.
2 Preparing To Print 2.2 8264E Loading roll media Follow the procedure below to load roll media on the 8264E. 1. Loosen the left side and right side roll media holders at the rear of the printer. To do this, pull the lever towards you to release it from the ratchet. Then rotate the lever clockwise until you can no longer firmly grasp it. Release the lever (so the ratchet engages), then rotate the lever counterclockwise until the media holders can be slid on their track. 2.
2 Preparing To Print 5. Tighten the fixing lever on the roll media holder (Left) by ratcheting the lever clockwise until the roll media holder is tightened and can’t be moved. No. Name 1 Roll media holder (Left) 2 Fixing lever 6. Mount the roll media onto the core of the roll media holder (Left). Make sure the media’s cardboard tube is all the way onto the core so that it is flat against the inner part of the holder’s flange. No.
2 Preparing To Print 7. Slide the roll media holder (Right) toward the left and insert its core into the roll media’s cardboard tube. Make sure the media holder is inserted all the way into the tube so that the inside surface of its flange is flat against the cardboard tube. Do not tighten the fixing lever. No. Name 1 Roll media holder (Right) 2 Roll media 3 Fixing lever 8. Return to the fixing lever of the roll media holder (Left) and ratchet it counter-clockwise to loosen the media holder again.
2 Preparing To Print 10. Engage the damper drive switching plates and their locking brackets on the end of each roll media holder to increase tension on the media roll to avoid slack and "No media found" errors. No.
2 Preparing To Print 2.3 8264E Setting roll media This section explains how to set the roll media on the 8264E printer. Follow the procedure below to set the roll media. 1. Press the [Power] key to turn the unit ON. • The Power lamp on the control panel lights up in green. • The printer starts the initializing operation. • "Media End" displays in the control panel. • Do not operate the media loading lever during initial operation.
2 Preparing To Print 3. Open the front cover. No. 1 Name Front cover 4. From the rear, insert the roll media into the media feed slot. • Engaging and locking the damper drive switching plates while previously loading the roll media should prevent slack in the roll media. However, if the roll media does develop some slack, rewind it tightly and then reload it. No.
2 Preparing To Print 5. Pull the roll media out about one meter (39") from the front media feed slot which is located inside the front cover. No.
2 Preparing To Print 6. Eliminate any slack or slant by holding or taping the front edge of the media and rewinding the roll media a little using the flange on the roll media holder. • If you don’t hold the front edge of the media while rewinding, it will fall out from the media feed slot on the rear of the printer. • Confirm that the right edge of the roll media does not extend outward of the loading mark on the right side of the media guide at the front of the printer.
2 Preparing To Print No. Name 1 Roll media 2 Pressurizing rollers 7. If the edge of the roll media is set less than 5mm from the edge of the pressurizing roller, follow the procedure below to adjust the position of the roll media. a. Loosen the fixing levers of the right and left roll media holders, and move the roll media to the left or right. b. After moving the roll media, fix it in place by re-tightening both fixing levers. • Fix the roll media holders by pressing the holders to the printer.
2 Preparing To Print 8. Lower the media loading lever. No. 1 Name Media loading lever • When loading the new roll media, cut the front edge of the media if it is not straight. 3.4 8264E Cutting media manually • To increase the pressure on the media, lower the media loading lever further. No.
2 Preparing To Print 9. Close the front cover. The Media Type setup menu displays in the control panel. No. 1 • Name Front cover For changing the media type, set the media type as shown in 3.5.3 Setting media type in the User Guide.
2 Preparing To Print 2.4 8254E Loading roll media Follow the procedure below to load roll media on the 8254E. • Load roll media on a horizontal surface such as a desk or table. If you load roll media with the scroller standing vertically, there is a possibility that the scroller might get damaged. 1. Load the roll media onto the scroller so that the media’s loose end "flap" points in a counter-clockwise direction (toward the left) when viewed from the fixed flange, as shown below. 2.
2 Preparing To Print 4. Set the scroller onto the scroller receiver so that the fixed flange faces the side with the ink cartridge slots. No.
2 Preparing To Print 2.5 8254E Setting roll media Follow the procedure below to set the roll media on the 8254E. 1. Press the [Power] key to turn the unit ON. • The Power lamp on the control panel lights up in green. • The printer starts the initializing operation. • "Media End" is displayed in the control panel. • Do not operate the media loading lever during initial operation. The print head portion may touch the pressurizing roller portion, and cause a malfunction. 2.
2 Preparing To Print 3. Set the roll media to the media feed slot • If the roll media is not wound tightly, wind it tightly again, and then load it. No. Name 1 Roll media 2 Media feed slot 4. Open the front cover and pull out the roll media. No.
2 Preparing To Print 5. Holding the front edge of the roll media, roll it backward, using the scroller flanges, to remove any bend and/or slant in the media. No. Name 1 Roll media 2 Scroller flanges 6. Lower the media loading lever. No. 1 • 22 Name Media loading lever When loading the new roll media, cut the front edge of the media if it is not straight. 3.
2 Preparing To Print 7. Close the front cover. No.
2 Preparing To Print This page has been intentionally left blank.
3 Basic Operation 3.1 Feeding media You can feed roll media to the position that you want. Follow the procedure below to feed media. 1. Confirm that the control panel displays "Ready to Print." 2. Check that the media loading lever is lowered. 3. Press and hold the [Forward↓] key or the [Backward↑] key. • Media is fed forward or backward. 4. Release the [Backward↑] key or [Forward↓] key after feeding media to the desired position.
3 Basic Operation 3.2 Stopping printing operation If you want to stop printing for any reason, do the following: 1. Stop sending printing data from the computer to the printer. 2. Press the [Cancel] key. • Pressing [Cancel] causes the printer to do the following. Printer status During printing Terminates printing and deletes the remaining data in the printer. Receiving/converting Deletes the received/analyzed data and the subsequent file of data.
3 Basic Operation 3.3 Pausing printing It is possible to pause the printer during printing. Follow the procedure below to pause or restart printing. • If you pause the printing, the print quality will not be guaranteed. 1. While the printer is printing, press the [–] key. • The printer pauses its printing. • "PrintRestart -> ENTER" displays in the control panel. 2. To restart printing, press the [Enter] key. • The printer resumes its printing.
3 Basic Operation 3.4 8264E Cutting media manually • When printing is finished, the media guide is hot. Wait until the media guide cools off. Follow the procedure below to cut roll media. 1. Verify the following regarding the operational condition of the printer: • Printing or other operations are not in progress. • "Ready to Print"is displayed on the control panel. 2. If the roll media cut position is changed, refer to 3.1 Feeding media and advance the roll media to the desired cut position. 3.
3 Basic Operation 4. Place a razor blade on the media cut groove on the media guide, and cut the roll media. No. Name 1 Media guide 2 Media cut groove 3 Razor blade The cutting roll media operation is complete. • When loading the new roll media, cut the front edge of the media if it is not straight.
3 Basic Operation 3.5 8254E Cutting media manually 1. Feed the roll media to the media cut position after printing. • “Manual Cut -> ENTER” displays in the control panel. • Pay attention to the following points when you cut roll media. Mishandling the razor blade may cause a cut on your finger or hand. • When you hold media, do not place your finger on the media cut groove. • Move the razor blade along the media cut groove. 2.
3 Basic Operation 3.6 When media jams occur When the media is jammed, follow the procedure below. 1. Press the [Power] key to turn the printer’s power OFF. 2.1.2 Turning the power OFF 2. Open the front cover. 8264E 8254E No.
3 Basic Operation 3. Move the print head section all the way to the right. 8264E 8254E No.
3 Basic Operation 4. Raise the media loading lever. 8264E 8254E No.
3 Basic Operation 5. Pull the media toward the front of the printer, and cut the torn part with a cutting tool such as a razor blade. 8264E 8254E No.
3 Basic Operation 6a. 8264E only - Turn the flanges of the roll media holders and wind the roll media backwards, onto its spool. No. Name 1 Flanges 2 Roll media 6b. 8254E only - Turn the flanges of the roll media holders and wind the roll media backwards, onto its spool. No. Name 1 Roll media 2 Scroller 7. If paper dust or pieces of paper remain inside the printer, remove them. Try to do so without blowing paper dust inside the printer.
3 Basic Operation This page has been intentionally left blank.
4 Replacing Consumables 4.1 Replacing ink cartridges This section describes how and when to replace the ink cartridges. (1) Replacement frequency An ink cartridgeshould be replaced when either of the following happens: a. "[****] InkNearEnd" displays in the control panel • This message displays when there is a small amount of ink remaining in the ink cartridge. • The alarm buzzer sounds. To stop the buzzer, press the [Enter] key. • Replace the old ink cartridge with the new ink cartridge.
4 Replacing Consumables b. 38 "[****] InkEnd" displays in the control panel • This message displays when there is no ink remaining in the ink cartridge. • The alarm buzzer sounds. To stop the buzzer, press the [Enter] key. • Immediately replace the empty ink cartridge with the new ink cartridge. • As a precaution, it is good practice to not silence the alarm until you have installed the new cartridge in its slot.
4 Replacing Consumables (2) Type The only genuine ink cartridges that are compatible with the printer are as follows. Description Model No.
4 Replacing Consumables • Do not give ink cartridges strong shakes. Doing so may cause ink leakage. • Do not disassemble ink cartridges. A disassembled ink cartridge cannot be used. • When an ink cartridge is moved from a cold place to warm place, let the ink cartridge warm up in the new printing environment for at least three hours before printing. • Do not refill an ink cartridge with ink. It may result in abnormal printing. • Insert or remove the ink cartridge only at the time of replacement.
4 Replacing Consumables 2. Remove the ink cartridge that you want to replace from its ink cartridge slot. 8264E 8254E No.
4 Replacing Consumables 3. Take out the new ink cartridge from its bag. • Open the bag just before inserting the ink cartridge into the cartridge slot. Leaving the ink cartridge with the bag open for a long time may result in abnormal printing. • Use the ink cartridge within two years from the date printed on the package. Using an ink cartridge after this period may affect print quality. • Replace the ink cartridge six months after installing it in the printer.
Prepared by: Xerox Corporation Global Knowledge and Language Services 800 Phillips Road, Bldg. 0218-01A Webster, New York 14580-9791 USA ©2008 by Xerox Corporation. All rights reserved. Copyright protection claimed includes all forms and matters of copyrightable material and information now allowed by statutory judicial law or hereinafter granted, including without limitation, material generated from the software programs which are displayed on the screen such as icons, screen displays, looks, etc.