
All in One Printer User Manual

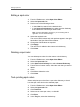


3. Select the job that you want to preview, and then click Open.
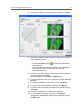
4. Select the separations that you want to edit by performing one
of the following actions:
●
Click the All Colors button
to edit all the separations
simultaneously.
●
Click the individual separation buttons for the separations
that you want to edit—for example, click the cyan
separation button only.
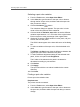
5. Click the curve in the graph to add a point, and then drag the
point to modify the separation.
The value appears in the Input or Output boxes.
6. To remove a point on the curve, select the point and then click
Remove.
7. To reset the gradation curve to a 45° curve, click Reset.
8. To revert to the original gradation settings, click Revert.
9. To remove the last change you made to the gradation graph,
click Undo.
10. To edit the brightness or contrast, move the slider.
11. To view gradation changes in your job, click Refresh.
Changes are automatically applied to the displayed image in
the After view.
Color adjustment with the Gradation Tool 59