Remote Services Setup Guide 701P44379 August 18, 2005 Version 50.
DocuSP Remote Services Setup Guide Version 50.XX Table Of Contents Section 1 Before You Start … 1 Section 2 Configuring Remote Services 3 Section 3 Registration & Customer Acceptance 4 Section 4 Testing the Connectivity 9 Section 5 Troubleshooting Appendix A Configuring Remote Services at Xerox Sites 11 12 Prepared by: Xerox Corporation DocuSP Development 800 Phillips Road Bldg. 300 Webster, New York 14580 USA ©2005 by Xerox Corporation. All rights reserved.
DocuSP Remote Services Setup Guide Version 50.XX Section 1 Before You Start … Complete the following steps to ensure that the DocuSP DFE is configured properly for Remote Services. __1. Ensure that the DocuSP DFE is connected to the Customer’s network and not ripping or printing jobs (idle). __2. Ensure that the customer has purchased an FSMA Agreement. __3. Locate the Remote Services Installation Worksheet in the product installation planning document (Figure 1).
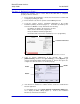
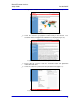
DocuSP Remote Services Setup Guide Version 50.XX [Enable DNS] is checked Domain Name DNS Server List Figure 3 - DNS Setup Window If a different Name Service is used, select the corresponding tab and enter the information supplied with the Installation Worksheet. __6. Log into DocuSP Diagnostics, and enter dC105 System Configuration Setup. Ensure that the information required for Remote Services to function properly has been entered (Figure 4).
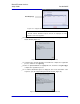
DocuSP Remote Services Setup Guide Version 50.XX Section 2 Configuring Remote Services __1. To open Remote Services, move the mouse to a blank area of the workspace and press the [Help] key located at the upper-left corner or the keyboard. The Remote Services Home window is displayed (Figure 5). Figure 5 - Remote Services Home Window Note: A short delay (~30 seconds) may occur before the window opens. __2. If the Registration window opens automatically, minimize it at this time.
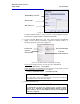
DocuSP Remote Services Setup Guide Version 50.XX __5. Record the Host ID and Print Engine Serial Number at this time. This information will be required at a later time if the customer decides to register Remote Services from an alternate location. Host ID: Serial Number: __6. Select [Network Settings] to display the Network Settings window. __7. Check the Remote Services Installation Worksheet from the installation planning document.
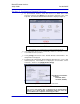
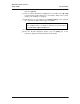
DocuSP Remote Services Setup Guide Version 50.XX The registration window for Remote Services is opened (Figure 9). Figure 9 - Remote Services Registration Window __2. Select the customer’s geographic location/country in the window. The Customer Letter and Agreement Addendum are displayed (Figure 10). Figure 10 - Customer Letter & Agreement Addendum __3. Ensure that the customer reads the Customer Letter and Agreement Addendum at this time. __4.
DocuSP Remote Services Setup Guide Version 50.XX Note: Access to an additional service (Sentinel) is provided if DocuTech 128, 155, or 180 Highlight Color is selected as the product. __5. Select the services requested by the customer. __6. Enter the customer information. If registering from the product UI, the Equipment Host ID and Machine Serial Number are already filled in. __7. After all information has been entered, have the customer select [Register]. __8.
DocuSP Remote Services Setup Guide Version 50.XX New Request(s) Figure 14 - Support Requests Window with New Request(s) Note: A DocuSP License Download request will also be displayed for new installations and version upgrades . __12. Click on the I D number for Update Attributes to open the Support Request Details window (Figure 15). Figure 15 - Details Window (Registration) __13. Verify that the selected ID number is intended to complete the registration process, and then select [Close]. __14.
DocuSP Remote Services Setup Guide Version 50.XX __16. Verify that the selected ID number is intended to download a license, and then select [Close]. __17. Click on License Download to highlight the row, and then select [Accept] to download the new DocuSP license. Note that the Status of the request changes from Pending to In-Progress. __18. Wait about 30 seconds, and then select [Refresh Table]. If the download has completed, the Status will change to Completed.
DocuSP Remote Services Setup Guide Version 50.XX Section 4 Testing the Connectivity __1. On the Home window, select the link for [1 File Ready For Transfer] (Figure 17). If prompted, logon as System Administrator. Link Figure 17 - Test Link __2. Ensure that the test file row in the Transfer pop-up window is highlighted (Figure 18). Select [Start Transfer] to transmit the test file.
DocuSP Remote Services Setup Guide Version 50.XX Note: If the confirmation message does not appear within one minute, the transfer was not successful. Refer to Section 5, Troubleshooting. __3. Select [Close Window] to close the Transfer window. __4. At this time, ask the customer for permission to enable Remote Monitoring. Have the customer determine an appropriate time-of-day for automatic data transfers. With customer consent, complete the remaining steps. __5.
DocuSP Remote Services Setup Guide Version 50.XX Section 5 Troubleshooting Connectivity Problems Symptom Corrective Action Unable to log on as Customer Service Engineer. A password recognition error may prevent logon as Customer Service Engineer. If unable to logon on as CSE, logon as System Administrator. An undetermined error prevents transfer of the test file. If the customer uses DNS Name Service, ensure that the information has been entered correctly.
DocuSP Remote Services Setup Guide Version 50.XX Appendix A Configuring Remote Services for Xerox Sites Internal Xerox sites (training centers, customer support centers, etc.) are “behind” the Xerox firewall, and require a configuration “flag” to be set for proper operation of the Remote Services software. When setting up Remote Services at internal Xerox sites, complete the following steps BEFORE starting Section 2 of this guide: __ a. At the DocuSP Controller, open a Terminal window and login as root.
701P44379