Getting to Know Your Product DocuColor 4 Copier/Printer Carrier Product Orientation Guide Note to Carriers: Open this document and review it page-by-page with your Customer.
Xerox Corporation Xerox Customer Education Services Xerox Square XRX2-18B 100 Clinton Ave. South Rochester, New York 14644 © 1999 by Xerox Corporation. All rights reserved. Copyright protection claimed includes all forms and matters of copyrightable material and information now allowed by statutory or judicial law or hereinafter granted, including without limitations, material generated from the software programs which are displayed on the screen, such as icons, screen displays, looks, etc.
Contents Carrier session overview 1 What to expect from the Carrier session 1 Component parts of the DocuColor 4 Copier/Printer 2 Component overview 2 Location of the power switches 3 Location of the serial number plate 3 The printer control panel 4 The Scanner/ADF control panel 5 Performing routine tasks 6 Loading paper in the paper trays 6 Loading paper in the bypass tray 7 Making copies using the Automatic Document Feeder 8 Making a copy from the document glass 8 Copy Output 9
Getting to Know Your Product iv Product Orientation Guide
Carrier session overview Orientation topics This product orientation session will include these topics: • Usage and control • Paper supply • Output trays • Access areas for jam clearance • Location of power switch and serial number plate Length of session This product orientation session will last about 10 minutes. Note: This brief overview is not intended as a formal training session.
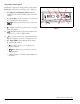
Component parts of the DocuColor 4 Copier/Printer Component overview Point out each component as you describe it. See Figure 1. Note: Some items shown are optional accessories and may not be present on the machine you are using. 1. The Scanner/ADF Control Panel contains the control buttons and the display for the copier functions. 8 1 2 7 3 6 4 5 2. The Printer Control Panel contains the control buttons and the liquid crystal display (LCD) for the printer only functions. 3.
Location of the power switches Point out the location of the power switches. See Figure 2. 1. The main Power Switch is located on the right side of the Scanner/ADF. This switch controls both the Scanner/ADF and the printer. 1 Figure 2 2. The printer Power Switch is located at the left rear of the printer. Press the switch up to turn on the power and press the switch down to turn off the power. This switch should be left on at all times.
The printer control panel Identify the components of the printer control panel. Point out each item as you discuss it. See Figure 5. 1 2 3 4 1. The Liquid Crystal Display (LCD) shows the condition of the printer and messages related to settings. 2. The Arrow Keys are used to move the cursor and to scroll through a list of options. 3. (Menu) steps from one top level screen to the next. 4. (Online) switches the printer between being online and offline. 5.
The Scanner/ADF control panel Identify the components of the Scanner/ADF control panel. Point out each item as you discuss it. See Figure 6. 1 2 3 1. The display shows status messages and indicates the selections made during copying. 2. The Contrast Dial is used to adjust the brightness of the display. 3. The Control Panel Buttons provide control of the copier functions. • The Keypad buttons 0 through 9 and * are used to enter the number of copies or a password. The C button clears an incorrect entry.
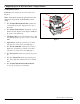
Performing routine tasks Loading paper in the paper trays Demonstrate the steps as you describe them. 3 You may have three paper trays. To load paper in a paper tray: 1. Face the DocuColor 4 Copier/Printer so that you are directly in front of the paper tray. 2. See Figure 7. Open the tray by pulling it straight out. 2 3. Press down on the metal plate until it latches. 4. Take the paper out of the wrapper. Figure 7 5. See Figure 8. Move the paper guides toward the outer edges of the paper drawer. 6.
Loading paper in the bypass tray Demonstrate how to open the bypass tray and load paper. 1. See Figure 10. Open the bypass tray by swinging the door down. 2 1 2. Ensure the guide at the front of the tray is flipped up unless 13 x 19 in. (330 x 483 mm) paper is being used. Figure 10 3. See Figure 11. Set the paper guide to the width of the paper being loaded. 4. Load a stack of paper long edge feed and slide the paper into the printer until it stops.
Making copies using the Automatic Document Feeder Note: The Automatic Document Feeder is an option and may not be present. Demonstrate placing an original into the document feeder tray. See Figure 12. 2 1. Place the original in the document feeder tray face up. A stack of up to 50 originals may be placed in the tray. 2. Slide the documents forward until the green indicator lights, indicating the document is inserted correctly. 3 1 3. Adjust the side guide to the size of the paper.
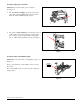
Copy Output Note: Copies may be delivered to the face up tray or the face down tray. See Figure 14. 1. The Face Up Tray stacks the copies face up. 2. The Face Down Tray stacks the copies face down. 2 1 Figure 14 Access areas for jam clearance Clearing a jam in the scanner/ADF Show how to open the ADF to clear jams. See Figure 17. 1 1. Open the ADF left cover by lifting it to the left. Remove the jammed document and all torn pieces of paper. 2.
4. See Figure 16. Raise the ADF and remove any documents from the platen glass. 5. Close the ADF. 6. Reload the stack of originals, adjust the documents guide, and press the Start button to continue copying. Figure 16 Clearing a jam in a paper tray Clear a jam in a paper tray by: 1. See Figure 17. Slowly pull the paper tray out until it stops. 2 2. Remove the jammed or creased paper. Be sure to remove all pieces of torn paper. 3. Remove the remaining stack of paper from the tray. 1 Figure 17 4.
5. See Figure 19. Reload the paper in the tray, being sure the paper is under the fluke at the front right side. 5 6. Slowly push the paper tray back into the printer as far as it will go. 6 Figure 19 Clearing a jam in the bypass tray Show how to clear a jam in the bypass tray: 1. See Figure 20. Pull the jammed paper out of the tray. Be sure no torn pieces of paper are left inside. Figure 20 Clearing a jam in the right side Show how to open the lower right unit and remove the jammed paper. 1.
3. See Figure 22. Lift up on the green handle to open the cover. 3 5 4. Turn the green knob to move the jammed paper. 5. Pull the paper out. Be sure no pieces of torn paper are left inside. 6. Lower the cover. 4 Figure 22 7. See Figure 23. Push the lower right unit back into the printer. 8. Reload paper into the bypass tray. 7 18 Figure 23 Clearing a jam in the fuser ! WARNING: The fuser surface is very hot. Do not touch the fuser or you may be burned. Show how to clear a paper jam in the fuser.
! WARNING: Do not touch the white roller on the oil roll cartridge. The oil will stick to your skin. 3. Place two pieces of paper on a flat surface to set the oil roll cartridge on when you remove it. 4 5 4. See Figure 25. Remove the oil roll cartridge and set it aside. 5. Removed the jammed paper in the direction of the arrow. Be sure no torn pieces of paper are left inside the fuser area. Figure 25 6. See Figure 26. Reinsert the oil roll cartridge. 7.
Clearing a jam in the left side Demonstrate how to open the top left cover and remove a paper jam. 1 1. See Figure 27. Open the top left cover. 2. Remove the jammed paper. Be sure no torn pieces of paper remain inside the printer. 2 Figure 27 3. See Figure 28. Close the top left cover. 3 Figure 28 Clearing a jam in the two tray module Show how to clear a jam in the two tray module. 1. See Figure 29. Open the right cover of the two tray module. 2. Remove the jammed paper.
Customer Evaluation Questionnaire Xerox Product: Carrier Name: _____________________________________ Date: _________________ Company Name: ____________________________________ Participant Name: (optional): ________________________ To what extent do you agree with the following statements? (Check the appropriate box.) Make additional copies, as needed. Please write in ink, if available. You may write comments on this evaluation if you wish. Please return at your earliest convenience.
No Postage Necessary If Mailed in the United States BUSINESS REPLY MAIL First Class Mail Permit No. 229 Postage will be paid by Addressee Xerox Corporation Customer Education Services Attn: GTKYP CSMS Suite 2000, ESL2-211 360 N.