November 2016 05-0891-100
Design © 2016 Xerox Corporation. All rights reserved. Xerox®, Xerox and Design® and DocuMate® are registered trademarks of Xerox Corporation in the United States and/or other countries and are used under license from Xerox Corporation. Visioneer is a trademark licensee of Xerox®. BR9772 Content © 2016 Visioneer, Inc. All rights reserved. The Visioneer brand name and OneTouch® logo are registered trademarks of Visioneer, Inc.
by this product may be protected by governmental laws and other regulations, such as copyright laws. The customer is solely responsible for complying with all such laws and regulations.
Table of Contents Safety ...............................................................................................................................vi Safety Introduction .............................................................................................................................. vi Operational Safety Information..................................................................................................... vi Electrical Information..................................................
Xerox® DocuMate® 3120 Table of Contents Scanning Interfaces ........................................................................................................................... 21 Maintenance ...............................................................................................................23 Safety Precautions .............................................................................................................................. 23 Hardware Properties............................
Safety Safety Introduction Notices and Safety Please read the following instructions carefully before operating the machine and refer to them as needed to ensure the continued safe operation of your machine. Your Xerox® product and supplies have been designed and tested to meet strict safety requirements. These include safety agency evaluation and certification, and compliance with electromagnetic regulations and established environmental standards.
Xerox® DocuMate® 3120 Safety Note: Your Xerox® machine is equipped with an energy saving device to conserve power when the machine is not in use. The machine may be left on continuously. Do not do these: • Never use a ground adapter plug to connect the equipment to a power outlet that lacks a ground connection terminal. • Never attempt any maintenance function that is not specifically described in this documentation. • Never remove covers or guards that are fastened with screws.
Xerox® DocuMate® 3120 Safety Electrical Supply • This product shall be operated from the type of electrical supply indicted on the product’s data plate label. If you are not sure that your electrical supply meets the requirements, please consult your local power company for advice. • Always connect equipment to a correctly grounded power outlet. If in doubt, have the outlet checked by a qualified electrician.
Xerox® DocuMate® 3120 Safety 3. Do not use aerosol cleaners. The use of cleaners that are not approved may cause poor performance of the equipment, and could cause a dangerous condition. 4. Use supplies and cleaning materials only as directed in this manual. 5. Do not remove covers or guards that are fastened with screws. There are no parts behind these covers that you can maintain or service. 6.
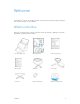
Welcome Your new Xerox® scanner can quickly scan stacks of single-sided or double-sided pages and place their electronic images on your computer. What’s in the Box Before proceeding, check the contents of the box. If items are missing or damaged, contact the dealer where you purchased the scanner.
Xerox® DocuMate® 3120 Welcome System Requirements Pentium 4 PC or AMD equivalent with: • A DVD-ROM drive • An available Universal Serial Bus (USB) port • Microsoft® Windows® operating system: – 32-bit Windows XP (Service Pack 2) – 32-bit or 64-bit Windows Vista (Service Pack 1) – 32-bit or 64-bit Windows 7 – 32-bit or 64-bit Windows 8 / 8.1 The scanner is compatible with Service Pack 3 for Windows XP, Service Pack 2 for Windows Vista, and Service Pack 1 for Windows 7.
Xerox® DocuMate® 3120 Welcome • Nuance OmniPage user’s guide—contains detailed instructions on using the software, including information on using Optical Character Recognition to create editable text files from the scanned documents. • Nuance PDF Converter user’s guide—contains detailed information on using the application to create and modify PDF files. Xerox® DocuMate 3120 Scanner 1 2 3 4 5 6 7 1. Input Tray—Holds the documents in the Automatic Document Feeder for scanning. 2.
Xerox® DocuMate® 3120 4 Welcome User Guide
Scanner Setup Unpack and Assemble the Scanner 1. Remove the scanner from its protective foam and plastic bag. 2. Remove any shipping tape from the scanner, input tray and output tray. 3. Lift the input tray up from the scanner. Pull the output tray down from the scanner body. It will snap in place when it is down all the way.
Xerox® DocuMate® 3120 4. Scanner Setup Open the automatic document feeder cover and remove any tape or protective foam from inside the feeder. Close the feeder cover when you are finished. Connect the Power Cord Note: Only use the power supply (DA-24C24 made by APD) included with your scanner. Connecting any other type of power supply may damage your scanner, and will void its warranty. 1. Plug the power supply into the power port on the scanner. 2.
Installation Please make sure of the following before you begin installation: • If you are prompted to reboot during installation, please select "No". Finish installing the rest of the software, then close all open windows and reboot your computer. • The information in this guide may cover software not provided with the scanner you purchased. Please disregard any information about the software not applicable to your scanner.
Xerox® DocuMate® 3120 Installation Install the Software and Connect the Scanner 1. Start Microsoft Windows and make sure that no other applications are running. 2. Insert the installation disc into your computer’s DVD-ROM drive. The disc automatically starts. 3. The Select Language window opens. Click the drop-down menu arrow and select the language to use. Click OK. The disc’s Main menu window opens.
Installation Xerox® DocuMate® 3120 4. On the Main menu, select Install software. 5. Make sure the boxes for Scanner Driver and Visioneer OneTouch are selected, as well as any other applications you want to install. Note: The software provided with your scanner may differ slightly from the list shown in the window. 6. Click Install now.
Xerox® DocuMate® 3120 Installation Installing the Scanner Driver The scanner driver installation will start first. 1. The Welcome screen for the scanner driver Setup Wizard opens. Click Next. 2. On the Xerox License Agreement window, read the license agreement. If you accept the terms, select I Agree then click Next. If you choose not to accept the license agreement, click Cancel. Click Close on the Installation Interrupted window. 3. The software will now be installed. 4.
Installation Xerox® DocuMate® 3120 Connect the USB Cable and Turn on the Power 1. Remove any tape from the USB cable. 2. Plug the USB cable into the USB port on the scanner then into a USB port on the computer. Check your computer’s manual for USB port locations. If the plug does not attach easily, make sure that you are plugging it in correctly. Do not force the plug into either connection. 3. Turn on the scanner power.
Xerox® DocuMate® 3120 Installation 4. When you’re certain that the software has completely loaded, return to the “Complete the installation by connecting your hardware” window. 5. Click OK to complete the installation process. 6. Click Close on the Installation Complete window to close and exit the driver installer.
Installation Xerox® DocuMate® 3120 Installing Visioneer OneTouch The Visioneer OneTouch software installation will start automatically after you click Close on the driver Installation Complete window. 1. Click Next on the Welcome to the OneTouch Setup Wizard. 2. On the Visioneer License Agreement window, read the license agreement. If you accept the terms, select I Agree then click Next.
Xerox® DocuMate® 3120 Installation Installing Additional Applications Your scanner includes free, additional applications as described in the table below. 1. Return to the disc’s Main menu and click Install software. 2. Select the additional applications you want to install, then click Install now. 3. Follow the instructions on the screen to install each of the additional applications. Software About the Software Nuance PaperPort® PaperPort is a document management software application.
Xerox® DocuMate® 3120 Installation View the User Guides 1. Return to the disc’s Main menu and click on View user guides. 2. Click on View scanner documentation to access the scanner user guide and scanning guides for OneTouch and TWAIN.
Xerox® DocuMate® 3120 Installation Register Your Scanner Registering your scanner is important as it provides you with access to our free telephone support service. Registration also gives you free access to software updates for your scanner. To register your scanner: You will need an active internet connection to register your scanner. If you do not have internet access you can contact our customer service department to register the scanner.
Loading Documents to Scan Always remove any staples or paper clips from documents before inserting them into the scanner. Staples and paper clips can jam the feed mechanism and scratch the internal components. Also remove any labels, stickers, or Post-It™ notes that may come off during the scanning process and get stuck in the scanner. Misuse as described here will void your scanner’s warranty. Supported Document Types You can scan the following types of documents and cards with this scanner.
Xerox® DocuMate® 3120 Loading Documents to Scan We recommend you limit the amount or completely avoid scanning documents that are in this list. • Curled, wrinkled or folded documents may cause paper jams or multiple pages being fed through the scanner at one time. • Perforated or punched paper that could tear when the separation roller engages. • Coated paper or photographs where the coating can flake off during scanning and leave residue in the scanner.
Loading Documents to Scan Xerox® DocuMate® 3120 Scanning from the Automatic Document Feeder (ADF) Preparing Documents for Scanning • Fan the documents to make sure all pages in the stack are separated. • Bend and then flatten the document stack to make sure the horizontal edges are aligned to help prevent paper from skewing while being pulled through the scanner. • Pinch the ends to align the leading edges slantwise to help prevent multiple pages from being fed through at a single time.
Xerox® DocuMate® 3120 Loading Documents to Scan Loading Documents 1. Adjust the paper guide for the width of paper, and make sure the input and output trays are fully extended. Make sure the bottom of the tray is down all the way before scanning. If the tray isn’t fully seated in position, paper feeding from the input tray may jam in the scanner. 2. Load the documents face down with their tops into the Automatic Document Feeder. 3.
Xerox® DocuMate® 3120 Loading Documents to Scan Scanning Interfaces • OneTouch Control Panel—When you press the Simplex or Duplex button on the scanner, the scanner starts scanning using the settings for the current LED number. The scanned image is then sent to a destination on your computer or network drive. OneTouch Button Panel—Use this scan option when you want to scan from the computer screen.
Xerox® DocuMate® 3120 • Loading Documents to Scan TWAIN and WIA Interface—This option uses your scanner’s TWAIN interface to scan. Select scanning options before scanning, put the document in the scanner, then click the Scan button in the TWAIN interface window. Please see the TWAIN Scanning Guide on the installation disc for instructions. You can also click the Help button in the TWAIN interface to open the instructions in an Internet browser.
Maintenance This section contains information about maintenance, troubleshooting, uninstalling, scanner specifications, and spare parts. Safety Precautions When servicing the scanner you should take the following precautions to ensure your safety and prevent damage to the scanner. Do These • Wear protective gloves when cleaning the scanner with Isopropyl rubbing alcohol. Rubbing alcohol may irritate sensitive skin. • Only perform scanner maintenance as described in this chapter.
Xerox® DocuMate® 3120 Maintenance Hardware Properties You can use the scanner’s properties page to keep track of scanner maintenance, change some of the hardware options, configure the scanner interface behavior, and adjust application options that may be available for your scanner. To open the scanner hardware properties page: • Windows 7 and later—from the Windows Control Panel, open Hardware and Sound and then Devices and Printers.
Maintenance Xerox® DocuMate® 3120 Power Settings • Sleep mode—sleep mode is the low-power state when the scanner is not in use. You can adjust the amount of time you want the scanner to wait before it goes into low power. Click the green enter button to save any changes in the Sleep mode field. Click the red reset button to reset to the default timeout value. • Power off—input the number of minutes you want the scanner to wait before it turns itself off.
Xerox® DocuMate® 3120 Maintenance Clearing Paper Jams If your scanner stops scanning due to a paper jam in the Automatic Document Feeder, a warning opens after a few moments. 1. Open the Automatic Document Feeder cover. 2. Remove the jammed paper and close the cover.
Maintenance Xerox® DocuMate® 3120 Note: Be careful when cleaning the rollers. All of the rollers, except the free rollers, are designed to rotate in one direction only. Do not force the roller to rotate in the opposite direction. Forcing the roller to rotate will damage it, and cause the scanner to feed pages incorrectly. 1. Wet a soft cloth with some Isopropyl rubbing alcohol (70%). 2. Open the Automatic Document Feeder cover. 3. Wipe clean the feed rollers and scanner glass in the scanner body. 4.
Xerox® DocuMate® 3120 5. Be careful not to snag the cloth on the spring arms of the ADF pad. 6. Close the scanner when you’re finished.
Maintenance Xerox® DocuMate® 3120 Replacing the ADF Pad Assembly Problems with documents feeding into the ADF is an indication that the pad is wearing thin. The ADF pad can be used to scan up to 30,000 pages. The usage life of the ADF pad varies by what type of documents are generally scanned. Scanning large batches of heavily textured paper and embossed plastic cards will cause the ADF pad to wear faster. Large continuous batch scanning will also cause the ADF pad to wear faster.
Xerox® DocuMate® 3120 3. Maintenance Close the scanner when you’re finished. Replacing the Roller Assembly The roller will wear out and is designed to be a user-replaceable part. A worn roller can cause documents to feed in skewed at an angle, or multiple pages to feed at the same time. Before replacing the roller you should clean it as excessive dust on the roller will make it appear worn and smooth. You cannot properly diagnose a worn roller until you have cleaned it.
Maintenance Xerox® DocuMate® 3120 2. Pull the paper guide away from the scanner. 3. The replaceable roller is located behind the paper guides. 4. The roller is held in place with a lock tab that rotates to lock and unlock it. To unlock the tab, rotate it upward until the small lock flange is completely free. 5. Remove the roller from the scanner and discard it, it cannot be repaired. 6. Before installing the new roller, clean any dust that may have gotten on it during shipping.
Xerox® DocuMate® 3120 Maintenance 7. Insert the left end of the new roller assembly into the hole in the ADF cover. Angle the roller into the scanner and align the lock tab with the slot in the scanner. 8. Rotate the lock tab into the scanner. Press down on the lock flange to lock the roller into the scanner. The lock will “click” into place when it is secure. However, if it does not rotate easily into the housing, make sure the flange is properly seated in its latch. 9.
Maintenance Xerox® DocuMate® 3120 10. Close the scanner when you’re finished. Troubleshooting Problem: The scanner won’t scan. What’s wrong? Check for one of these possible causes: • Are the cables loose or not plugged in securely? Inspect the cable connections. Make sure the cables are plugged in securely. • Is the scanner’s status light on? Turn on the scanner’s power. If the status light doesn’t come on, plug the power supply into another electrical outlet.
Xerox® DocuMate® 3120 Maintenance Problem: Why won’t my scanner buttons work after scanning with Windows Image Acquisition (WIA)? After performing a scan using the WIA interface you must close the application you were using before scanning with the buttons on the scanner. This does not occur when scanning using the TWAIN or ISIS interface.
Maintenance Xerox® DocuMate® 3120 Problem: I tried to 'Repair' the OneTouch application by using the 'Change' function through the Add/Remove Program within the Control Panel and was not able to repair it. 1. Before attempting to repair OneTouch, unplug the USB cable connected to the scanner. 2. Perform the Change/Repair function again. If you are asked for the Install DVD, insert the disc into the DVD-ROM player and click OK. 3. When prompted, plug the USB cable back into the scanner. 4.
Xerox® DocuMate® 3120 Maintenance Problem: The ADF won’t feed pages properly. A dirty or worn ADF pad assembly or dirt on the roller can cause documents to feed in skewed at an angle, or multiple pages to feed at the same time. Try cleaning the roller first. See “Cleaning the Scanner” on page 26. If that doesn’t solve the problem, the pad assembly may need to be replaced. It is user replaceable. See “Replacing the ADF Pad Assembly” on page 29 for the steps to replace the pad.
Xerox® DocuMate® 3120 Maintenance Error Code Problem Description Solution 0 Scanner is not connected to the computer. (The LED does not flash “E” and the status light remains blue.) A cable may be loose. Check that the scanner’s cables are correctly attached to the computer. If the scanner still does not connect, re-boot the computer. 4 Paper jam Open the ADF cover and remove the jammed page. See “Clearing Paper Jams” on page 26. 6 The scanner’s cover is open.
Xerox® DocuMate® 3120 Maintenance Uninstalling Visioneer Acuity™: Visioneer Acuity is automatically installed when you install the scanner driver using the installation disc. You can also download the Visioneer Acuity module from the support pages for your scanner at www.xeroxscanners.com. Visioneer Acuity is a utility with advanced image processing options to instantly improve the visual clarity of anything you scan. 1. In the list of installed programs select Visioneer Acuity Assets. 2.
Xerox® DocuMate® 3120 Maintenance Scanner Specifications Scanner Dimensions Width 11.2 inches (284 mm) Depth 6.7 inches (170 mm) Height 6.5 inches (165 mm) Weight 5.1 pounds (2.3 kg) Power Information Power Supply APD (DA-24C24) DC Jack, 3P, 100~240Vac, 24Vdc, 1A, 24W, Class 1, ENERGY STAR, RoHS Scanner Rating 24Vdc, 1.0A Power consumption ≤ 24 Watts (during operation) ≤ 5.3 Watts (on standby) ≤ 2.9 Watts (power save after 15 minutes without scanning) ≤ 0.
Xerox® DocuMate® 3120 Maintenance Xerox® DocuMate 3120 Parts List Please use the following part names and numbers when ordering replacements for your Xerox® DocuMate 3120 scanner.
Regulatory Information Basic Regulations United States (FCC Regulations) This equipment has been tested and found to comply with the limits for a Class A digital device, pursuant to Part 15 of the FCC Rules. These limits are designed to provide reasonable protection against harmful interference when the equipment is operated in a commercial environment.
Xerox® DocuMate® 3120 Regulatory Information A full declaration of conformity, defining the relevant directives and referenced standards, can be obtained from your Xerox Limited representative or by contacting: Environment, Heath and Safety The Document Company Xerox Bessemer Road Welwyn Garden City Herts AL7 1HE England, Telephone +44 (0) 1707 353434 Turkey (RoHS Regulation) In compliance with Article 7 (d) We hereby certify “It is in compliance with the EEE Regulation”.
Xerox® DocuMate® 3120 Regulatory Information 3. Obligations or Securities of any Foreign Government, Bank, or Corporation. 4. Copyrighted material, unless permission of the copyright owner has been obtained or the reproduction falls within the “fair use” or library reproduction rights provisions of the copyright law. Further information of these provisions may be obtained from the Copyright Office, Library of Congress, Washington, D.C. 20559. Ask for Circular R21. 5.
Xerox® DocuMate® 3120 Regulatory Information 8. Documents, registers or records kept by public officials charged with the duty of making or issuing certified copies thereof, where the reproduction falsely purports to be a certified copy thereof. 9. Copyrighted material or trademarks of any manner or kind without the consent of the copyright or trademark owner.
Compliance Information Product Recycling & Disposal USA & Canada Perchlorate Material - This product may contain one or more Perchlorate-containing devices, such as batteries. Special handling may apply, please see: http://www.dtsc.ca.gov/hazardouswaste/ perchlorate/. If you are managing the disposal of your Xerox® product, please note that the product may contain lead, mercury, Perchlorate, and other materials whose disposal may be regulated due to environmental considerations.
Xerox® DocuMate® 3120 Compliance Information Professional/Business Environment Application of this symbol on your equipment is confirmation that you must dispose of this equipment in compliance with agreed national procedures. In accordance with European legislation, end of life electrical and electronic equipment subject to disposal must be managed within agreed procedures.