
User`s guide


User’s Guide 37
DocuMate 700 Scanning From One Touch
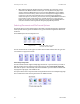
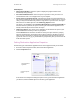
Global Options
• Show Progress Window—Select this option to display the progress window of the
document(s) during scanning.
• Use enhanced folder browser—Select this option if you want to save your scans to a
network location that is not a mapped drive on your computer.
• Create copies of scanned documents—Sometimes the image of a scanned document is
only saved as a temporary file until its Destination Application is finished using it. In those
cases you may want an additional, permanent copy saved on your hard drive. The copies
will be saved in the folder specified in the Folder Copy Options section.
This option is not available if either Document Management or Storage and CD-R/W are
selected, because, by default, file copies for those types of Destination Applications are
already automatically saved in the folder for copies.
• Folder Copy Options—This section of the dialog box sets the location for copies of your
scanned documents and how you want to group them.
Click the Browse button and select the folder for saving the copies. Select the grouping
option for the documents. The Group by button option groups the documents under the
name of the One Touch button. Group by type arranges the scanned documents by the
type of file, such as .rtf or .jpg. If you also want to group them by date you can choose the
week and month options.
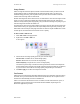
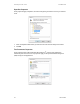
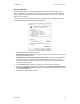
Setting Destination Application Properties
The different types of Destination Applications have various properties that you can select.
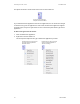
1. On the One Touch Properties window, click a Destination Application.
2. Click the Properties button.
A One Touch 4.0 Link Properties dialog box opens for the type of Destination Application
you selected, and the available options are for that type of application.
Click a Destination
Application.
Click the Properties
button